- 0 Facebook
- 3 Pinterest
- 4 Email
- Copy Link
- 7 shares
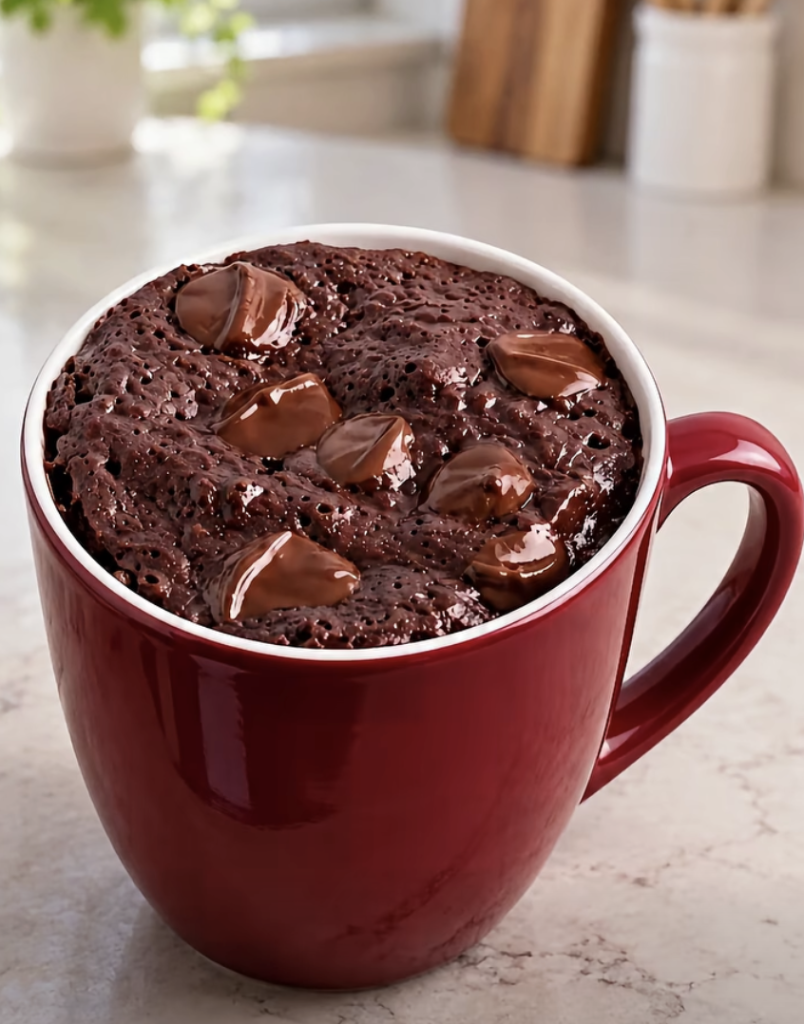
Deeply chocolatey and unapologetically fudgy, this sugar-free mug brownie proves that dessert doesn’t need a pile of sugar, or a pile of dishes, to feel indulgent. Everything stirs together right in the mug, with melted butter lending a dense, velvety crumb and sugar-free chocolate chips melting into gooey pockets. One minute in the microwave and it’s warm, rich, and spoon-ready (no oven , no waiting). Add whipped cream or sugar-free ice cream on top.
Why Make a Sugar-Free Mug Brownie?
This Sugar-Free Simple Chocolate Brownie in a Mug is the answer to a sudden chocolate craving when you don’t want to turn on the oven or wash a sink full of dishes. Just 2 tablespoons of flour and a spoonful of cocoa, bound with melted butter, give it a dense, fudgy crumb instead of the spongy, cake-like texture many mug desserts end up with. Using a 1:1 sugar-free sweetener keeps the measuring simple, and the sugar-free chocolate chips melt into little pockets of gooey richness. Cooking pros know the key is to stop the microwave as soon as the top looks just set, because the brownie keeps firming up as it rests. The result is a warm, single-serving treat that’s ready in about six minutes, with no leftover batter to tempt you.
Ingredient Breakdown with Tips
A mug brownie has very few ingredients, so each one matters. Here is what every component does and how to get the fudgiest result from this Sugar-Free Simple Chocolate Brownie in a Mug.
The Dry Ingredients
- All-purpose flour (2 tablespoons) : This gives the brownie just enough structure to hold together without turning cakey. Spoon it into the measuring spoon and level it off, since packing it in makes the brownie dry. For a gluten-free version, a 1:1 gluten-free baking blend works well.
- Unsweetened cocoa powder (1 tablespoon) : This is the source of the deep chocolate flavor and dark color. Dutch-process cocoa gives a smoother, more mellow taste, while natural cocoa is a bit sharper. Either works here, but sift out any lumps so you don’t get dry pockets.
- Granulated sugar-free sweetener (1-2 tablespoons) : Choose a granulated blend that measures 1:1 with sugar, such as erythritol, monk fruit blends, or allulose. Start with 1 tablespoon for a darker, bittersweet brownie and go up to 2 if you like it sweeter. Allulose stays softer and moister, while erythritol can leave a slight cooling aftertaste.
- Baking powder (⅛ teaspoon) : This adds a tiny lift so the brownie isn’t a dense puck. Use a fresh container, because old baking powder won’t lift properly, and don’t add extra, which makes the texture spongy and can taste metallic.
- Salt (a pinch) : Salt sharpens the chocolate and balances any lingering sweetener aftertaste. Fine salt dissolves best in such a small batter.
The Wet Ingredients
- Milk (2 tablespoons) : Milk hydrates the flour and cocoa and keeps the center soft. Whole milk gives the richest result, but unsweetened almond, oat, or soy milk works too. Skip sweetened plant milks, which add hidden sugar.
- Melted butter (1 tablespoon) : Butter is the secret to the fudgy, velvety crumb, and it adds rich flavor. Let it cool for a few seconds after melting so it doesn’t warm the batter unevenly. Unsalted butter gives you the most control over the seasoning, and coconut oil is a good dairy-free swap.
- Vanilla extract (¼ teaspoon) : Vanilla rounds out the cocoa and adds a warm, bakery-style aroma. Pure vanilla extract has a noticeably better flavor than imitation, and a little goes a long way.
The Chocolate Finish
- Sugar-free chocolate chips (1 tablespoon) : These melt into gooey pockets of chocolate without adding sugar. Check the label, since some brands use maltitol, which can upset sensitive stomachs, while others use stevia or erythritol. For extra-melty pockets, roughly chop a sugar-free chocolate bar instead.
Step-by-Step Instructions
- Melt the butter in a small microwave-safe dish for 15 to 20 seconds, until fully liquid, then let it cool for a few seconds so it doesn’t warm the batter unevenly.
- Whisk the flour, cocoa powder, sugar-free sweetener, baking powder, and salt together in a 10 to 12-ounce microwave-safe mug. I like to press out any cocoa lumps with the back of a fork until the mixture looks like a uniform, dark powder.
- Pour in the milk, melted butter, and vanilla extract, then stir until the batter is smooth, thick, and glossy with no dry streaks.
- Scrape the bottom and corners of the mug with a spoon, since pockets of dry flour love to hide there and can leave chalky spots after cooking.
- Fold in the sugar-free chocolate chips, saving a few to press gently onto the top for extra melty pockets.
- Microwave uncovered on high for 50 to 70 seconds, until the edges look set and the center is still slightly soft and glossy. I start checking at 50 seconds, because a slightly underdone center is exactly what keeps this brownie fudgy.
- Let the mug rest for 1 to 2 minutes, since the brownie keeps firming up as it cools. Top with whipped cream or a scoop of sugar-free ice cream and eat it warm, straight from the mug.
Tip: If the top still looks wet and shiny after resting, return the mug to the microwave for 10 seconds at a time. The center should look soft but not liquid.
Microwave wattages vary, so start with the shorter cook time and add seconds as needed. Overcooking is the fastest way to turn a fudgy brownie dry.
Make Ahead Options
Yes, you can prep this Sugar-Free Simple Chocolate Brownie in a Mug ahead of time, and it turns late-night cravings into a two-minute job! Whisk the flour, cocoa, sweetener, baking powder, and salt in multiples (say, 6 servings) and store the mix in an airtight jar in a cool pantry for up to 3 months . Shake well before using, since cocoa settles. When the craving hits, scoop one serving (about 4 to 5 tablespoons) into a mug, then stir in the milk, melted butter, and vanilla, and fold in the chips. Adding liquids just before cooking protects the rise, so microwave 50 to 70 seconds for a brownie just as fudgy as made-from-scratch.
Make It Your Way
This brownie is a great blank canvas, so use whatever you have in the pantry or whatever your cravings call for. These swaps are tested for the small mug batch and keep the fudgy texture intact.
- Low-carb flour swap : Replace the all-purpose flour with 2 tablespoons almond flour for a denser, lower-carb brownie, and start checking a few seconds early.
- Fully dairy-free version : Use coconut oil for the butter, unsweetened oat milk, and dairy-free sugar-free chips. I find it stays just as fudgy.
- Mocha twist : Whisk ⅛ teaspoon instant espresso powder into the dry ingredients. It deepens the chocolate flavor without making the brownie taste like coffee.
- Peanut butter swirl : Dollop 1 teaspoon of no-sugar-added peanut butter on top before cooking and swirl lightly with a toothpick for a salty, nutty pocket.
- Mint or cinnamon : I add ⅛ teaspoon peppermint extract for a mint-chocolate brownie, or ¼ teaspoon cinnamon for gentle warmth. Peppermint is potent, so measure carefully.
- Add some crunch : Fold in a tablespoon of toasted chopped walnuts or pecans with the chips for crunch against the fudgy center.
Storage & Freezing
- Refrigerator : Let the brownie cool completely, then cover the mug tightly with plastic wrap or a small plate, or slide it into an airtight container. This Sugar-Free Simple Chocolate Brownie in a Mug keeps for up to 2 days in the fridge. The butter firms up as it chills, so the brownie turns denser and more fudge-like. If you used erythritol, it may also taste slightly cooler and feel a bit firmer than it did fresh. Allulose tends to stay softer.
- Freezer: Freezing works best for a single portion. Once it’s fully cool, lift the brownie out of the mug, wrap it snugly in parchment and then plastic wrap or a freezer bag, and freeze for up to 1 month. The cocoa and butter hold up well, and the sugar-free chips stay intact. Freeze it plain, because whipped cream and ice cream toppings don’t survive thawing.
- Reheating: Microwave the brownie in its mug at 50% power for 10 to 15 seconds, then check it. Add 5-second bursts if needed, since this small brownie dries out fast and turns rubbery when overheated. If it feels a little stiff, a teaspoon of milk on top before reheating helps revive the soft center. From frozen, thaw it in the fridge for a few hours, or microwave at 50% power for 20 to 30 seconds. Add fresh toppings only after it’s warm.
- Make-ahead tip: I often skip baking extras and instead mix the dry ingredients (flour, cocoa, sweetener, baking powder, and salt) in a small jar. They keep in a cool, dry pantry for a few weeks. When a craving hits, I scoop it into a mug, add the milk, melted butter, and vanilla, and cook it fresh in about a minute. That gives the best fudgy, gooey center.
Tips for the Best Sugar-Free Simple Chocolate Brownie in a Mug: So Fudgy
- Pick your sweetener wisely : Allulose keeps the crumb softer and moister, while erythritol can taste slightly cool and bake drier. Start with 1 tablespoon and adjust next time.
- Crush the cocoa lumps : I press the flour and cocoa with a fork before adding liquid, because dry clumps survive the microwave and taste bitter.
- Cool the butter briefly : Piping-hot butter can start cooking the flour on contact. Waiting a few seconds keeps the batter smooth, thick, and glossy.
- Scrape the mug base : Dry flour hides in the bottom edge and leaves chalky spots. Run a spoon around the corners before folding in the chips.
- Top with reserved chips : Pressing a few sugar-free chips onto the surface lets them melt into gooey pockets instead of sinking. I always save a few for this.
Serving Suggestions
- Serve it right in the mug, warm: Let the Sugar-Free Simple Chocolate Brownie in a Mug rest for its 1 to 2 minutes, then top it while the center is still soft. A spoonful of whipped cream or a small scoop of sugar-free vanilla ice cream melts into the fudgy crumb. For a cleaner look, set the mug on a small saucer with a dessert spoon and dust the top with a little cocoa powder.
- Add contrast to the richness: This brownie is dense and deeply chocolatey, so something tart or crunchy balances it well. Fresh raspberries or sliced strawberries add brightness. Toasted chopped pecans, walnuts, or sliced almonds add crunch. I like to finish mine with a tiny pinch of flaky sea salt, which sharpens the cocoa and softens any sweetener aftertaste. A drizzle of natural almond butter or a spoonful of unsweetened Greek yogurt also works if you want something less sweet.
- Choose a drink that matches the intensity: A hot americano, espresso, or black tea cuts through the butter and chocolate. Cold unsweetened almond milk or regular milk is a classic match if you want something soothing. For a more grown-up pairing, a small glass of dry red wine, such as Cabernet Sauvignon, echoes the bitterness of the cocoa.
- Scale it for the occasion: It’s a one-mug treat for a quiet weeknight, but it also works for date night or a movie night in. Cook each mug separately rather than doubling the batter in one, so the centers stay gooey. Stagger the cooking so everyone gets a warm brownie, and set out bowls of berries, nuts, and whipped cream so each person can build their own.
Common Questions About Sugar-Free Simple Chocolate Brownie in a Mug: So Fudgy
- Can I use a different sweetener? Yes, allulose keeps it softer than erythritol.
- How do I know it’s done? Edges look set, center stays soft and glossy.
- Can I make it ahead? Refrigerate up to 2 days; reheat at 50% power.
- Why is my brownie dry or chalky? Overcooking dries it; I scrape corners to avoid chalkiness.
- 0 Facebook
- 3 Pinterest
- 4 Email
- Copy Link
- 7 shares
Sugar-Free Simple Chocolate Brownie in a Mug: So Fudgy
Ingredients
Instructions
Melt the butter in a small microwave-safe dish for 15 to 20 seconds, until fully liquid, then let it cool for a few seconds so it doesn’t warm the batter unevenly.
Whisk the flour, cocoa powder, sugar-free sweetener, baking powder, and salt together in a 10 to 12-ounce microwave-safe mug. Press out any cocoa lumps with the back of a fork until the mixture looks like a uniform, dark powder.
Pour in the milk, melted butter, and vanilla extract, then stir until the batter is smooth, thick, and glossy with no dry streaks.
Scrape the bottom and corners of the mug with a spoon to remove any hidden dry flour and avoid chalky spots.
Fold in the sugar-free chocolate chips, saving a few to press gently onto the top for extra melty pockets.
Microwave uncovered on high for 50 to 70 seconds, checking at 50 seconds, until the edges look set and the center is still slightly soft and glossy. Microwave wattages vary, so start with the shorter time and add seconds as needed.
Let the mug rest for 1 to 2 minutes, since the brownie keeps firming up as it cools. Top with whipped cream or a scoop of sugar-free ice cream and eat warm, straight from the mug. If the top still looks wet after resting, return to the microwave for 10-second bursts until the center is soft but not liquid.
Notes
Pick your sweetener wisely: Allulose keeps the crumb softer and moister; erythritol can taste cool and bake drier. Start with 1 tablespoon and adjust next time.
Crush the cocoa lumps: Press the flour and cocoa with a fork before adding liquid to avoid bitter, dry clumps.
Cool the butter briefly: Let melted butter rest a few seconds so it doesn’t start cooking the flour on contact.
Scrape the mug base: Run a spoon around the corners before folding in chips to remove hidden dry flour.
Top with reserved chips: Press a few sugar-free chips onto the surface so they melt into gooey pockets instead of sinking.
Refrigerator : Cool completely, then cover tightly; keeps up to 2 days. The brownie firms and becomes denser when chilled.
Freezer: For single-portion freezing, lift the cooled brownie from the mug, wrap in parchment and plastic, and freeze up to 1 month. Do not freeze with whipped cream or ice cream toppings.
Reheating: Microwave at 50% power for 10–15 seconds, adding 5-second bursts as needed. From frozen, thaw in the fridge or microwave at 50% for 20–30 seconds. A teaspoon of milk on top before reheating can help revive the center.
Make-ahead tip: Mix dry ingredients (flour, cocoa, sweetener, baking powder, salt) in a jar and store in a cool, dry place for a few weeks; add wet ingredients and microwave when craving strikes.
Nutrition
| Serving Size | 1 mug (single serving) |
|---|