- 0 Facebook
- 10 Pinterest
- 6 Email
- Copy Link
- 16 shares
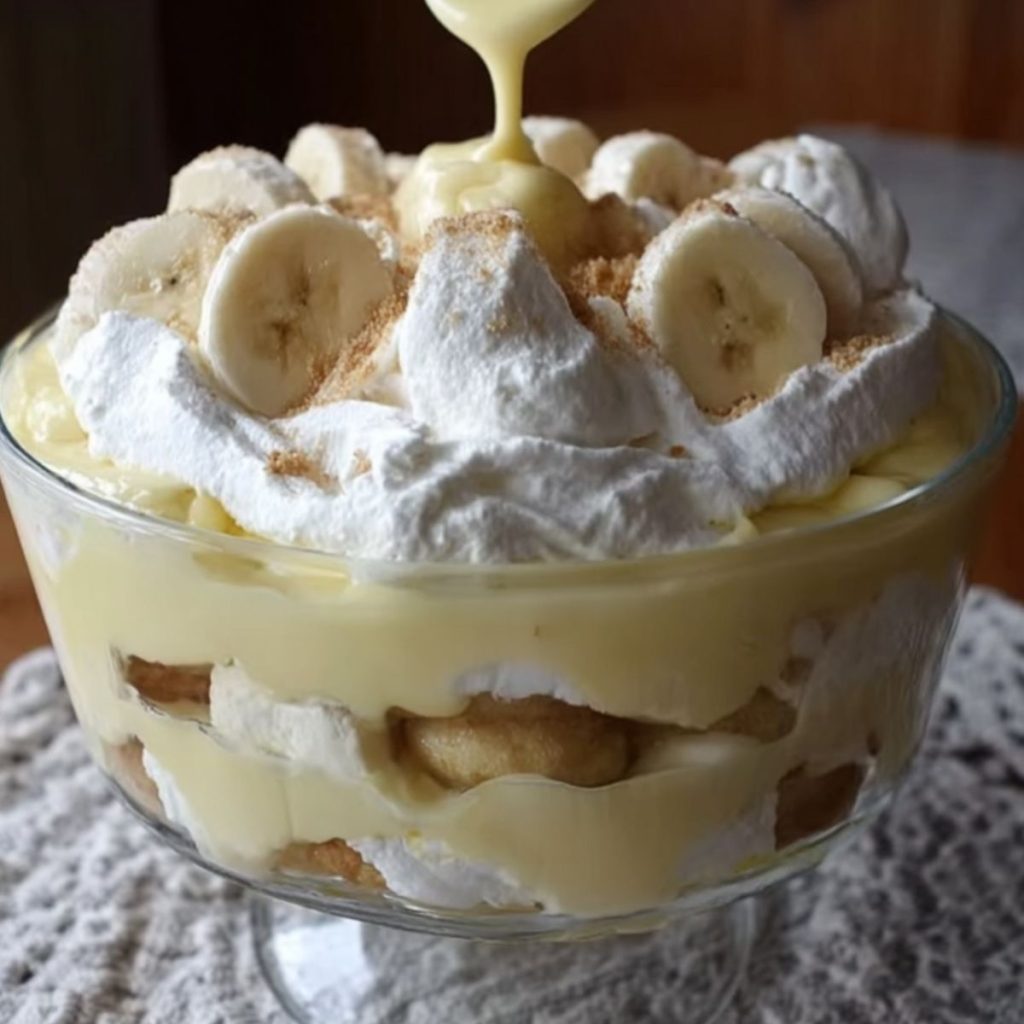
This nostalgic dessert gets a magnificent upgrade that transforms humble ingredients into something extraordinary. Not Your Mama’s Banana Pudding layers creamy, vanilla-infused pudding with ripe bananas and classic vanilla wafers—but the addition of sweetened condensed milk creates an indulgent richness that elevates it beyond the traditional version. The fluffy whipped topping crowns this chilled masterpiece, making it impossibly light despite its decadent flavor profile. Served in a trifle bowl to showcase its beautiful layers, this show-stopping treat makes an impressive finale to any meal.
Why You’ll Love This Recipe
This elevated twist on banana pudding delivers all the nostalgic comfort you remember with special touches that make it truly unforgettable.
- Impossibly Creamy Texture : The combination of instant pudding and sweetened condensed milk creates a silky-smooth base that’s richer and more luxurious than traditional recipes.
- Perfect Balance of Flavors : The sweetness from ripe bananas complements the vanilla-infused pudding while the wafers add just the right amount of texture and subtle crunch.
- Make-Ahead Miracle : This dessert actually improves after chilling, allowing the flavors to meld and the wafers to soften into cake-like layers that slice beautifully.
- No Baking Required : Even on the hottest summer days, this impressive dessert comes together without turning on the oven —just mix, layer, and chill.
- Crowd-Pleasing Classic : The familiar flavors with an upgraded approach make this dish a guaranteed hit at potlucks, family gatherings, and dinner parties where guests inevitably request the recipe.
Ingredient Breakdown with Tips
Every component in Not Your Mama’s Banana Pudding plays a crucial role in creating those irresistible layers of flavor and texture that make this dessert stand out from traditional recipes. Each ingredient has been carefully selected to ensure the perfect balance of sweetness, creaminess, and nostalgic comfort.
- Vanilla wafers : These classic cookies provide structure and a subtle sweetness that complements the creamy elements. Choose fresh, crisp wafers as they’ll soften perfectly during chilling to create tender, cake-like layers.
- Ripe bananas : The star ingredient that adds natural sweetness and that unmistakable tropical flavor. Look for bananas with some brown spots for maximum sweetness—they should be ripe but still firm enough to slice cleanly.
- Instant vanilla pudding mix : Creates the quick-setting base that holds everything together. The instant variety works best here as it thickens reliably without cooking and maintains its structure when layered.
- Cold milk : Activates the pudding mix and determines the final consistency. Using very cold milk helps the pudding set properly—whole milk creates the richest results, but 2% works well too.
- Sweetened condensed milk : The secret ingredient that elevates this from ordinary to extraordinary pudding. This thick, sweet milk adds an incomparable richness and velvety texture that transforms the basic pudding into something truly special.
- Whipped topping : Contributes a cloud-like lightness that balances the rich pudding layers. While homemade whipped cream can be substituted, store-bought varieties hold their structure longer, especially for presentations that need to stand up for several hours.
- Vanilla extract : Enhances and deepens the flavor profile throughout the dessert. Pure vanilla extract (rather than imitation) makes a noticeable difference in the final taste, especially when paired with the vanilla wafers and pudding.
Let’s Cook It
- Whisk the instant vanilla pudding mix with cold milk in a large bowl for about 2 minutes until it begins to thicken slightly.
- Add the sweetened condensed milk and vanilla extract to the pudding mixture, stirring until completely incorporated and smooth. The mixture should be thick but still pourable.
- Slice the ripe bananas into approximately 1/4-inch rounds. I find slightly firm bananas with just a few brown spots work perfectly for both flavor and presentation.
- Create the first layer by arranging vanilla wafers in a single layer on the bottom of your serving dish or trifle bowl, slightly overlapping them.
- Add a layer of banana slices over the wafers, then pour about one-third of the pudding mixture over the bananas, making sure to spread it evenly to the edges.
- Repeat the layering process twice more: wafers, bananas, and pudding. The pudding should be the final layer on top.
- Cover the dish tightly with plastic wrap, pressing it directly onto the surface of the pudding to prevent a skin from forming, and refrigerate for at least 4 hours or overnight.
- Just before serving, spread whipped topping over the final pudding layer and garnish with crushed vanilla wafers or additional banana slices for a beautiful presentation.
Tips for the Best Not Your Mama’s Banana Pudding
Here are some insider tricks to make this banana pudding absolutely unforgettable:
- Choose bananas wisely : Look for bananas with small brown spots—they’re sweet but firm enough to hold shape when sliced, preventing mushiness in your layers.
- Chill the mixing bowl : I always refrigerate my bowl for 10 minutes before mixing the pudding and milk—this helps it set faster and creates a thicker base.
- Layer strategically : Place wafers around the perimeter of your dish first, showing them against the glass for that classic, beautiful presentation everyone loves.
- Prevent browning bananas : Brush sliced bananas with a tiny bit of lemon juice before layering them in—it prevents discoloration without affecting the sweet flavor.
- Perfect the pudding texture : Let the pudding mixture sit for 5 minutes after combining with condensed milk—this achieves the ideal consistency before you begin layering.
Perfect Pairings & Serving Ideas
This Not Your Mama’s Banana Pudding is a showstopper on its own, but a few thoughtful serving touches can elevate it from delicious to unforgettable.
For casual gatherings, I love serving this pudding in individual glass dishes or mason jars that showcase those beautiful layers – it’s a presentation that never fails to impress guests. The clear containers let everyone see the careful construction of wafers, bananas, and that luxurious pudding before they dive in.
For a more elegant presentation, consider serving smaller portions in martini glasses or champagne coupes with tiny vanilla wafers as garnish. This dessert pairs beautifully with coffee or tea, but for something special, try serving it alongside a glass of dessert wine like Moscato d’Asti or even a splash of bourbon for the adults.
If you’re hosting a dessert bar, this banana pudding works wonderfully alongside other no-bake treats like chocolate mousse or fresh fruit – the creamy texture provides a perfect contrast to crunchier desserts. And don’t forget that final sprinkle of crushed vanilla wafers right before serving for that perfect textural contrast!
Variations & Substitutions
Making this banana pudding your own is half the fun! Whether you’re accommodating dietary needs or just wanting to explore new flavor combinations, these swaps and additions will keep this dessert fresh and exciting.
- Cookie alternatives : Not a fan of vanilla wafers or can’t find them? Try graham crackers, shortbread cookies, or even gingersnaps for a spicy twist that pairs beautifully with the sweet bananas.
- Dairy-free option : I’ve made this with coconut milk and dairy-free whipped topping for friends with lactose intolerance, and it’s still wonderfully creamy. Just be sure to use instant pudding formulated for non-dairy milk.
- Flavor boosters : Add a tablespoon of rum extract or bourbon to the pudding mixture for a sophisticated adult version that’s perfect for dinner parties.
- Chocolate lover’s delight : Swap vanilla pudding for chocolate pudding mix and use chocolate wafers instead of vanilla for an indulgent chocolate-banana combination that’s absolutely irresistible.
- Fruity twist : Layer in some fresh berries like strawberries or blueberries between the banana layers for added color, nutrition, and a bright flavor contrast to the creamy pudding.
- Crunchy elements : Sprinkle toasted coconut, crushed toffee bits, or finely chopped nuts between layers or as a garnish for added texture and flavor dimension.
How to Store and Freeze It
This Not Your Mama’s Banana Pudding will keep beautifully in the refrigerator for up to 3 days when stored in an airtight container or tightly covered with plastic wrap. The flavors actually continue to develop during this time, though the bananas will gradually darken (this doesn’t affect the taste).
For the best texture experience, I don’t recommend freezing this dessert. The high moisture content in the bananas and pudding mixture tends to separate when thawed, resulting in a watery consistency. The whipped topping and vanilla wafers also lose their distinct textures after freezing and thawing.
If planning to serve this at a special event, you can prepare it up to 24 hours in advance for optimal freshness and texture. When ready to enjoy leftovers, simply remove from the refrigerator and serve chilled—no reheating necessary for this cool, creamy treat!
Make-Ahead Tips for Not Your Mama’s Banana Pudding
This Not Your Mama’s Banana Pudding is a meal prep dream that actually improves with time! You can assemble the entire dessert (minus the final whipped topping) up to 24 hours in advance, allowing the vanilla wafers to soften into tender, cake-like layers while the flavors meld beautifully. To prevent the bananas from browning, toss the sliced bananas with a tablespoon of lemon juice before layering, or assemble the pudding just before the final chill time. Store covered in the refrigerator , then add the whipped topping and garnishes just before serving. This make-ahead approach not only saves precious time on busy days but ensures your dessert achieves that perfect, restaurant-quality texture that makes this elevated banana pudding absolutely irresistible.
Recipe FAQs
Can I use homemade whipped cream instead of store-bought? Yes, just whip 2 cups heavy cream until stiff.
How ripe should my bananas be? Spotted but still firm for best flavor.
Can I make this pudding ahead of time? Yes, it’s actually better after overnight chilling.
Will this work with gluten-free vanilla wafers? Absolutely—the texture remains deliciously authentic.
How do I prevent my banana slices from browning? Brush with lemon juice before layering.
- 0 Facebook
- 10 Pinterest
- 6 Email
- Copy Link
- 16 shares
Heavenly Twist: Not Your Mama's Banana Pudding
Ingredients
Instructions
Whisk the instant vanilla pudding mix with cold milk in a large bowl for about 2 minutes until it begins to thicken slightly.
Add the sweetened condensed milk and vanilla extract to the pudding mixture, stirring until completely incorporated and smooth. The mixture should be thick but still pourable.
Slice the ripe bananas into approximately 1/4-inch rounds.
Create the first layer by arranging vanilla wafers in a single layer on the bottom of your serving dish or trifle bowl, slightly overlapping them.
Add a layer of banana slices over the wafers, then pour about one-third of the pudding mixture over the bananas.
Repeat the layering process twice more: wafers, bananas, and pudding. The pudding should be the final layer on top.
Cover the dish tightly with plastic wrap and refrigerate for at least 4 hours or overnight.
Just before serving, spread whipped topping over the final pudding layer and garnish with crushed vanilla wafers or additional banana slices.
Notes
Choose bananas wisely: Look for bananas with small brown spots—they’re sweet but firm enough to hold shape when sliced.
Chill the mixing bowl: Refrigerate your bowl for 10 minutes before mixing the pudding and milk.
Layer strategically: Place wafers around the perimeter of your dish first for a beautiful presentation.
Prevent browning bananas: Brush sliced bananas with a tiny bit of lemon juice before layering.
Perfect the pudding texture: Let the pudding mixture sit for 5 minutes after combining with condensed milk.
Nutrition
| Serving Size | 1 cup |
|---|---|
| Calories | 320 calories |
| Sugar Content | 22g |
| Sodium Content | 350mg |
| Fat Content | 10g |
| Saturated Fat Content | 5g |
| Unsaturated Fat Content | 4g |
| Trans Fat Content | 0g |
| Carbohydrate Content | 59g |
| Fiber Content | 1g |
| Protein Content | 5g |
| Cholesterol Content | 15mg |