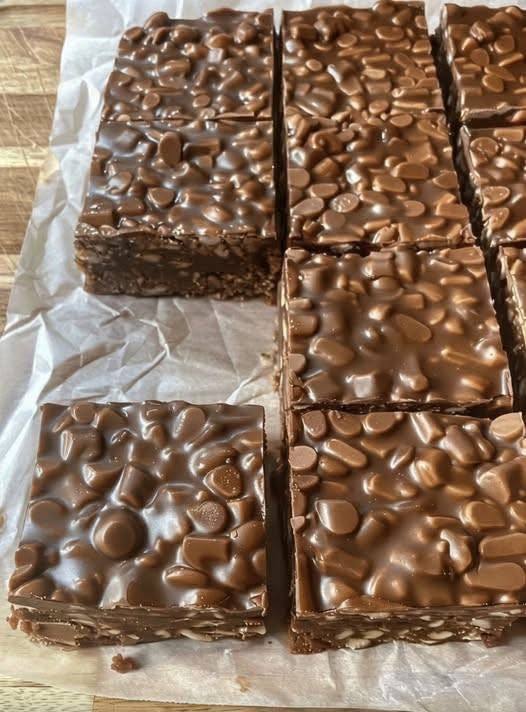
No-Bake Homemade Crunch Bars
Who doesn’t love a good candy bar? That perfect blend of smooth chocolate and satisfying crunch is pure bliss. But what if we told you that you could recreate that magic right in your own kitchen, with minimal effort and absolutely no baking required? Get ready to unleash your inner confectioner because today we’re diving into the delightful world of No-Bake Homemade Crunch Bars!
These aren’t just any homemade treats; they’re a nostalgic trip back to childhood, a quick fix for a chocolate craving, and a guaranteed crowd-pleaser all rolled into one. Imagine rich, velvety chocolate encasing crispy rice cereal, all held together in a perfectly proportioned bar. The best part? They come together in a flash, making them ideal for last-minute desserts, after-school snacks, or simply when you need a little something sweet without turning on the oven. Say goodbye to complicated recipes and hello to instant gratification!
Our No-Bake Homemade Crunch Bars are ridiculously easy to make, featuring simple ingredients you likely already have in your pantry. They offer that irresistible combination of creamy, chewy, and crunchy textures that makes classic crunch bars so addictive. Plus, they’re incredibly versatile, allowing you to customize them to your heart’s content. Whether you’re a seasoned baker or a kitchen novice, this recipe is foolproof and promises delicious results every single time.
Nutritional Information
Per serving (approximate values, based on 16 servings):
- Calories: 220 kcal
- Protein: 2g
- Carbohydrates: 28g
- Fat: 12g
- Fiber: 1g
- Sodium: 70mg
Ingredients
- 1 ½ cups good quality milk chocolate chips (or chopped milk chocolate bar)
- ¼ cup unsalted butter
- 2 tablespoons light corn syrup (or honey for a slightly different flavor)
- ½ teaspoon vanilla extract
- 4 cups crispy rice cereal (such as Rice Krispies)
- Pinch of sea salt (optional, for enhancing flavor)
Instructions
- Line an 8×8 inch square baking pan with parchment paper, leaving an overhang on two sides to easily lift the bars out later. Set aside.
- In a large microwave-safe bowl, combine the milk chocolate chips, unsalted butter, and light corn syrup.
- Heat the mixture in the microwave in 30-second intervals, stirring well after each interval, until the chocolate is mostly melted and smooth. This usually takes about 1.5 to 2 minutes total. Alternatively, you can melt these ingredients in a double boiler over simmering water, stirring until smooth.
- Once the chocolate mixture is smooth and lump-free, remove it from the heat (or microwave) and stir in the vanilla extract and the pinch of sea salt, if using.
- Add the crispy rice cereal to the melted chocolate mixture. Gently fold the cereal into the chocolate until every piece is evenly coated. Be careful not to crush the cereal too much.
- Pour the chocolate-cereal mixture into the prepared 8×8 inch pan.
- Using a spatula or the back of a spoon, press the mixture down firmly and evenly into the pan. Make sure it’s compacted well to ensure the bars hold together.
- Place the pan in the refrigerator for at least 1 to 2 hours, or until the chocolate is completely set and firm.
- Once thoroughly chilled and firm, use the parchment paper overhang to lift the entire slab of crunch bars out of the pan and onto a cutting board.
- Using a sharp knife, cut the slab into 16 equal squares or rectangles. For cleaner cuts, you can warm your knife slightly under hot water and wipe it dry before each cut.
- Serve immediately or store for later enjoyment.
Cooking Tips and Variations
For the smoothest melting, use good quality chocolate chips or finely chopped chocolate. Cheaper chocolate can sometimes seize or become grainy when melted. If melting in the microwave, go slow and stir frequently to prevent burning. If you prefer a double boiler, ensure the water in the pot doesn’t touch the bottom of the bowl holding the chocolate, and avoid getting any water into the chocolate mixture, as this can cause it to seize.
When mixing the cereal into the chocolate, be gentle to maintain the crispiness. Over-mixing or too much force can break down the cereal, leading to a less crunchy bar. Pressing the mixture firmly into the pan is crucial for the bars to hold their shape. A rubber spatula or even the bottom of a clean glass can help you achieve a compact, even layer.
For a darker chocolate flavor, try using semi-sweet or dark chocolate chips. You can even do a mix of milk and dark chocolate. To make these extra special, drizzle a contrasting chocolate (like white chocolate) over the top once the bars have set but before cutting. Sprinkle with flaky sea salt for a gourmet touch.
Additions like mini marshmallows, chopped nuts (peanuts, almonds, pecans), or even a tablespoon of peanut butter stirred into the melted chocolate can create exciting new flavor profiles. For a hint of mint, add a few drops of peppermint extract along with the vanilla. If you want to make these vegan, ensure you use dairy-free chocolate chips, a plant-based butter alternative, and ensure your crispy rice cereal is certified vegan.
Storage and Reheating
No-Bake Homemade Crunch Bars are best stored in an airtight container at room temperature for up to 3-4 days. If your kitchen is particularly warm, or if you prefer a firmer bar, you can store them in the refrigerator. When stored in the fridge, they will be very firm, so it’s a good idea to let them sit out for 5-10 minutes before serving to soften slightly for the best texture.
These bars do not typically require reheating. They are designed to be enjoyed at room temperature or slightly chilled. Reheating them would cause the chocolate to melt, and they would lose their shape and crunch. For longer storage, you can freeze the cut bars in an airtight container for up to 1-2 months. Thaw them in the refrigerator overnight or at room temperature for about 30 minutes before serving.
Frequently Asked Questions
Can I use a different type of cereal?
While crispy rice cereal is traditional and provides the classic crunch, you can experiment with other cereals. Corn flakes or even crushed graham crackers can work, but the texture and flavor will be different. Ensure the cereal is not too dense or sugary, as it might alter the final consistency and sweetness.
My chocolate seized! What did I do wrong?
Chocolate seizing (becoming thick, grainy, and unworkable) often happens if it gets too hot too quickly, or if even a tiny bit of water gets into the melting chocolate. When melting, go slow, stir often, and use a clean, dry bowl and utensils. If using a double boiler, ensure the bowl doesn’t touch the simmering water below.
How can I make these less sweet?
To reduce the sweetness, you can use semi-sweet or dark chocolate chips instead of milk chocolate. You can also slightly reduce the amount of corn syrup, though it helps with the binding. A pinch of sea salt also helps to balance out the sweetness.
Can I double the recipe?
Yes, you can easily double this recipe. If doubling, use a larger pan, such as a 9×13 inch baking dish, and ensure you have enough space in your refrigerator for chilling. The chilling time might also be slightly longer for a thicker batch.
No-Bake Homemade Crunch Bars
Ingredients
Instructions
Line an 8×8 inch square baking pan with parchment paper, leaving an overhang on two sides to easily lift the bars out later. Set aside.
In a large microwave-safe bowl, combine the milk chocolate chips, unsalted butter, and light corn syrup.
Heat the mixture in the microwave in 30-second intervals, stirring well after each interval, until the chocolate is mostly melted and smooth. This usually takes about 1.5 to 2 minutes total. Alternatively, you can melt these ingredients in a double boiler over simmering water, stirring until smooth.
Once the chocolate mixture is smooth and lump-free, remove it from the heat (or microwave) and stir in the vanilla extract and the pinch of sea salt, if using.
Add the crispy rice cereal to the melted chocolate mixture. Gently fold the cereal into the chocolate until every piece is evenly coated. Be careful not to crush the cereal too much.
Pour the chocolate-cereal mixture into the prepared 8×8 inch pan.
Using a spatula or the back of a spoon, press the mixture down firmly and evenly into the pan. Make sure it’s compacted well to ensure the bars hold together.
Place the pan in the refrigerator for at least 1 to 2 hours, or until the chocolate is completely set and firm.
Once thoroughly chilled and firm, use the parchment paper overhang to lift the entire slab of crunch bars out of the pan and onto a cutting board.
Using a sharp knife, cut the slab into 16 equal squares or rectangles. For cleaner cuts, you can warm your knife slightly under hot water and wipe it dry before each cut.
Serve immediately or store for later enjoyment.