Introduction
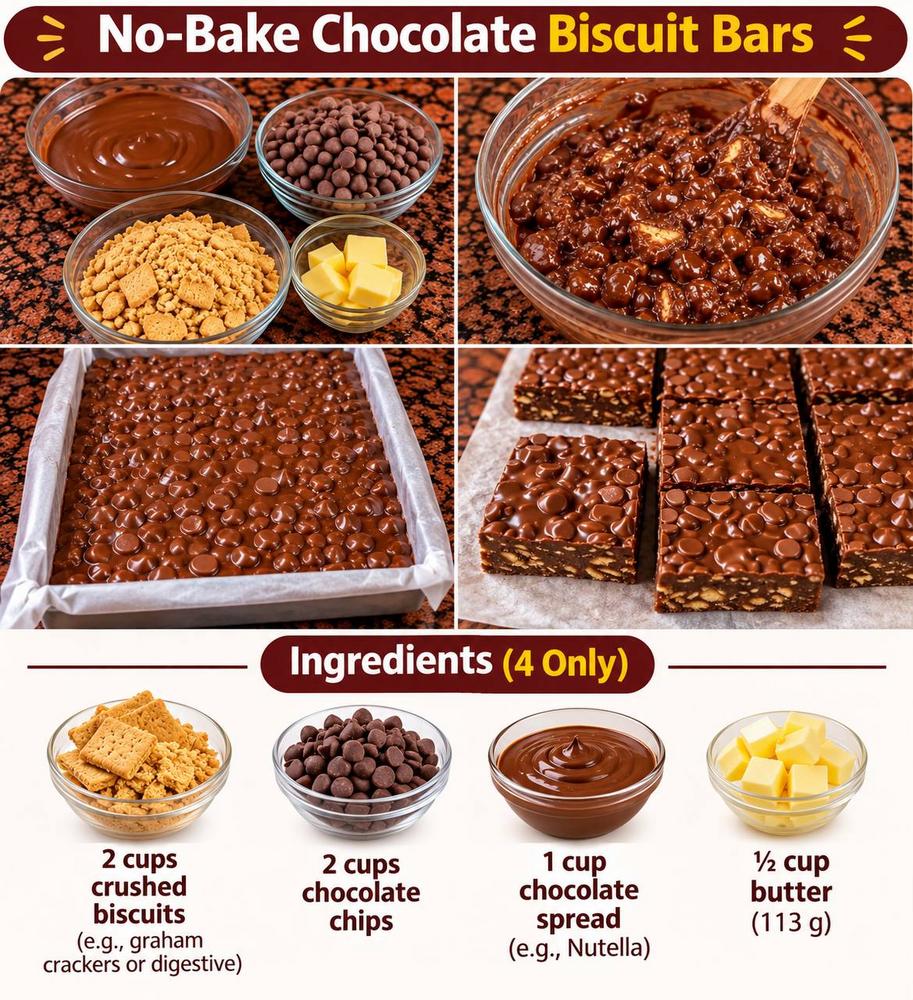
Craving something sweet, rich, and utterly satisfying, but the thought of turning on your oven fills you with dread? Look no further! Our No-Bake Chocolate Biscuit Bars are here to rescue your dessert dilemmas. This incredibly easy and delightfully delicious treat is the ultimate fuss-free indulgence, perfect for satisfying those chocolate cravings without breaking a sweat. Imagine a dense, chewy, chocolatey base studded with crunchy biscuit pieces, all bound together with a luscious chocolate spread and topped with even more decadent chocolate chips. It’s a dream come true for anyone who loves a good homemade treat but prefers to keep things simple.
These No-Bake Chocolate Biscuit Bars are more than just a quick dessert; they’re a versatile crowd-pleaser that fits seamlessly into any occasion. Whether you’re a beginner cook looking for a foolproof recipe, a parent needing a fun kitchen project with the kids, or hosting a party and want a make-ahead dessert that impresses, these bars tick all the boxes. They require minimal ingredients, minimal effort, and deliver maximum flavor, making them an instant favorite in any household. Get ready to discover your new go-to recipe for a sweet, simple, and utterly irresistible chocolate experience.
What makes these bars truly special is their incredible simplicity and the delightful interplay of textures and flavors. The humble biscuit transforms into a chewy, chocolate-infused foundation, offering a satisfying bite that’s complemented by the smooth, rich chocolate spread and the satisfying crunch of chocolate chips. There’s no baking involved, which means no waiting for ovens to preheat, no worrying about overcooking, and more time to enjoy the delightful process of creating something wonderful. From pantry to plate, these bars come together in a flash, making them ideal for spontaneous cravings or when you need a quick dessert that tastes like it took hours of effort.
Nutritional Information
Per serving (approximate values):
- Calories: 380
- Protein: 4g
- Carbohydrates: 48g
- Fat: 22g
- Fiber: 3g
- Sodium: 180mg
Ingredients
- 2 cups crushed biscuits (e.g., graham crackers, digestive biscuits, or shortbread)
- 2 cups chocolate chips (divided)
- 1 cup chocolate spread (e.g., Nutella or other chocolate-hazelnut spread)
- ½ cup butter (113 g), unsalted or salted
Instructions
- Prepare Your Pan: Line an 8×8 or 9×9-inch baking pan with parchment paper, leaving an overhang on the sides. This will make it much easier to lift the bars out once they are set.
- Crush the Biscuits: Place your chosen biscuits into a large Ziploc bag and seal it tightly. Use a rolling pin or the bottom of a heavy pan to crush them into a mixture of fine crumbs and small, pea-sized chunks. Alternatively, pulse them in a food processor a few times until you reach the desired consistency. Transfer the crushed biscuits to a large mixing bowl.
- Melt the Wet Ingredients: In a microwave-safe bowl, combine the butter, chocolate spread, and 1 cup of the chocolate chips. Microwave on high for 30-second intervals, stirring well after each interval, until the mixture is completely melted and smooth. This usually takes about 1-2 minutes total. Alternatively, you can melt these ingredients in a saucepan over low heat on the stovetop, stirring constantly until smooth. Be careful not to burn the chocolate.
- Combine and Mix: Pour the melted chocolate mixture over the crushed biscuits in the large mixing bowl. Using a sturdy spatula or wooden spoon, mix everything together thoroughly until the biscuits are completely coated and a thick, uniform mixture forms.
- Press into the Pan: Transfer the biscuit and chocolate mixture into the prepared baking pan. Using the back of a spoon, a spatula, or your clean hands, press the mixture down firmly and evenly into the pan. Make sure to get into the corners and create a compact, flat layer.
- Add Topping: Sprinkle the remaining 1 cup of chocolate chips evenly over the top of the pressed biscuit mixture. Gently press them down lightly with your hand or the back of a spoon to ensure they adhere to the surface.
- Chill to Set: Place the baking pan in the refrigerator and chill for at least 2-3 hours, or until the bars are completely firm and set. Adequate chilling time is crucial for the bars to hold their shape and be easy to slice.
- Slice and Serve: Once completely firm, lift the parchment paper overhang to remove the entire block of bars from the pan. Place it on a cutting board. Using a sharp knife, slice the block into 16-20 uniform bars, depending on your desired size. Serve chilled and enjoy your delicious no-bake treat!
Cooking Tips and Variations
Achieving perfect No-Bake Chocolate Biscuit Bars is incredibly simple, but a few tips can elevate your results from good to absolutely amazing. Firstly, when crushing your biscuits, aim for a mix of fine crumbs and slightly larger pea-sized pieces. This combination adds wonderful textural interest to the bars, giving them a more satisfying chew. While a food processor makes quick work of this, a Ziploc bag and a rolling pin are perfectly effective and a great way to release some stress!
When melting your butter, chocolate spread, and chocolate chips, patience is key. Whether you’re using a microwave or a stovetop, melt them gently and stir frequently. Overheating chocolate can cause it to seize or burn, leading to a grainy texture and bitter taste. If microwaving, use short 30-second bursts and stir vigorously in between. For stovetop melting, keep the heat on low and remove from heat as soon as the mixture is smooth.
Pressing the mixture evenly and firmly into the pan is crucial for bars that hold together well and slice beautifully. Use the back of a spoon, a spatula, or even the bottom of a clean measuring cup to exert even pressure across the entire surface. This compact base is what gives your bars their structure. Don’t skimp on the chilling time! This is a no-bake recipe, and chilling is what sets the bars. Rushing this step will result in soft, crumbly bars that are difficult to cut. Allow at least 2-3 hours, or even better, chill them overnight for the firmest results.
For storage, keep your leftover No-Bake Chocolate Biscuit Bars in an airtight container in the refrigerator. They will stay fresh and delicious for up to a week. They can also be frozen for up to a month; just be sure to separate layers with parchment paper to prevent sticking. Thaw in the refrigerator before serving.
Now, let’s talk variations! These bars are a fantastic canvas for creativity. To add an extra layer of crunch and flavor, consider stirring in ½ cup of chopped nuts like almonds, walnuts, or pecans along with the crushed biscuits. For a chewy twist, dried fruits such as raisins, cranberries, or chopped apricots can be a delightful addition. Shredded coconut is another popular choice that pairs wonderfully with chocolate, adding a tropical hint.
Want to play with toppings? Drizzle melted white chocolate over the finished bars for a stunning visual contrast and an extra layer of sweetness. A sprinkle of flaky sea salt before chilling can enhance the chocolate flavor beautifully, creating a sophisticated sweet and salty profile. A dusting of cocoa powder or a sprinkle of mini marshmallows on top can also add a fun touch.
For a deeper, more complex chocolate flavor, a pinch of espresso powder (about ½ teaspoon) added to the melted chocolate mixture can intensify the richness without making the bars taste like coffee. A splash of vanilla extract (about 1 teaspoon) can also boost the overall flavor profile. If you’re feeling adventurous, try adding a tablespoon of orange zest for a bright, citrusy note that complements the chocolate beautifully. The possibilities are endless, so feel free to experiment and make these bars truly your own!
Storage and Reheating
Storing your No-Bake Chocolate Biscuit Bars properly is key to maintaining their delicious texture and freshness. Once sliced, transfer the bars to an airtight container. If stacking layers, it’s a good idea to place a piece of parchment paper between each layer to prevent them from sticking together. Store the container in the refrigerator for up to 5-7 days. The chilled environment helps maintain their firm consistency and prevents the chocolate from becoming too soft.
These bars are best enjoyed chilled, straight from the refrigerator, as their firm texture is part of their appeal. Therefore, reheating is generally not recommended or necessary. If you prefer them slightly softer, you can let them sit at room temperature for about 10-15 minutes before serving, but avoid leaving them out for extended periods, especially in warm environments, as they will soften considerably.
For longer storage, No-Bake Chocolate Biscuit Bars freeze exceptionally well. Arrange the sliced bars in a single layer on a baking sheet and freeze until solid, about 1-2 hours. Once frozen, transfer them to a freezer-safe airtight container or a heavy-duty freezer bag, again using parchment paper between layers if stacking. They can be stored in the freezer for up to 1 month. To enjoy, simply remove the desired number of bars from the freezer and let them thaw in the refrigerator for a few hours, or at room temperature for about 30 minutes, until they are soft enough to eat. Freezing is a fantastic way to prepare a batch ahead of time for future cravings or unexpected guests.
Frequently Asked Questions
What kind of biscuits (cookies) should I use for this recipe?
You can use a variety of plain, relatively dry biscuits or cookies for this recipe. Popular choices include graham crackers, digestive biscuits, tea biscuits, shortbread cookies, or even plain butter cookies. The key is to choose a biscuit that isn’t too sweet or heavily flavored, allowing the chocolate to be the star. Avoid cream-filled or heavily frosted cookies, as they can alter the texture and sweetness of the bars.
Can I make these bars vegan or dairy-free?
Yes, absolutely! To make these bars vegan or dairy-free, you’ll need to make a few substitutions. Use a plant-based butter alternative (like vegan butter sticks), a dairy-free chocolate spread (many brands offer vegan hazelnut spreads), and dairy-free chocolate chips. Ensure your chosen biscuits are also vegan-friendly, as some contain dairy or eggs. The process remains exactly the same.
My bars aren’t firming up properly. What went wrong?
The most common reason for bars not firming up is insufficient chilling time. These are no-bake bars, and the cold temperature is what sets them. Ensure you’ve chilled them for at least 2-3 hours, or ideally longer, even overnight. Another factor could be the ratio of wet to dry ingredients; ensure your measurements were accurate, especially for the butter and chocolate spread, as too much liquid can make them softer. If they’re still too soft after adequate chilling, try placing them in the freezer for 30 minutes to an hour for a quick firm-up.
How can I cut the bars cleanly without them crumbling or sticking?
For clean cuts, ensure your bars are thoroughly chilled and very firm. Use a large, sharp knife. For the cleanest slices, you can run the knife under hot water and wipe it dry between each cut. This helps the knife glide through the chocolate without dragging. Press down firmly and cut straight through rather than sawing. If the bars start to soften during cutting, place them back in the refrigerator for 10-15 minutes to firm up again.
No-Bake Chocolate Biscuit Bars
Ingredients
Instructions
Prepare Your Pan: Line an 8×8 or 9×9-inch baking pan with parchment paper, leaving an overhang on the sides. This will make it much easier to lift the bars out once they are set.
Crush the Biscuits: Place your chosen biscuits into a large Ziploc bag and seal it tightly. Use a rolling pin or the bottom of a heavy pan to crush them into a mixture of fine crumbs and small, pea-sized chunks. Alternatively, pulse them in a food processor a few times until you reach the desired consistency. Transfer the crushed biscuits to a large mixing bowl.
Melt the Wet Ingredients: In a microwave-safe bowl, combine the butter, chocolate spread, and 1 cup of the chocolate chips. Microwave on high for 30-second intervals, stirring well after each interval, until the mixture is completely melted and smooth. This usually takes about 1-2 minutes total. Alternatively, you can melt these ingredients in a saucepan over low heat on the stovetop, stirring constantly until smooth. Be careful not to burn the chocolate.
Combine and Mix: Pour the melted chocolate mixture over the crushed biscuits in the large mixing bowl. Using a sturdy spatula or wooden spoon, mix everything together thoroughly until the biscuits are completely coated and a thick, uniform mixture forms.
Press into the Pan: Transfer the biscuit and chocolate mixture into the prepared baking pan. Using the back of a spoon, a spatula, or your clean hands, press the mixture down firmly and evenly into the pan. Make sure to get into the corners and create a compact, flat layer.
Add Topping: Sprinkle the remaining 1 cup of chocolate chips evenly over the top of the pressed biscuit mixture. Gently press them down lightly with your hand or the back of a spoon to ensure they adhere to the surface.
Chill to Set: Place the baking pan in the refrigerator and chill for at least 2-3 hours, or until the bars are completely firm and set. Adequate chilling time is crucial for the bars to hold their shape and be easy to slice.
Slice and Serve: Once completely firm, lift the parchment paper overhang to remove the entire block of bars from the pan. Place it on a cutting board. Using a sharp knife, slice the block into 16-20 uniform bars, depending on your desired size. Serve chilled and enjoy your delicious no-bake treat!