- 0 Facebook
- 9 Pinterest
- 1 Email
- Copy Link
- 10 shares
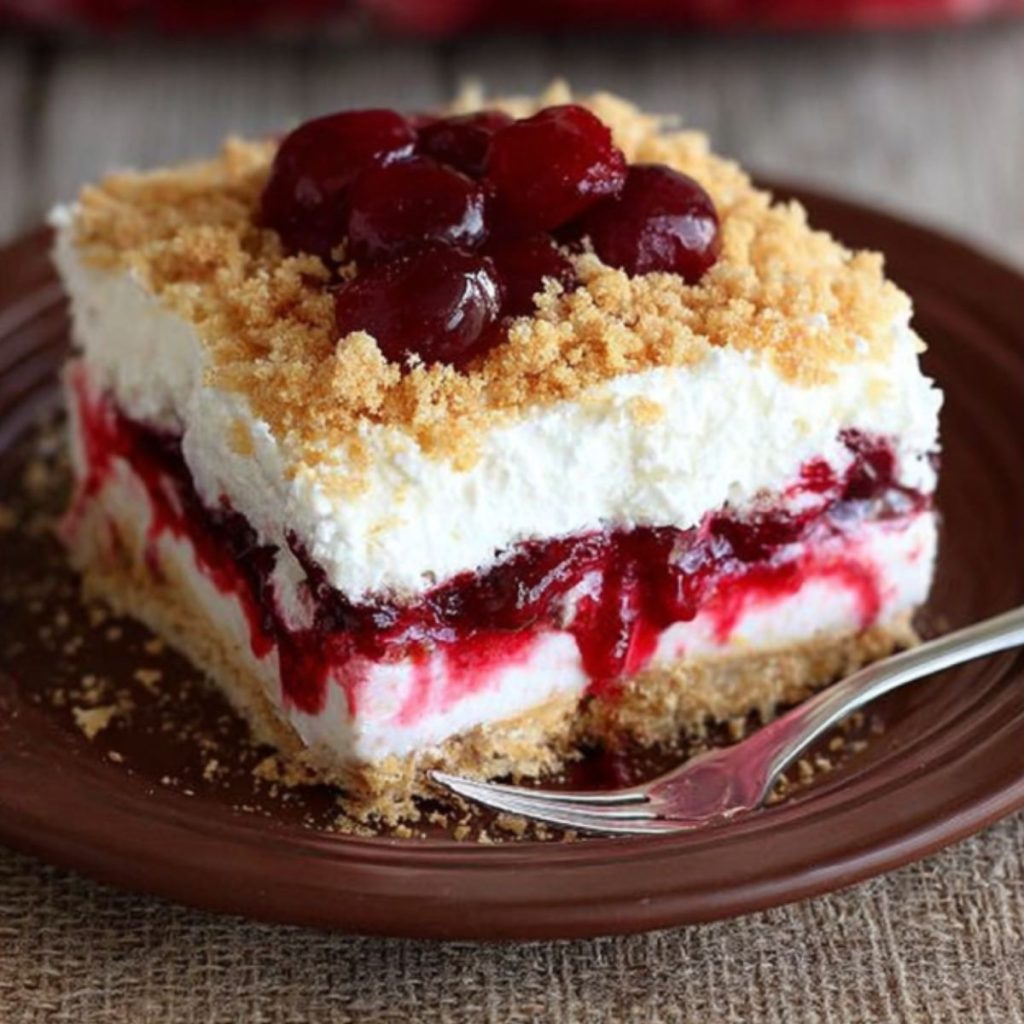
Last summer, I found myself staring into my friend Sarah’s refrigerator at a potluck, desperately searching for something that would satisfy my sweet tooth without the guilt of overindulging. That’s when I spotted this gorgeous layered dessert that looked like it belonged in a fancy bakery window. One bite of her “Cherry Yum Yum” and I was absolutely hooked – the creamy, dreamy layers paired with that burst of cherry sweetness was pure magic.
What started as a desperate dessert hunt turned into my most requested recipe. I’ve made this no-bake wonder countless times since, tweaking it to perfection through trial and error. The best part? You don’t need to turn on your oven , making it perfect for hot summer days or when you’re short on time but still want to impress.
This recipe has become my go-to for everything from family gatherings to last-minute dinner parties. It’s foolproof, gorgeous, and delivers that “wow, you made this?” reaction every single time.
Why You’ll Love This No-Bake Cherry Yum Yum
What makes this Cherry Yum Yum absolutely irresistible is how it perfectly balances rich, creamy textures with bright, fruity flavors. I’ve discovered that the combination of tangy cream cheese and sweet powdered sugar creates this incredibly smooth base that pairs beautifully with the tart-sweet cherry filling. The graham cracker crust adds just the right amount of crunch and buttery flavor to ground all those luscious layers.
From a culinary perspective, this dessert works because it hits every flavor note – sweet, tart, rich, and light all at once. The no-bake method allows the flavors to meld together in the refrigerator , creating depth that actually improves over time. It’s beginner-friendly since there’s no risk of overbaking or temperature timing, yet sophisticated enough to serve at elegant gatherings.
- No-bake convenience – perfect for hot weather or busy schedules
- Make-ahead friendly – actually tastes better the next day
- Crowd-pleaser – appeals to both kids and adults
- Customizable – easy to adapt with different fruit fillings
- Impressive presentation – looks like you spent hours in the kitchen
Ingredients Notes
- Cream Cheese: I always use full-fat cream cheese for the richest, most luxurious texture. Make sure it’s completely softened to avoid lumps in your creamy layer.
- Powdered Sugar: This dissolves beautifully into the cream cheese without any grittiness, creating that perfectly smooth sweetness that granulated sugar simply can’t achieve.
- Frozen Whipped Topping: I prefer this over heavy cream because it holds its structure better and won’t deflate. Use the entire container for rich, fluffy texture.
- Cherry Pie Filling: The star of the show! I look for brands with whole cherries and a glossy, thick syrup for the best visual appeal and flavor.
- Graham Cracker Crumbs: These provide the perfect buttery, slightly sweet foundation. I sometimes make my own by crushing whole crackers for extra freshness.
- Butter: Use real butter, not margarine, for that authentic rich flavor that makes the crust taste homemade and special.
How to Make No-Bake Cherry Yum Yum
Step 1: Prepare the Crust Mix the graham cracker crumbs with melted butter until the mixture resembles wet sand and holds together when pressed. Press firmly into the bottom of a 9×13 inch dish, creating an even layer. The crust should feel compact and hold its shape.
Step 2: Create the Cream Layer In a large bowl, beat the softened cream cheese until completely smooth and fluffy, about 2-3 minutes. Gradually add powdered sugar in 2-3 additions, beating well after each addition until no lumps remain. Gently fold in the entire container of thawed whipped topping until just combined – don’t overmix or it will deflate.
Step 3: Assemble the Layers Spread the cream cheese mixture evenly over the graham cracker crust, smoothing with a spatula. Make sure to reach all corners and create an even surface for the cherry layer.
Step 4: Add the Cherry Topping Spoon the cherry pie filling over the cream layer, spreading gently to avoid disturbing the cream beneath. The cherries should create a beautiful, colorful top layer.
Step 5: Chill and Set Refrigerate for at least 4 hours, but preferably overnight. This allows all the flavors to meld and the layers to set properly for clean, beautiful slices.
Step 6: Serve (Optional) For elegant presentation, garnish with fresh mint leaves or a sprinkle of toasted coconut flakes just before serving.
Expert Cooking Tips
- I always test my cream cheese by pressing it gently – it should give easily without being too soft or it won’t hold structure.
- Room temperature ingredients blend better – take cream cheese and whipped topping out 30 minutes before starting for smoothest results.
- Press crust firmly with measuring cup bottom to create an even, compact base that won’t crumble when serving.
- Use offset spatula for layering – it prevents tearing the cream layer when adding cherries and creates professional-looking edges.
- Score serving lines before chilling – lightly mark portions with knife tip, then chill for cleanest cuts when serving.
Storage Tips
- Refrigerate covered up to 4 days – wrap tightly with plastic wrap or store in airtight container to prevent absorption of other flavors.
- Freeze individual portions up to 2 months – wrap each slice in plastic wrap, then foil to prevent freezer burn and maintain texture.
- Thaw frozen portions in refrigerator overnight – never at room temperature to maintain food safety and prevent layer separation.
- Avoid storing near strong-smelling foods – the cream layer easily absorbs odors, so keep away from onions or garlic.
- Best served within 24 hours of making – flavors are most balanced and layers hold their distinct textures perfectly.
Variations and Substitutions
- Dairy-free version: Use dairy-free cream cheese and coconut whipped topping for identical texture and taste without compromising structure.
- Gluten-free option: Substitute graham crackers with gluten-free vanilla wafers or crushed gluten-free cookies for same buttery crunch.
- Fruit variations: Try blueberry, strawberry, or peach pie filling for seasonal twists while maintaining the same flavor balance.
- Chocolate twist: Add 2 tablespoons cocoa powder to cream layer and use chocolate cookie crumbs for decadent variation.
- Lighter version: Use reduced-fat cream cheese and sugar-free pudding mix instead of powdered sugar for fewer calories.
- Nutty addition: Fold chopped pecans or almonds into crust mixture for extra texture and sophisticated flavor profile.
What to Serve with No-Bake Cherry Yum Yum
- Strong black coffee or espresso – the bitter notes perfectly balance the sweet, creamy dessert and cleanse the palate beautifully.
- Vanilla ice cream scoop – adds temperature contrast and extra creaminess that enhances the overall indulgent experience without competing flavors.
- Fresh mint garnish – provides aromatic brightness and color contrast that elevates presentation while adding subtle freshness to each bite.
- Toasted coconut flakes – sprinkle on top for textural interest and subtle tropical notes that complement the cherry flavor perfectly.
- Sparkling water with lemon – offers palate-cleansing bubbles and citrus notes that cut through richness and prepare taste buds for more.
- Mixed berry compote – additional fruit flavors create a sophisticated dessert board presentation while adding natural tartness and color variety.
FAQ
Q: Can I make this ahead of time? A: Yes! It actually tastes better after chilling overnight as flavors meld together beautifully.
Q: Why is my cream layer lumpy? A: Cream cheese wasn’t fully softened. Next time, leave at room temperature longer before mixing.
Q: Can I use fresh cherries instead? A: Pie filling works best as fresh cherries release too much juice and make layers soggy.
Q: How do I get clean slices? A: Use a sharp knife dipped in warm water, wiping clean between each cut for perfect presentation.
Q: Can I substitute Cool Whip? A: Yes, frozen whipped topping and Cool Whip work interchangeably in this recipe without affecting texture.
Q: Why is my crust falling apart? A: Add more melted butter gradually until mixture holds together when pressed firmly in your palm.
- 0 Facebook
- 9 Pinterest
- 1 Email
- Copy Link
- 10 shares
No-Bake Cherry Yum Yum
Ingredients
Instructions
- Step 1: Prepare the Crust
Mix the graham cracker crumbs with melted butter until the mixture resembles wet sand and holds together when pressed. Press firmly into the bottom of a 9×13 inch dish, creating an even layer. The crust should feel compact and hold its shape.
- Step 2: Create the Cream Layer
In a large bowl, beat the softened cream cheese until completely smooth and fluffy, about 2-3 minutes. Gradually add powdered sugar in 2-3 additions, beating well after each addition until no lumps remain. Gently fold in the entire container of thawed whipped topping until just combined – don’t overmix or it will deflate.
- Step 3: Assemble the Layers
Spread the cream cheese mixture evenly over the graham cracker crust, smoothing with a spatula. Make sure to reach all corners and create an even surface for the cherry layer.
- Step 4: Add the Cherry Topping
Spoon the cherry pie filling over the cream layer, spreading gently to avoid disturbing the cream beneath. The cherries should create a beautiful, colorful top layer.
- Step 5: Chill and Set
Refrigerate for at least 4 hours, but preferably overnight. This allows all the flavors to meld and the layers to set properly for clean, beautiful slices.
- Step 6: Serve (Optional)
For elegant presentation, garnish with fresh mint leaves or a sprinkle of toasted coconut flakes just before serving.