- 0 Facebook
- 10 Pinterest
- 8 Email
- Copy Link
- 18 shares
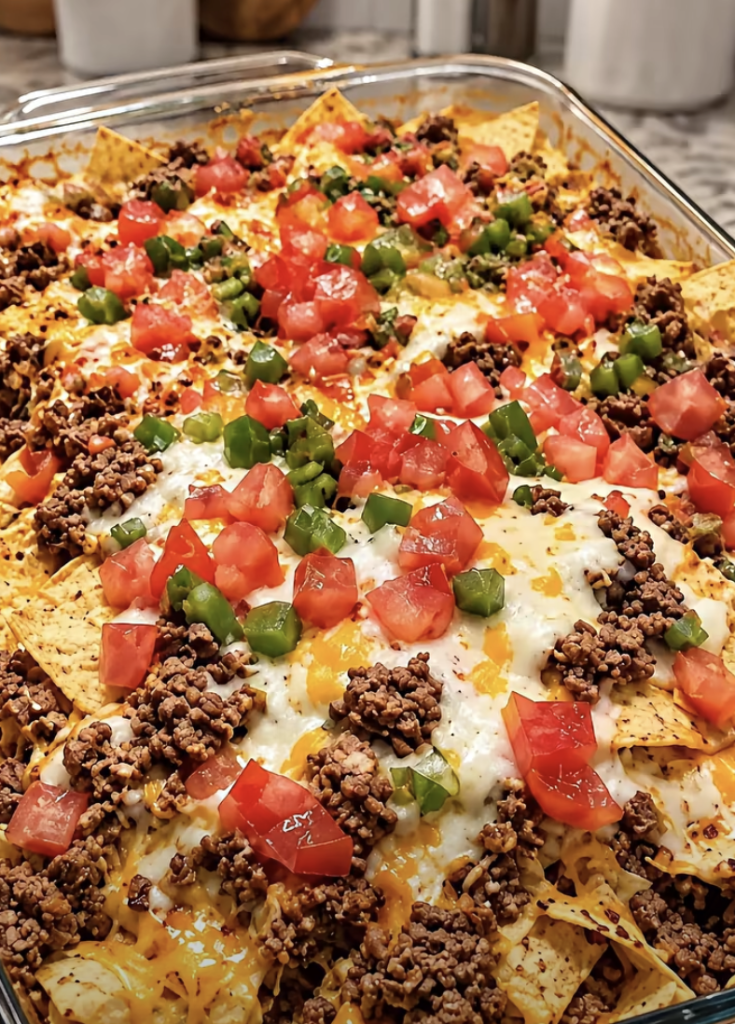
Crisp tortilla chips, smoky taco-spiced beef, and a blanket of cheddar and mozzarella that bubbles into golden, stretchy pockets: this nacho bake is a snack-night fantasy turned into a proper dinner. Everything comes together in one baking dish (no assembly-line fuss), with juicy tomatoes, sweet bell pepper, and zesty salsa tucked between the layers. Scoop it up hot, then dollop on cool sour cream and a scatter of cilantro for a homemade meal that leaves drive-thru cravings in the dust.
Why Make This Loaded Beef Nacho Bake?
Because it delivers all the fun of game-day nachos in a sturdy, scoopable dinner that feeds six with about 20 minutes of prep. Browning the beef with taco seasoning and a splash of water creates a juicy, saucy filling that clings to the chips instead of leaving them dry. Layering chips, beef, and cheese twice, rather than piling everything on top, gives you cheesy bites from corner to corner. A mix of sharp cheddar for flavor and mozzarella for that stretchy pull keeps it rich without being greasy, as long as the beef is well drained. Diced tomato, green pepper, and onion add sweetness and crunch, and the bake-until-bubbly method means no babysitting at the stove. It’s a reliable crowd-pleaser for picky eaters and hungry guests alike, and leftovers keep in the fridge for up to 3 days. Reheat them in a hot oven to bring back some of that crispness.
Ingredient Notes
The right ingredients turn a good Loaded Beef Nacho Bake into one that’s crispy, saucy, and gooey in all the right places. Here’s what each one does and how to get the best results.
The Base
- Ground beef (1 lb / 450 g) : This is the hearty, savory backbone of the dish. Choose 85/15 for the best balance of flavor and juiciness, and drain off excess fat after browning so the bake stays rich instead of greasy.
- Tortilla chips (10 oz bag) : These provide the crunch and structure. Pick thick, sturdy, restaurant-style chips that can hold up under the toppings, and skip thin chips, which turn soggy fast.
The Cheese
- Shredded cheddar cheese (2 cups) : Cheddar brings the sharp, tangy flavor that defines classic nachos. Shred it from a block if possible, since pre-shredded bags contain anti-caking agents that can keep it from melting smoothly.
- Shredded mozzarella cheese (1 cup) : Mozzarella adds the stretchy, golden pull everyone loves. Use low-moisture mozzarella, not fresh, which releases too much water and can make the layers soggy.
The Seasoning and Sauce
- Taco seasoning (1 oz packet) : This delivers the smoky, savory, slightly spicy flavor in the beef. Choose a brand with a moderate salt level, or use a homemade blend if you want to control the sodium.
- Water (1/2 cup) : Water dissolves the seasoning and simmers into a light sauce that coats the beef and keeps it juicy. For extra depth, low-sodium beef broth works as a swap.
- Salsa (1 cup) : Salsa adds tang, moisture, and a little heat between the layers. A thick, chunky variety works best, and watery salsa should be drained briefly so it doesn’t make the chips limp.
- Olive oil (1 tablespoon) : A little oil helps soften the onion and bell pepper and prevents sticking if the beef is very lean. Any neutral cooking oil, such as avocado or vegetable oil, can stand in.
- Garlic powder (1/2 teaspoon) : Garlic powder spreads savory depth evenly through the beef without the risk of burnt bits. In a pinch, one finely minced fresh garlic clove can replace it, cooked briefly until fragrant.
- Black pepper (1/2 teaspoon) : Pepper adds gentle warmth and rounds out the seasoning. Freshly ground has a brighter, more aromatic bite than pre-ground.
The Fresh Veggies
- Diced tomatoes (1 cup) : Tomatoes add juicy sweetness and a fresh contrast to the rich cheese and beef. Use ripe Roma tomatoes, or well-drained canned diced tomatoes, to keep extra liquid out of the dish.
- Green bell pepper (1, diced) : The pepper adds a crisp, slightly grassy flavor and a pop of color. Dice it small so it softens evenly as it bakes, or use red or orange pepper for a sweeter taste.
- Diced onion (1/2 cup) : Onion gives the filling savory sweetness and a subtle bite. Yellow or white onion works well, and finely diced pieces blend in better for picky eaters.
The Finishing Touches
- Sour cream (1/2 cup) : Sour cream cools down the spice and adds a creamy tang. Full-fat gives the best texture, and plain Greek yogurt is a good lighter substitute. Dollop it on after baking so it stays cool and creamy.
- Fresh cilantro (2 tablespoons, optional) : Cilantro adds a bright, herbal finish that lifts the whole dish. Chop it just before serving to keep its flavor vibrant, and swap in sliced green onions or parsley if cilantro isn’t your favorite.
Step-by-Step Instructions
- Preheat the oven to 375°F (190°C) and set out a 9×13-inch baking dish . Have your cheeses shredded and your tomatoes drained before you start so the assembly goes quickly.
- Heat the olive oil in a large skillet over medium heat. Sauté the diced onion and green bell pepper for 3 to 4 minutes, until the onion turns translucent and the pepper softens slightly.
- Add the ground beef to the skillet and break it into small crumbles with a wooden spoon. Cook for 6 to 8 minutes until no pink remains, then drain off the excess fat, which I never skip because it keeps the bake from turning greasy.
- Stir in the taco seasoning, garlic powder, black pepper, and water. Simmer for 3 to 4 minutes until the liquid reduces to a glossy sauce that clings to the beef; it may look thin at first, but it thickens as it simmers.
- Spread half the tortilla chips in the baking dish and spoon half the beef over them. Top with half the salsa, half the diced tomatoes, 1 cup of cheddar, and 1/2 cup of mozzarella.
- Repeat with the remaining chips, beef, salsa, and tomatoes, then finish with the remaining cheddar and mozzarella. Press down gently with the back of a spoon so the chips settle without crushing.
- Bake uncovered for 15 to 18 minutes, until the cheese is fully melted, bubbling at the edges, and lightly golden. I like to let it rest for 5 minutes afterward so the layers set and scoop out cleanly.
- Dollop the sour cream over the top and sprinkle with the chopped cilantro. Serve straight from the dish while the cheese is still stretchy.
Pro tip: If the top browns faster than the cheese melts, loosely tent the dish with foil for the first 10 minutes of baking, then uncover to finish.
Reminder: Let leftovers cool completely before storing them in an airtight container in the fridge for up to 3 days, and reheat them in a hot oven rather than the microwave to bring back some crunch.
Variations & Substitutions
This Loaded Beef Nacho Bake is forgiving, so adjust it to fit your pantry, your diet, or your heat tolerance. These are the swaps I trust most.
- Swap the protein : Ground turkey or chicken replaces the beef evenly. Add an extra tablespoon of olive oil for the leaner meat, and cook until no pink remains.
- Make it vegetarian : Replace the beef with two drained, rinsed cans of black beans and 8 ounces of finely chopped sautéed mushrooms, keeping the same seasoning.
- Dairy-free option : Use dairy-free cheddar-style and mozzarella-style shreds, and swap the sour cream for cashew cream. Watch the bake closely, since melt times vary by brand.
- Turn up the heat : I fold diced jalapeños or a tablespoon of chopped chipotle in adobo into the beef, or swap pepper jack for half the cheddar.
- Gluten-free version : Choose chips and taco seasoning labeled gluten-free, since some packets contain wheat-based fillers. The rest of the recipe is naturally gluten-free.
- Add corn for bulk : Stir 1 cup of drained corn kernels into the beef for sweetness and extra volume, which helps stretch the dish for a bigger crowd.
Serving Suggestions
- Serve it family-style, straight from the dish: After the 5-minute rest, bring the Loaded Beef Nacho Bake to the table in its baking dish and cut it into generous squares with a wide spatula so the layers stay intact. Add the sour cream and cilantro just before serving so they stay cool and bright against the hot cheese. I like to set out small bowls of extra salsa, sliced jalapeños, lime wedges, and sliced green onions so everyone can build their own plate.
- Balance the richness with something crisp and acidic: Between the cheddar, mozzarella, and seasoned beef, this dish is hearty, so it needs a fresh counterpoint. A crunchy salad of shredded romaine, cucumber, radish, and cherry tomatoes with a lime vinaigrette cuts through the cheese beautifully. A quick cabbage slaw with lime juice and a pinch of salt works just as well.
- Turn it into a full meal: Warm black beans, grilled corn rubbed with lime and chili powder, or a scoop of guacamole round out the plate without competing with the beef. Since the chips already supply plenty of starch, I usually skip rice and let the salad and beans carry the sides.
- Match the drink to the occasion: For game night or a crowd, an ice-cold Mexican lager or a salt-rimmed margarita matches the bold taco flavors. For a family weeknight dinner, sparkling limeade or a pitcher of cucumber-lime agua fresca refreshes the palate between cheesy bites.
Make-Ahead Tips for Loaded Beef Nacho Bake
This Loaded Beef Nacho Bake is a dream for meal prep on busy weeknights, and yes, you can make it ahead of time! Cook the seasoned beef, onion, and pepper up to 3 days in advance, then refrigerate in an airtight container (this also deepens the flavor). Shred the cheeses and dice the tomatoes up to 24 hours ahead, storing them separately so nothing turns watery. Keep the chips sealed at room temperature, since assembling early makes them soggy. When you’re ready, rewarm the beef, layer everything, and bake 15 to 18 minutes, adding a few extra minutes if the filling is cold, for a just-as-delicious dinner with almost no effort.
Expert Tips
- Shred your own cheese : Block cheddar melts smoother than pre-shredded, which contains anti-caking agents. Pair it with low-moisture mozzarella for a stretchy pull without extra water.
- Drain wet toppings : Let the diced tomatoes sit in a strainer and spoon the chunky part of the salsa from the jar, so extra liquid never turns the chips soggy.
- Pick sturdy chips : Thick, restaurant-style tortilla chips stand up to the beef and salsa. Press them down gently with a spoon so they settle without crushing.
- Reduce the sauce : I simmer the taco seasoning and water until glossy and clinging to the beef, because a runny filling soaks the bottom layer of chips.
- Tent with foil : If your Loaded Beef Nacho Bake browns before the cheese fully melts, cover it loosely for the first 10 minutes, then uncover to finish.
- Rest, then garnish : I let the dish sit for 5 minutes so the layers set, then add the sour cream and cilantro so they stay cool and fresh.
Storage & Freezing
- Refrigerator (up to 3 days): Let the bake cool completely, and get it into the fridge within 2 hours of leaving the oven . Spoon portions into shallow airtight containers, or cover the baking dish tightly with foil. Hot steam trapped under a lid turns the chips to mush, so don’t rush this step. Expect the chips to soften as they absorb sauce from the beef and salsa. Leave off the sour cream and cilantro and add them fresh after reheating, since sour cream turns watery and cilantro wilts.
- Freezer (up to 2 months): I don’t freeze the fully assembled Loaded Beef Nacho Bake, because the chips, tomatoes, and salsa release moisture as they thaw and leave you with a soggy, grainy result. Instead, I freeze the cooked, drained beef filling flat in a zip-top freezer bag and thaw it overnight in the fridge. Then I layer it with fresh chips, salsa, tomatoes, and cheese and bake as usual. Shredded cheese freezes well too, so you can stash a bag alongside the beef for a fast weeknight dinner. Sour cream doesn’t freeze well because it separates, so always add it fresh.
- Reheating (hot oven , not the microwave): Heat leftovers in a 350°F (175°C) oven , covered loosely with foil, for 10 to 15 minutes until hot throughout (165°F / 74°C). Then uncover for 3 to 5 minutes so the cheese bubbles and the top chips crisp up. If the bottom layer looks dry, scatter a few fresh chips and a handful of cheddar on top before the uncovered stretch. This revives both the crunch and the melt. The microwave heats quickly but leaves the chips soft and chewy, so I save it for emergencies only.
Recipe FAQs
- Can I assemble this Loaded Beef Nacho Bake ahead of time? Prep the beef ahead; layer and bake fresh.
- Why drain the beef and tomatoes first? Draining prevents greasy, soggy chips.
- Which tortilla chips work best here? I choose thick, restaurant-style chips; they stay crisp.
- How do I store and reheat leftovers? Reheat in a hot oven; fridge up to 3 days.
- 0 Facebook
- 10 Pinterest
- 8 Email
- Copy Link
- 18 shares
Irresistible Loaded Beef Nacho Bake Your Family Will Crave
Ingredients
Instructions
Preheat the oven to 375°F (190°C) and set out a 9×13-inch baking dish. Have your cheeses shredded and your tomatoes drained before you start so the assembly goes quickly.
Heat the olive oil in a large skillet over medium heat. Sauté the diced onion and green bell pepper for 3 to 4 minutes, until the onion turns translucent and the pepper softens slightly.
Add the ground beef to the skillet and break it into small crumbles with a wooden spoon. Cook for 6 to 8 minutes until no pink remains, then drain off the excess fat.
Stir in the taco seasoning, garlic powder, black pepper, and water. Simmer for 3 to 4 minutes until the liquid reduces to a glossy sauce that clings to the beef.
Spread half the tortilla chips in the baking dish and spoon half the beef over them. Top with half the salsa, half the diced tomatoes, 1 cup of cheddar, and 1/2 cup of mozzarella.
Repeat with the remaining chips, beef, salsa, and tomatoes, then finish with the remaining cheddar and mozzarella. Press down gently with the back of a spoon so the chips settle without crushing.
Bake uncovered for 15 to 18 minutes, until the cheese is fully melted, bubbling at the edges, and lightly golden. Let it rest for 5 minutes afterward so the layers set and scoop out cleanly.
Dollop the sour cream over the top and sprinkle with the chopped cilantro. Serve straight from the dish while the cheese is still stretchy.
Pro tip: If the top browns faster than the cheese melts, loosely tent the dish with foil for the first 10 minutes of baking, then uncover to finish.
Notes
Shred your own cheese: Block cheddar melts smoother than pre-shredded; pair with low-moisture mozzarella for a stretchy pull without extra water.
Drain wet toppings: Let the diced tomatoes sit in a strainer and spoon the chunky part of the salsa from the jar so extra liquid never turns the chips soggy.
Pick sturdy chips: Thick, restaurant-style tortilla chips stand up to the beef and salsa. Press them down gently with a spoon so they settle without crushing.
Reduce the sauce: Simmer the taco seasoning and water until glossy and clinging to the beef to avoid a runny filling that soaks the chips.
Tent with foil if needed: If the top browns before the cheese fully melts, cover loosely for the first 10 minutes, then uncover to finish.
Rest, then garnish: Let the dish sit for 5 minutes so the layers set, then add the sour cream and cilantro so they stay cool and fresh.
Storage — Refrigerator (up to 3 days): Cool completely and refrigerate in shallow airtight containers or tightly covered; leave off sour cream and cilantro and add fresh after reheating.
Storage — Freezer (up to 2 months): Freeze the cooked, drained beef filling separately (flat in a freezer bag) rather than the assembled bake. Thaw overnight and assemble with fresh chips, salsa, tomatoes, and cheese before baking.
Reheating (oven recommended): Reheat leftovers in a 350°F (175°C) oven, covered loosely with foil, for 10 to 15 minutes until hot (165°F / 74°C), then uncover 3 to 5 minutes to crisp the top. If the bottom is dry, scatter a few fresh chips and cheddar on top before finishing uncovered.
Nutrition
| Serving Size | 1/6 of recipe |
|---|---|
| Calories | 670 kcal |
| Sugar Content | 4 g |
| Sodium Content | 870 mg |
| Fat Content | 42 g |
| Saturated Fat Content | 18 g |
| Unsaturated Fat Content | 22 g |
| Trans Fat Content | 0.5 g |
| Carbohydrate Content | 35 g |
| Fiber Content | 4 g |
| Protein Content | 28 g |
| Cholesterol Content | 120 mg |