- 0 Facebook
- 9 Pinterest
- 0 Email
- Copy Link
- 9 shares
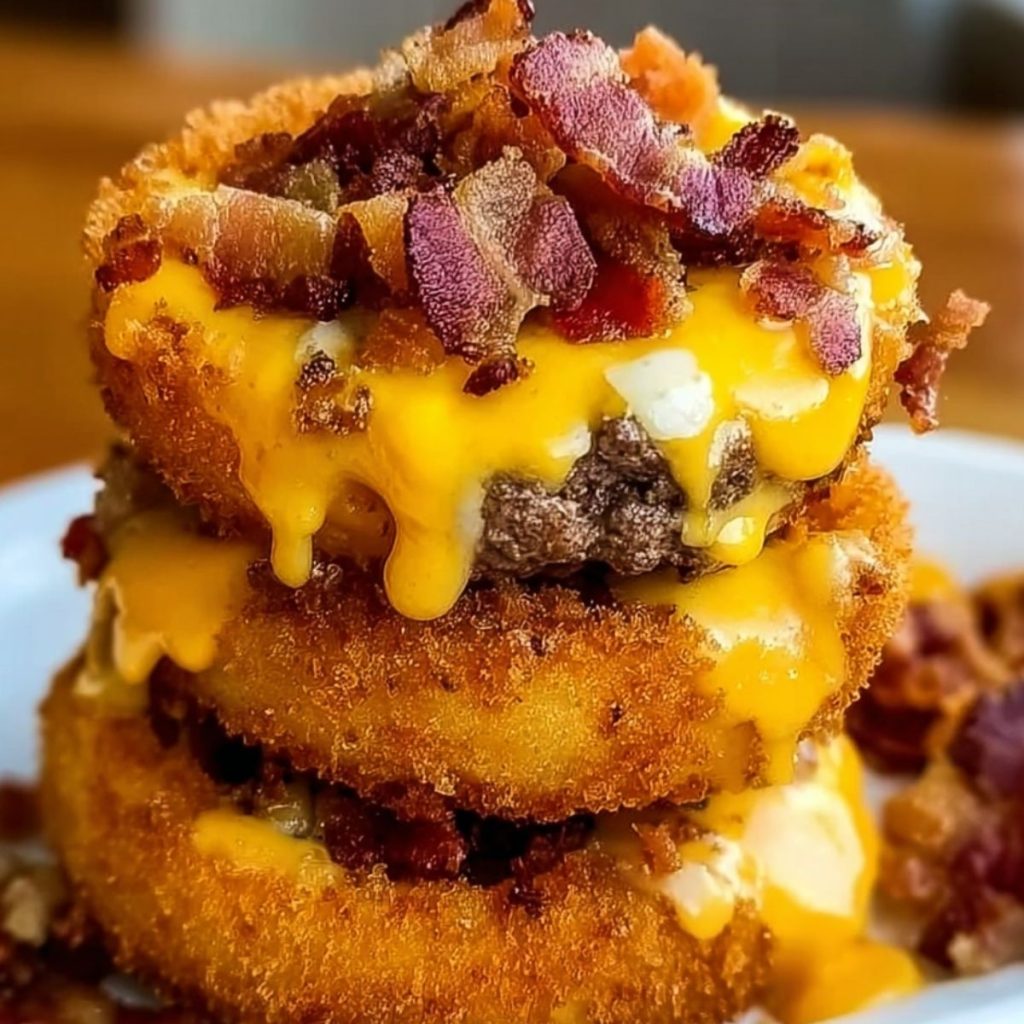
These Ultimate Loaded Bacon Cheeseburger Onion Rings deliver the perfect marriage of two beloved comfort foods in one irresistible bite. Crispy golden onion rings serve as edible vessels for a savory ground beef filling, studded with crumbled bacon and melted cheddar that oozes with each mouthwatering bite. The contrast between the crunchy breaded exterior and the juicy, flavorful center creates a textural masterpiece that transforms ordinary onion rings into an extraordinary snacking experience. Serve these indulgent rings with cool ranch dressing for the ultimate dipping pleasure.
Why It’s a Trusted Favorite
These Loaded Bacon Cheeseburger Onion Rings combine the best of two worlds in one addictive, shareable treat. Here’s why they deserve a spot in your recipe collection:
- Flavor Explosion : Each bite delivers the perfect balance of savory beef, smoky bacon, melted cheese, and sweet onion wrapped in a crispy golden coating.
- Perfect Party Food : These impressive rings consistently disappear first at gatherings, with their grab-and-dip format making them ideal for mingling and game day spreads.
- Make-Ahead Magic : Prepare the beef mixture and slice the onions up to 24 hours ahead – a technique that actually enhances flavor development before final assembly and frying.
- Customization Champion : The basic method works beautifully with ground turkey or plant-based alternatives, and the seasoning profile can be adjusted for spice lovers or milder palates.
- Crispy-Tender Balance : The triple coating method (flour, egg, breadcrumbs) creates that restaurant-quality crunch while protecting the juicy filling – no soggy rings or dry centers.
Ingredient Notes
The secret to these Ultimate Loaded Bacon Cheeseburger Onion Rings lies in the quality and preparation of each ingredient. Every component plays a crucial role in creating that perfect balance of flavors and textures that makes this recipe truly exceptional.
- Ground beef : Opt for 80/20 lean-to-fat ratio for the juiciest filling. The fat content helps maintain moisture while providing rich flavor during the quick frying process.
- Shredded cheddar cheese : Use medium or sharp cheddar for best flavor, and always shred it yourself rather than using pre-shredded varieties which contain anti-caking agents that prevent proper melting.
- Onion : Sweet varieties like Vidalia or Walla Walla work beautifully here, providing natural sweetness that balances the savory filling. Look for large, uniform rings for easier stuffing.
- All-purpose flour : This creates the essential first layer of the breading station, helping the egg wash adhere properly. For a gluten-free option, rice flour makes an excellent substitute.
- Breadcrumbs : Panko delivers superior crispness compared to regular breadcrumbs due to its larger, airier structure. Toast them briefly in a dry pan for even more crunch.
- Eggs : Room temperature eggs create a more consistent coating. The proteins in the eggs act as the critical “glue” that binds the breadcrumbs to the flour-dusted rings.
- Worcestershire sauce : This fermented condiment adds complex umami depth to the beef. Just a tablespoon transforms ordinary ground beef into something extraordinary.
- Garlic powder : Provides even garlic flavor throughout the meat mixture without the moisture or burning risk of fresh garlic. For extra depth, try roasted garlic powder.
- Onion powder : Complements the fresh onion rings with concentrated flavor in the beef mixture. This creates a harmonious layering of onion flavors throughout the dish.
- Salt and pepper : Diamond Crystal kosher salt and freshly ground black pepper offer superior flavor and control. Remember that the cheese and bacon will add saltiness too.
- Bacon : Pre-cook until crisp then crumble finely for even distribution throughout the beef mixture. Applewood or hickory-smoked varieties add wonderful depth of flavor.
- Ranch dressing : The cooling, creamy tanginess provides the perfect counterpoint to the rich, crispy rings. Consider making homemade for best results, or doctor store-bought with fresh herbs.
- Oil for frying : Choose a neutral oil with a high smoke point such as peanut, canola or vegetable oil. Maintain a consistent 350-375°F for perfect golden-brown results without greasiness.
Step-by-Step Instructions
- Cook the bacon until crispy, then crumble finely and set aside. I like to use the oven method at 400°F for uniform results without the splatter.
- Mix the ground beef in a large bowl with the crumbled bacon, shredded cheddar, Worcestershire sauce, garlic powder, onion powder, salt, and pepper until well combined but not overworked.
- Slice the onion into thick rings (about ½-inch wide), then carefully separate the layers to create rings of different sizes. Choose rings that will hold about 2 tablespoons of the beef mixture.
- Stuff each onion ring with the beef mixture, pressing gently to fill the entire ring while keeping the meat flush with the edges. The meat should be packed firmly enough to hold together but not so tight that it expands beyond the onion during cooking.
- Set up a breading station with three shallow dishes: flour seasoned with salt and pepper in the first, beaten eggs in the second, and breadcrumbs in the third. Dredge each stuffed ring first in flour, then egg, and finally coat thoroughly with breadcrumbs.
- Heat oil in a deep fryer or large pot to 350°F. Working in batches to avoid overcrowding, fry the rings for 3-4 minutes until golden brown and the beef is cooked through (165°F internal temperature).
- Transfer the fried rings to a paper towel-lined plate to drain excess oil. These are best served immediately while the exterior is crispy and the cheese is still wonderfully melty.
- Serve with ranch dressing for dipping, and prepare for these to disappear quickly! The contrast between the crispy coating, sweet onion, and savory filling is absolutely irresistible.
Variations & Substitutions
Don’t have every ingredient on hand or want to customize these loaded rings to your taste? These onion rings are incredibly versatile and forgiving!
Meat alternatives: Ground turkey or chicken work beautifully as lighter options – just add an extra tablespoon of Worcestershire sauce to enhance the savory flavor. For plant-based eaters, seasoned Impossible or Beyond meat makes a remarkably similar substitute.
Cheese swaps: While cheddar is the classic choice, I love experimenting with pepper jack for heat, smoked gouda for depth, or even blue cheese crumbles for a gourmet twist. Just ensure whatever cheese you use melts well.
Gluten-free adaptation: Replace all-purpose flour with rice flour or a gluten-free all-purpose blend, and use gluten-free panko breadcrumbs for the coating. The texture remains wonderfully crisp!
Spice it up: Add 1-2 tablespoons of diced jalapeños to the beef mixture for a kick, or incorporate 1 teaspoon of cayenne or chipotle powder for smoky heat throughout.
Air fryer version: While traditional deep-frying gives the best texture, you can spray the breaded rings generously with oil and air fry at 375°F for 8-10 minutes for a lighter approach. The texture won’t be identical, but they’ll still be delicious.
Dipping variations: Ranch is classic, but try barbecue sauce, honey mustard, or a spicy sriracha mayo to complement different flavor profiles in your customized rings.
Storage & Freezing
These Loaded Bacon Cheeseburger Onion Rings are definitely best enjoyed fresh from the fryer, but proper storage can help maintain their quality if you have leftovers. Here’s how to handle them:
For refrigeration, place completely cooled onion rings in a single layer in an airtight container lined with paper towels to absorb excess moisture. They’ll keep for up to 2 days, though the crispy coating will naturally soften over time. I’ve found that separating layers with parchment paper helps prevent them from sticking together.
While freezing is possible, it does affect the texture significantly. If you must freeze them, place cooled rings on a baking sheet in a single layer until frozen solid (about 2 hours), then transfer to a freezer bag with parchment between layers. Freeze for up to 1 month.
To reheat, the oven is your best friend! Place refrigerated or frozen rings on a wire rack over a baking sheet and heat at 375°F for 7-10 minutes (or 15 minutes if frozen). This method helps restore some crispness to the coating while ensuring the beef filling heats through properly. Avoid microwaving as it will make the once-crispy coating soggy and rubbery.
Make Ahead Options
These Loaded Bacon Cheeseburger Onion Rings are perfect for meal prep enthusiasts looking to streamline their party preparations! You can prepare the seasoned beef mixture up to 24 hours ahead and store it covered in the refrigerator , which actually allows the flavors to meld beautifully. The onion rings can also be sliced and separated up to 12 hours in advance (store in cold water to prevent browning, then pat completely dry before stuffing). For even more convenience, stuff the rings and complete the entire breading process up to 4 hours ahead, then refrigerate on a parchment-lined tray until ready to fry. When you’re ready to serve, simply heat your oil to 350°F and fry as directed – you’ll have restaurant-quality results with minimal last-minute effort!
Expert Tips
Here are some hard-won secrets to make your Loaded Bacon Cheeseburger Onion Rings absolutely perfect:
- Choose the right onions: Sweet onions like Vidalia have wider, sturdier rings that hold more beef filling without breaking. Look for large onions with well-defined layers.
- Pre-chill the stuffed rings: I’ve found that 15 minutes in the refrigerator after stuffing helps the beef mixture firm up, making the breading process much cleaner and preventing filling from escaping.
- Double-dredge for extra crunch: For restaurant-quality crispiness, after the initial breading, dip the rings back in egg and then panko again. This creates that satisfying shattering crunch when you bite in.
- Temperature matters: Use an instant-read thermometer to maintain oil at exactly 350°F. Too hot and the coating burns before the beef cooks; too cool and the rings absorb excess oil, becoming greasy.
- Drain properly: After frying, stand the Loaded Bacon Cheeseburger Onion Rings vertically on paper towels rather than stacking them flat. This prevents steam from softening the bottom side.
- Season immediately: Sprinkle a pinch of salt over the rings the moment they come out of the fryer while the surface is still hot and slightly oily – this creates the perfect seasoning that sticks.
Serving Suggestions
These Loaded Bacon Cheeseburger Onion Rings deserve to be the star of the show, but knowing how to serve them can elevate your meal from great to unforgettable!
I love arranging these golden beauties in a spiral tower on a serving platter, with a small bowl of ranch dressing nestled in the center for communal dipping. The vertical presentation not only looks impressive but helps maintain that perfect crispiness all around each ring.
For a complete meal, pair these hearty rings with lighter sides that provide contrast—a tangy coleslaw with apple cider vinegar dressing cuts through the richness beautifully, or a simple arugula salad with lemon vinaigrette adds a peppery freshness. If you’re serving these at a game day gathering, complement them with other finger foods like buffalo chicken dip or loaded potato skins for an indulgent spread.
These Loaded Bacon Cheeseburger Onion Rings make an excellent appetizer for burger night too—serve them before bringing out classic cheeseburgers and fries for a themed dinner that celebrates all the beloved burger flavors in different forms. For drinks, a cold craft beer or even a spiked milkshake makes for a deliciously indulgent pairing that complements the savory, cheesy flavors.
Recipe FAQs
Can I bake these instead of frying? Yes, but the coating won’t be as crispy.
What’s the best type of onion to use? Sweet onions like Vidalia work perfectly.
Can I prepare these ahead of time? Yes, stuff and bread them up to 4 hours before.
Can I use turkey instead of beef? Absolutely! Just add a touch more seasoning.
How do I know when they’re fully cooked? They’ll reach 165°F internally when done.
Will panko breadcrumbs make a difference? I always use panko for superior crunchiness.
- 0 Facebook
- 9 Pinterest
- 0 Email
- Copy Link
- 9 shares
Ultimate Loaded Bacon Cheeseburger Onion Rings
Ingredients
Instructions
Cook the bacon until crispy, then crumble finely and set aside. I like to use the oven method at 400°F for uniform results without the splatter.
Mix the ground beef in a large bowl with the crumbled bacon, shredded cheddar, Worcestershire sauce, garlic powder, onion powder, salt, and pepper until well combined but not overworked.
Slice the onion into thick rings (about ½-inch wide), then carefully separate the layers to create rings of different sizes. Choose rings that will hold about 2 tablespoons of the beef mixture.
Stuff each onion ring with the beef mixture, pressing gently to fill the entire ring while keeping the meat flush with the edges. The meat should be packed firmly enough to hold together but not so tight that it expands beyond the onion during cooking.
Set up a breading station with three shallow dishes: flour seasoned with salt and pepper in the first, beaten eggs in the second, and breadcrumbs in the third. Dredge each stuffed ring first in flour, then egg, and finally coat thoroughly with breadcrumbs.
Heat oil in a deep fryer or large pot to 350°F. Working in batches to avoid overcrowding, fry the rings for 3-4 minutes until golden brown and the beef is cooked through (165°F internal temperature).
Transfer the fried rings to a paper towel-lined plate to drain excess oil. These are best served immediately while the exterior is crispy and the cheese is still wonderfully melty.
Serve with ranch dressing for dipping, and prepare for these to disappear quickly! The contrast between the crispy coating, sweet onion, and savory filling is absolutely irresistible.
Notes
Choose the right onions: Sweet onions like Vidalia have wider, sturdier rings that hold more beef filling without breaking. Look for large onions with well-defined layers.
Pre-chill the stuffed rings: I’ve found that 15 minutes in the refrigerator after stuffing helps the beef mixture firm up, making the breading process much cleaner and preventing filling from escaping.
Double-dredge for extra crunch: For restaurant-quality crispiness, after the initial breading, dip the rings back in egg and then panko again. This creates that satisfying shattering crunch when you bite in.
Temperature matters: Use an instant-read thermometer to maintain oil at exactly 350°F. Too hot and the coating burns before the beef cooks; too cool and the rings absorb excess oil, becoming greasy.
Drain properly: After frying, stand the Loaded Bacon Cheeseburger Onion Rings vertically on paper towels rather than stacking them flat. This prevents steam from softening the bottom side.
Season immediately: Sprinkle a pinch of salt over the rings the moment they come out of the fryer while the surface is still hot and slightly oily – this creates the perfect seasoning that sticks.
Nutrition
| Serving Size | 2-3 onion rings |
|---|---|
| Calories | 350 calories |
| Sugar Content | 2g |
| Sodium Content | 800mg |
| Fat Content | 24g |
| Saturated Fat Content | 8g |
| Unsaturated Fat Content | 12g |
| Trans Fat Content | 0g |
| Carbohydrate Content | 30g |
| Fiber Content | 1g |
| Protein Content | 18g |
| Cholesterol Content | 120mg |