Introduction
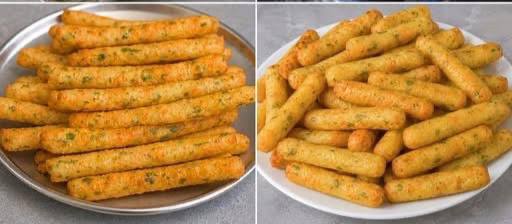
Get ready to meet your new favorite snack obsession: Easy Crispy Sticks! These delightful, golden-brown wonders are the perfect answer to those cravings for something crunchy, savory, and utterly satisfying. Forget store-bought chips or crackers; these homemade crispy sticks deliver an unparalleled freshness and a burst of flavor that will have everyone reaching for more. They’re incredibly versatile, making them ideal as a quick snack on their own, a fantastic appetizer to kick off any meal, or even a delightful accompaniment to your favorite dips and sauces. The best part? True to their name, they are genuinely easy to make, requiring minimal ingredients and a straightforward process that even beginner cooks can master with confidence.
What sets these Easy Crispy Sticks apart is their perfect balance of textures and tastes. Imagine a beautifully seasoned exterior that shatters with an audible crunch, giving way to a tender, slightly chewy interior. Each bite is a symphony of flavor, infused with aromatic herbs and a subtle warmth from carefully selected spices. They’re designed to be light enough not to spoil your appetite but substantial enough to truly hit the spot. Whether you’re hosting a gathering, looking for a delicious after-school treat, or simply want to elevate your snack game, these crispy sticks are a guaranteed crowd-pleaser that will disappear from the plate almost as quickly as they appear.
This recipe isn’t just about making delicious food; it’s about making delicious food accessible and enjoyable for everyone. We’ve streamlined the steps and focused on simple techniques to ensure that you can achieve perfect results every time, without any fuss or complicated equipment. From mixing a few basic pantry staples to achieving that coveted golden crisp, you’ll find the entire process to be surprisingly effortless and incredibly rewarding. So, roll up your sleeves, gather your ingredients, and prepare to unlock the secret to these irresistible Easy Crispy Sticks that are bound to become a staple in your culinary repertoire.
Nutritional Information
Per serving (approximate values):
- Calories: 180
- Protein: 5g
- Carbohydrates: 25g
- Fat: 7g
- Fiber: 2g
- Sodium: 280mg
Ingredients
- 2 cups (240g) all-purpose flour, plus more for dusting
- 1 teaspoon baking powder
- 1 teaspoon salt
- 1/2 teaspoon garlic powder
- 1/2 teaspoon onion powder
- 1/2 teaspoon dried oregano
- 1/4 teaspoon black pepper
- 1/4 teaspoon paprika (smoked or sweet, depending on preference)
- 1/4 cup (60ml) olive oil, plus more for brushing
- 1/2 cup (120ml) warm water (approximately 105-115°F / 40-46°C)
- 2 tablespoons grated Parmesan cheese (optional, for extra flavor)
- 1 tablespoon chopped fresh parsley (for garnish, optional)
Instructions
- Prepare the Dry Ingredients: In a large mixing bowl, whisk together the all-purpose flour, baking powder, salt, garlic powder, onion powder, dried oregano, black pepper, and paprika. Make sure all ingredients are well combined to ensure even flavor distribution throughout the sticks.
- Add Wet Ingredients: Create a well in the center of the dry ingredients. Pour in the olive oil and warm water. If using, add the optional grated Parmesan cheese at this stage.
- Form the Dough: Using a wooden spoon or your hands, gradually mix the wet ingredients into the dry ingredients until a shaggy dough forms. Once most of the flour is incorporated, turn the dough out onto a lightly floured surface.
- Knead the Dough: Knead the dough for about 5-7 minutes, or until it becomes smooth and elastic. If the dough is too sticky, add a tiny bit more flour, a teaspoon at a time. If it’s too dry, add a tiny bit more warm water. The dough should be firm but pliable.
- Rest the Dough: Form the dough into a ball, lightly brush it with a little olive oil to prevent drying, and place it back into the bowl. Cover the bowl with a clean kitchen towel or plastic wrap and let it rest at room temperature for 20-30 minutes. This resting period allows the gluten to relax, making the dough easier to roll out and resulting in a more tender crumb.
- Preheat Oven and Prepare Baking Sheets: While the dough is resting, preheat your oven to 400°F (200°C). Line two large baking sheets with parchment paper. This will prevent sticking and make cleanup much easier.
- Roll Out the Dough: Divide the rested dough into two equal portions. On a lightly floured surface, take one portion of dough and roll it out into a rectangle, approximately 1/8 to 1/4 inch thick. The thinner you roll it, the crispier the sticks will be. Aim for a consistent thickness across the entire sheet of dough.
- Cut the Sticks: Using a pizza cutter or a sharp knife, cut the dough into long, thin strips, about 1/4 to 1/2 inch wide and 4-6 inches long. You can make them shorter or longer depending on your preference.
- Arrange on Baking Sheets: Carefully transfer the cut dough sticks to the prepared baking sheets, arranging them in a single layer. Try not to overcrowd the baking sheets, as this can lead to uneven baking and prevent them from getting perfectly crispy. Leave a little space between each stick.
- Brush with Olive Oil: Lightly brush the tops of the dough sticks with a little extra olive oil. This helps with browning and adds to the overall crispiness.
- Bake the Crispy Sticks: Bake for 12-18 minutes, or until the sticks are golden brown and crispy. Baking time may vary depending on your oven and the thickness of your sticks. Halfway through baking (around 8-10 minutes), rotate the baking sheets from top to bottom and front to back to ensure even cooking and browning. Keep a close eye on them during the last few minutes to prevent burning.
- Cool and Garnish: Once baked, remove the crispy sticks from the oven and transfer them to a wire rack to cool completely. They will crisp up further as they cool. If desired, sprinkle with fresh chopped parsley before serving.
- Repeat for Remaining Dough: Repeat steps 7-12 with the second portion of dough.
- Serve: Serve your Easy Crispy Sticks warm or at room temperature with your favorite dips!
Cooking Tips and Variations
To achieve the ultimate crispiness for your Easy Crispy Sticks, several factors are crucial. Firstly, ensure your oven is fully preheated to the specified temperature. A cold oven will result in a chewier texture rather than the desired crisp. Secondly, when rolling out the dough, aim for a consistent thickness, ideally between 1/8 and 1/4 inch. Thinner dough yields a crispier stick, while thicker dough will be slightly more tender in the center. Don’t be afraid to roll it out quite thin! Overcrowding your baking sheets is a common mistake; leave adequate space between each stick to allow for proper air circulation, which is essential for even baking and browning. If the sticks are too close together, they will steam rather than bake, leading to a softer texture. Rotating your baking sheets halfway through the baking process is also key for uniform crispness and color across all your sticks.
There are numerous ways to customize these crispy sticks to suit your taste preferences. For a delightful cheesy variation, you can knead in an additional 1/4 cup of finely grated Parmesan or Pecorino Romano cheese directly into the dough. Alternatively, sprinkle a light layer of cheese over the sticks after brushing with olive oil, right before baking, for a golden, bubbly cheese crust. If you’re a fan of spicy food, add a pinch of cayenne pepper or red pepper flakes to the dry ingredients for a subtle kick. For an Italian herb blend, swap out the individual herbs for 1.5 teaspoons of a pre-mixed Italian seasoning. You can also experiment with different seed toppings; after brushing with olive oil, sprinkle with sesame seeds, poppy seeds, or even a mix of everything bagel seasoning for an extra layer of flavor and texture. For a sweet and savory twist, omit the garlic and onion powder, and instead add a teaspoon of cinnamon and a tablespoon of sugar to the dough, then sprinkle with a cinnamon-sugar mixture before baking for a dessert-like treat.
Consider the type of flour you use; while all-purpose flour works perfectly, using a blend of all-purpose and semolina flour (about 1.5 cups all-purpose to 0.5 cup semolina) can add a slightly coarser texture and nutty flavor, reminiscent of traditional Italian breadsticks. For those looking for a gluten-free option, a 1:1 gluten-free all-purpose flour blend can often be substituted, though you might need to adjust the water slightly and the dough may be a bit more delicate to handle. Always check the specific recommendations for your chosen gluten-free flour. To ensure even cooking and prevent burning, especially with thinner sticks, keep a close eye on them during the last few minutes of baking. Ovens can vary significantly, so what takes 12 minutes in one oven might take 18 in another. The goal is a uniform golden-brown color. If you find some portions browning faster than others, you can carefully remove the darker sticks and continue baking the lighter ones for a few more minutes. Finally, for an extra burst of fresh flavor, a light sprinkle of flaky sea salt immediately after they come out of the oven can elevate their taste profile even further.
Storage and Reheating
To maintain the delightful crispiness of your Easy Crispy Sticks, proper storage is essential. Once they have cooled completely to room temperature, transfer them to an airtight container. Placing them in a container while still warm will create condensation, making them soft and soggy. Store the airtight container at room temperature for up to 3-4 days. While they will still be delicious, their crispness will naturally diminish slightly over time. For longer storage, you can freeze unbaked dough strips for up to 1 month. Simply arrange them in a single layer on a parchment-lined baking sheet, freeze until solid, then transfer to a freezer-safe bag. When ready to bake, place them directly on a baking sheet (no need to thaw) and bake as directed, adding a few extra minutes to the baking time.
If your crispy sticks have lost some of their initial crunch, they are very easy to revive. To reheat and restore crispiness, preheat your oven or toaster oven to 350°F (175°C). Spread the crispy sticks in a single layer on a baking sheet. Heat for 5-7 minutes, or until they are warmed through and have regained their desired crisp texture. Be careful not to overheat, as they can quickly become too hard or even burn. Avoid using a microwave for reheating, as it will only make them softer and chewier, completely counteracting their intended crispy texture. For a quick refresh, an air fryer can also work wonders. Preheat the air fryer to 350°F (175°C) and air fry for 2-3 minutes, shaking the basket halfway through, until crispy. Always let them cool for a minute or two after reheating, as they will crisp up further as they cool down.
Frequently Asked Questions
What kind of dips pair well with these crispy sticks?
These versatile crispy sticks are fantastic with a wide variety of dips! Classic choices include marinara sauce, warm cheese dip, or a simple garlic aioli. For a fresh and tangy option, try a Greek yogurt dip seasoned with dill and lemon, or a creamy hummus. They also pair wonderfully with guacamole, spinach and artichoke dip, or even a spicy sriracha mayo for those who like a kick. Don’t be afraid to experiment with your favorite store-bought or homemade dips!
Can I make the dough ahead of time?
Yes, absolutely! You can prepare the dough up to 24 hours in advance. After kneading, form the dough into a ball, lightly brush with olive oil, place it in an airtight container or cover tightly with plastic wrap, and refrigerate. When you’re ready to bake, remove the dough from the refrigerator and let it sit at room temperature for about 30 minutes to an hour to soften slightly before rolling and cutting. This makes them perfect for party prep!
Why aren’t my crispy sticks getting crispy?
There are a few common reasons why your sticks might not be as crispy as desired. First, ensure your oven is fully preheated to the correct temperature. Second, make sure you’re rolling the dough thin enough (1/8 to 1/4 inch is ideal). Thicker sticks will be chewier. Third, avoid overcrowding the baking sheet; if the sticks are too close, they will steam instead of crisping. Lastly, ensure you’re baking them long enough until they are uniformly golden brown. Sometimes, an extra 2-3 minutes in the oven can make all the difference.
Can I fry these crispy sticks instead of baking them?
While this recipe is designed for baking, you can certainly shallow-fry them for an even richer, crispier result. Heat about 1/2 inch of a neutral oil (like vegetable or canola oil) in a large skillet over medium-high heat until it reaches about 350-375°F (175-190°C). Carefully add the cut dough sticks in batches, making sure not to overcrowd the pan. Fry for 1-2 minutes per side, or until golden brown and puffed. Transfer to a wire rack lined with paper towels to drain excess oil. Fried sticks will be incredibly crispy but also absorb more oil.
EASY CRISPY STICKS
Ingredients
Instructions
Prepare the Dry Ingredients: In a large mixing bowl, whisk together the all-purpose flour, baking powder, salt, garlic powder, onion powder, dried oregano, black pepper, and paprika. Make sure all ingredients are well combined to ensure even flavor distribution throughout the sticks.
Add Wet Ingredients: Create a well in the center of the dry ingredients. Pour in the olive oil and warm water. If using, add the optional grated Parmesan cheese at this stage.
Form the Dough: Using a wooden spoon or your hands, gradually mix the wet ingredients into the dry ingredients until a shaggy dough forms. Once most of the flour is incorporated, turn the dough out onto a lightly floured surface.
Knead the Dough: Knead the dough for about 5-7 minutes, or until it becomes smooth and elastic. If the dough is too sticky, add a tiny bit more flour, a teaspoon at a time. If it’s too dry, add a tiny bit more warm water. The dough should be firm but pliable.
Rest the Dough: Form the dough into a ball, lightly brush it with a little olive oil to prevent drying, and place it back into the bowl. Cover the bowl with a clean kitchen towel or plastic wrap and let it rest at room temperature for 20-30 minutes. This resting period allows the gluten to relax, making the dough easier to roll out and resulting in a more tender crumb.
Preheat Oven and Prepare Baking Sheets: While the dough is resting, preheat your oven to 400°F (200°C). Line two large baking sheets with parchment paper. This will prevent sticking and make cleanup much easier.
Roll Out the Dough: Divide the rested dough into two equal portions. On a lightly floured surface, take one portion of dough and roll it out into a rectangle, approximately 1/8 to 1/4 inch thick. The thinner you roll it, the crispier the sticks will be. Aim for a consistent thickness across the entire sheet of dough.
Cut the Sticks: Using a pizza cutter or a sharp knife, cut the dough into long, thin strips, about 1/4 to 1/2 inch wide and 4-6 inches long. You can make them shorter or longer depending on your preference.
Arrange on Baking Sheets: Carefully transfer the cut dough sticks to the prepared baking sheets, arranging them in a single layer. Try not to overcrowd the baking sheets, as this can lead to uneven baking and prevent them from getting perfectly crispy. Leave a little space between each stick.
Brush with Olive Oil: Lightly brush the tops of the dough sticks with a little extra olive oil. This helps with browning and adds to the overall crispiness.
Bake the Crispy Sticks: Bake for 12-18 minutes, or until the sticks are golden brown and crispy. Baking time may vary depending on your oven and the thickness of your sticks. Halfway through baking (around 8-10 minutes), rotate the baking sheets from top to bottom and front to back to ensure even cooking and browning. Keep a close eye on them during the last few minutes to prevent burning.
Cool and Garnish: Once baked, remove the crispy sticks from the oven and transfer them to a wire rack to cool completely. They will crisp up further as they cool. If desired, sprinkle with fresh chopped parsley before serving.
Repeat for Remaining Dough: Repeat steps 7-12 with the second portion of dough.
Serve: Serve your Easy Crispy Sticks warm or at room temperature with your favorite dips!