- 0 Facebook
- 3 Pinterest
- 9 Email
- Copy Link
- 12 shares
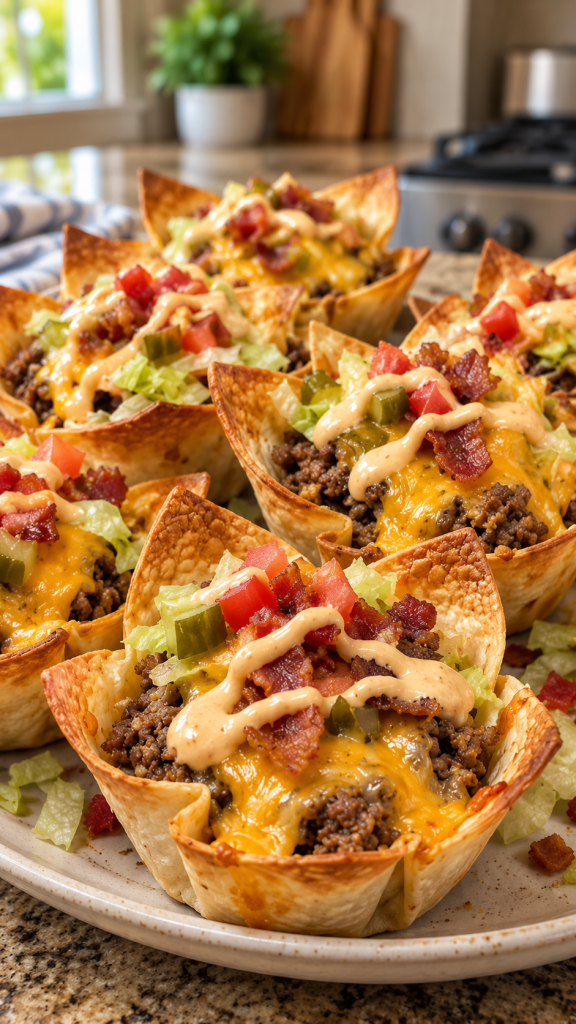
Crispy tortilla edges, a juicy beef center, and a blanket of melty cheddar make these cups taste like a bacon cheeseburger that finally learned how to be finger food. Everything comes together with a skillet and a muffin tin, so the garlicky beef gets spooned into golden, butter-brushed shells and baked until bubbly. Top them with cool lettuce, tomatoes, and pickles (plus a swirl of tangy burger sauce) for a homemade bite that makes drive-thru burgers feel pretty forgettable.
Craving Crispy Garlic Cheddar Bacon Cheeseburger Tortilla Cups?
Here’s why this recipe earns a permanent spot in your rotation. Brushing the tortillas with garlic butter before baking gives you sturdy, golden shells that stay crisp instead of going soft under the filling. A splash of Worcestershire sauce, sautéed onion, and fresh garlic gives the beef that deep, grill-style flavor, and the crumbled bacon and sharp cheddar bring smoky richness and a bubbly, melty finish. Everything comes together with just a skillet and a muffin tin in about 40 minutes, and it makes 12 cups, so it’s easy to feed a crowd on game day. Cooking the bacon until truly crisp and draining the beef well keeps every bite crunchy, not greasy. Topping each cup with cool lettuce, juicy tomatoes, tangy pickles, and a swirl of homemade burger sauce adds the fresh contrast that makes them taste like a real cheeseburger. They’re also easy to customize for picky eaters and simple to prep ahead, so you can skip the drive-thru and still get that burger-night satisfaction at home.
Ingredient Notes
Great tortilla cups start with the right ingredients, and each one here plays a part in the crisp shell, juicy filling, and fresh burger-style finish. Here’s what to know before you start on these Crispy Garlic Cheddar Bacon Cheeseburger Tortilla Cups.
The Cups
- Small flour tortillas (12, about 6 inches wide) : These form the crisp, golden shells. Warm them for 10-15 seconds in the microwave so they press into the muffin tin without cracking. If only larger tortillas are available, cut 6-inch rounds with a small bowl as a guide.
- Butter (2 tablespoons, melted) : Brushed on the tortillas, butter promotes browning and helps the shells stay crisp under the filling. Unsalted butter keeps the salt level in check, and olive oil works as a dairy-free swap.
- Garlic powder (½ teaspoon) : Stirred into the melted butter, it coats the shells evenly and won’t burn the way fresh garlic can in a hot oven . Choose plain garlic powder rather than garlic salt so the seasoning stays balanced.
The Burger Filling
- Ground beef (1 lb) : This is the juicy, savory base. An 80/20 or 85/15 blend gives the best flavor, and draining the fat well after browning keeps the cups crisp instead of greasy. Ground turkey or chicken also works, with an extra pinch of seasoning.
- Bacon (6 slices, cooked and crumbled) : Bacon adds smoky, salty crunch. Cook it until truly crisp, since it softens a bit in the oven , and blot it on paper towels before crumbling. Thick-cut bacon gives meatier bits, while turkey bacon is a lighter option.
- Onion (½ small, finely diced) : Onion brings mild sweetness and the classic burger-joint flavor. A fine dice lets it soften fully in the skillet , and yellow or sweet onions both work well.
- Garlic (3 cloves, minced) : Fresh garlic gives the beef its aromatic punch. Add it in the last minute or so of sautéing so it turns fragrant without turning bitter. Jarred minced garlic works in a pinch, though the flavor is milder.
- Worcestershire sauce (1 tablespoon) : This adds the deep, tangy, grill-style umami that makes ground beef taste like a burger. Look for a gluten-free version if needed, or use 2 teaspoons soy sauce plus a small splash of apple cider vinegar as a stand-in.
- Shredded cheddar cheese (1½ cups) : Cheddar delivers the melty, bubbly top and sharp flavor. Shred it fresh from a block, because pre-shredded cheese often contains anti-caking agents that keep it from melting smoothly. Sharp cheddar stands up best to the beef and bacon.
- Salt (½ teaspoon) : Salt sharpens the beef and onion flavors. Bacon and cheese are already salty, so season lightly and taste the beef before adding more.
- Black pepper (¼ teaspoon) : Pepper gives gentle warmth and a classic burger-seasoning kick. Freshly ground has a brighter flavor than pre-ground.
The Fresh Toppings
- Shredded lettuce (1 cup) : Lettuce adds cool, crisp contrast to the hot filling. Iceberg stays crunchiest, though romaine works too. Dry it thoroughly and add it just before serving so it doesn’t wilt.
- Diced tomatoes (½ cup) : Tomatoes bring juicy freshness and a touch of acidity. Roma tomatoes work best because they’re meatier, and scooping out the seeds keeps the toppings from turning watery.
- Diced dill pickles (⅓ cup) : Pickles supply the tangy crunch that makes these taste like a real cheeseburger. Pat them dry after dicing so excess brine doesn’t soak into the cups, and choose crisp, crunchy dill chips over softer varieties.
The Burger Sauce
- Mayonnaise (¼ cup) : Mayo forms the creamy base of the sauce. Full-fat mayonnaise gives the best texture, though Greek yogurt can replace half of it for a lighter version.
- Ketchup (2 tablespoons) : Ketchup adds a touch of sweetness and a rosy color. Regular ketchup is the right choice here, since flavored or heavily spiced varieties can overpower the sauce.
- Yellow mustard (1 teaspoon) : Mustard brings a bright, tangy edge that keeps the sauce from tasting heavy. Stick with classic yellow for that familiar burger-stand flavor.
- Pickle relish (1 tablespoon) : Relish adds sweet-tangy texture and a little crunch. Drain it well before stirring it in so the sauce stays thick, or finely chop dill pickles with a pinch of sugar as a substitute.
Step-by-Step Instructions
- Preheat the oven to 375°F and lightly grease a 12-cup muffin tin. Warm the tortillas in the microwave for 10-15 seconds, then press one into each cup, pleating the sides so they form a snug bowl.
- Stir the melted butter and garlic powder together, then brush it over the inside and rim of each tortilla. Bake the empty shells for 5-7 minutes, until the edges are lightly golden and the cups hold their shape.
- Brown the ground beef with the diced onion in a skillet over medium-high heat for 6-8 minutes, breaking it into small crumbles. I wait until the beef is fully browned and the onion looks soft and translucent before moving on.
- Stir in the minced garlic, Worcestershire sauce, salt, and pepper, and cook for about 1 minute, just until fragrant. Drain off the excess fat thoroughly, because this is what keeps the cups crisp instead of greasy.
- Remove the skillet from the heat and fold in the crumbled bacon and 1 cup of the shredded cheddar until the cheese starts to melt into the beef. The mixture should look thick and hold together on a spoon.
- Spoon the filling into the warm shells, packing it in gently, then sprinkle the remaining ½ cup cheddar on top. Bake for 8-10 minutes, until the cheese is bubbly and the tortilla edges are deep golden brown.
- While the cups bake, whisk the mayonnaise, ketchup, yellow mustard, and pickle relish in a small bowl. It may look a little loose at first, but it thickens slightly as it chills in the fridge.
- Let the cups rest in the tin for 5 minutes so they firm up, then lift them out with a spoon or small offset spatula. I like to top each one with shredded lettuce, diced tomatoes, and dill pickles, then finish with a swirl of burger sauce right before serving.
Tip: If a shell sticks, run a thin knife around the edge before lifting. For the crispiest results, let the cups cool on a wire rack instead of in the pan.
Reminder: Add the lettuce, tomatoes, and pickles just before serving so the cups stay crisp and the toppings stay fresh.
Variations & Substitutions
These cups are easy to adapt, so use whatever fits your pantry, your guests, or your mood. Here are a few tested tweaks that keep the crisp shell and the cheeseburger flavor.
- Gluten-free version : Use gluten-free flour tortillas, warmed until pliable, and a gluten-free Worcestershire sauce. Bake the shells a minute or two longer if they feel soft.
- Turn up the heat : I fold 2 tablespoons of diced pickled jalapeños into the beef and swap half the cheddar for pepper jack for a gentle, melty kick.
- Meatless option : Swap the beef for finely chopped cremini mushrooms and drained black beans, cooked until the moisture evaporates. Use vegetarian Worcestershire and omit the bacon.
- Dairy-free adaptation : Brush shells with olive oil, swap in a dairy-free cheddar-style shred, and use vegan mayo in the sauce. Expect slightly less stretch from the melted cheese.
- Lower-carb tweak : Choose 6-inch low-carb tortillas and watch them closely during the pre-bake, since they can brown faster than regular flour tortillas.
- Try different cheeses : Colby Jack or Monterey Jack melts extra creamy, while smoked Gouda adds depth. Shred any of them fresh from the block.
Make Ahead Options
Crispy Garlic Cheddar Bacon Cheeseburger Tortilla Cups are perfect for meal prep, and yes, you can make them ahead of time! Cook the beef filling and bacon, then fold in the cheddar and refrigerate everything in an airtight container for up to 2 days . Mix the burger sauce and store it separately in the fridge for the same time. Bake the empty garlic-butter shells, cool them completely, and keep them at room temperature in a sealed container for up to 24 hours so they stay crisp. When you’re ready to serve, rewarm the filling, spoon it into the shells, top with the extra cheddar, and bake for 8-10 minutes. Add the fresh toppings right before serving.
Serving Suggestions
- Plate them for crunch: Arrange the rested, rack-cooled cups on a platter lined with parchment, then add the lettuce, tomatoes, and pickles right before they hit the table. Pipe or spoon a small swirl of burger sauce on each cup and put extra sauce in a bowl for dipping. A tip from my own kitchen: for a party, I set out the plain baked cups with the toppings in separate bowls, so guests build their own and every bite of these Crispy Garlic Cheddar Bacon Cheeseburger Tortilla Cups stays crisp.
- Pair with something crisp and tangy: The filling is rich, with beef, bacon, and melted cheddar, so sides with acidity and crunch balance it best. Try a simple coleslaw with a vinegar-leaning dressing, dill pickle spears, or a crisp green salad tossed in a lemony vinaigrette. For a heartier burger-night spread, add oven -baked crinkle fries or sweet potato wedges, which are great for dunking in extra burger sauce.
- Choose drinks that cut through the richness: A cold lager or pale ale is a natural match for the smoky bacon and sharp cheddar. For a non-alcoholic option, ice-cold root beer, fresh lemonade, or unsweetened iced tea refresh the palate between bites.
- Match the serving style to the occasion: For game day or a casual party, serve them warm as finger food, with a few cups per person alongside fries and veggie sticks. For a weeknight dinner, plan on 2-3 cups per person with a big salad. Because each cup is a built-in portion, you can fill a tray quickly and keep refills coming straight from the oven .
Storage & Freezing
- Refrigerating: Let the baked cups cool completely on a wire rack, then store them without toppings in an airtight container, with parchment between layers, for up to 3 days. These Crispy Garlic Cheddar Bacon Cheeseburger Tortilla Cups are at their crunchiest within the first 2 days, since the tortilla slowly absorbs moisture from the beef and melted cheddar. Keep the burger sauce in a separate jar for up to 4-5 days, and chop the lettuce, tomatoes, and pickles fresh each time.
- Freezing: The baked, undressed cups freeze well because the garlic-butter shells and well-drained beef hold up to the cold. Freeze them in a single layer on a lined tray for about 1 hour, then transfer to a freezer bag with the air pressed out. They keep for up to 2 months. Don’t freeze the lettuce, tomatoes, pickles, or mayo-based burger sauce, which turn watery or separate when thawed. If I’m planning ahead, I pull the cups from the oven a minute early so they don’t over-brown when reheated.
- Reheating: The oven is the best way to bring back the crisp edges. Set the cups on a wire rack over a baking sheet and bake at 350°F for 8-10 minutes if refrigerated, or 12-15 minutes straight from frozen, until the cheese is bubbly and the filling reaches 165°F. An air fryer at 350°F for 4-6 minutes also works. The microwave steams the tortilla and leaves it chewy, so I use it only as a last resort.
- Serving after storage: Once the cups are hot, add fresh lettuce, tomatoes, and pickles, then finish with a swirl of cold burger sauce. The contrast of hot, crisp cups and cool toppings is what makes leftovers taste freshly made.
Expert Tips
Here are a few tricks I’ve picked up that help these Crispy Garlic Cheddar Bacon Cheeseburger Tortilla Cups come out golden, sturdy, and full of flavor every time.
- Warm tortillas first : Microwave the 6-inch tortillas for 10-15 seconds so they bend without cracking, then pleat the sides for a snug, bowl-shaped cup.
- Pre-bake the shells : Baking the butter-and-garlic-powder brushed tortillas for 5-7 minutes before filling sets a crisp base that won’t turn soggy under the beef.
- Drain the beef thoroughly : I tilt the skillet and press the crumbles with a spoon, since leftover fat is the fastest way to lose that crisp edge.
- Shred your own cheddar : A block of sharp cheddar shredded fresh melts smoother and browns better than pre-shredded, which contains anti-caking agents.
- Fold cheese in off-heat : Stir the bacon and 1 cup of cheddar in after removing the skillet, so the filling turns thick and cohesive instead of oily.
- Cool on a rack : After the 5-minute rest, I move the cups to a wire rack, and I wait to add lettuce, tomatoes, and pickles until serving.
Common Questions About Best Crispy Garlic Cheddar Bacon Cheeseburger Tortilla Cups
- How do I keep the shells crisp? Brush with garlic butter, pre-bake, drain beef well.
- Why do my tortillas crack in the tin? Microwave them 10-15 seconds first to soften.
- Can I freeze them? Yes, freeze baked, untopped cups for up to 2 months.
- When should I add the toppings? I add lettuce, tomatoes, and pickles right before serving.
- 0 Facebook
- 3 Pinterest
- 9 Email
- Copy Link
- 12 shares
Best Crispy Garlic Cheddar Bacon Cheeseburger Tortilla Cups
Ingredients
Instructions
Preheat the oven to 375°F and lightly grease a 12-cup muffin tin. Warm the tortillas in the microwave for 10-15 seconds, then press one into each cup, pleating the sides so they form a snug bowl.
Stir the melted butter and garlic powder together, then brush it over the inside and rim of each tortilla. Bake the empty shells for 5-7 minutes, until the edges are lightly golden and the cups hold their shape.
Brown the ground beef with the diced onion in a skillet over medium-high heat for 6-8 minutes, breaking it into small crumbles until the beef is fully browned and the onion is soft and translucent.
Stir in the minced garlic, Worcestershire sauce, salt, and pepper, and cook for about 1 minute, just until fragrant. Drain off the excess fat thoroughly to keep the cups crisp instead of greasy.
Remove the skillet from the heat and fold in the crumbled bacon and 1 cup of the shredded cheddar until the cheese starts to melt into the beef. The mixture should look thick and hold together on a spoon.
Spoon the filling into the warm shells, packing it in gently, then sprinkle the remaining ½ cup cheddar on top. Bake for 8-10 minutes, until the cheese is bubbly and the tortilla edges are deep golden brown.
While the cups bake, whisk the mayonnaise, ketchup, yellow mustard, and pickle relish in a small bowl. It may look a little loose at first, but it thickens slightly as it chills in the fridge.
Let the cups rest in the tin for 5 minutes so they firm up, then lift them out with a spoon or small offset spatula. Top each one with shredded lettuce, diced tomatoes, and dill pickles, then finish with a swirl of burger sauce right before serving.
Tip: If a shell sticks, run a thin knife around the edge before lifting. For the crispiest results, let the cups cool on a wire rack instead of in the pan. Add the lettuce, tomatoes, and pickles just before serving so the cups stay crisp.
Notes
Warm tortillas for 10-15 seconds to make them pliable and prevent cracking when shaping.
Pre-bake the garlic-butter brushed shells for 5-7 minutes to set a crisp base that resists sogginess.
Drain cooked beef thoroughly by tilting the skillet and pressing the crumbles to remove excess fat.
Shred cheddar from a block for better melting and browning compared to pre-shredded cheese.
Fold bacon and 1 cup of cheese into the beef off the heat so the filling becomes thick and cohesive.
Cool baked cups on a wire rack and add fresh toppings right before serving to preserve crunch.
Refrigerate baked, undressed cups in an airtight container for up to 3 days; freeze single-layer then bag for up to 2 months. Reheat in oven or air fryer for best texture.
Nutrition
| Serving Size | 1 tortilla cup |
|---|---|
| Calories | 340 kcal |
| Sugar Content | 2 g |
| Sodium Content | 450 mg |
| Fat Content | 24 g |
| Saturated Fat Content | 10 g |
| Unsaturated Fat Content | 12 g |
| Trans Fat Content | 0.5 g |
| Carbohydrate Content | 12 g |
| Fiber Content | 1 g |
| Protein Content | 18 g |
| Cholesterol Content | 60 mg |