Introduction
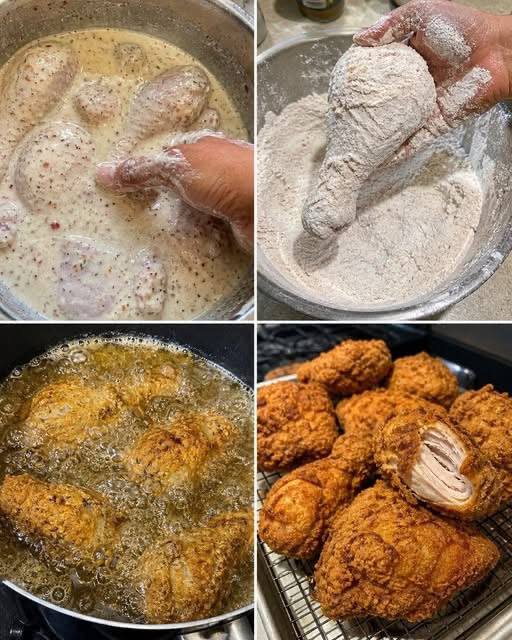
There are few foods that evoke such universal comfort and joy quite like a perfectly executed plate of fried chicken. The mere mention of it conjures images of family gatherings, backyard barbecues, and lazy Sunday afternoons. It’s a dish steeped in tradition, a culinary hug that transcends cultures and generations. But not all fried chicken is created equal. We’re talking about that elusive, magical combination of an impossibly crispy, golden-brown crust giving way to unbelievably tender, juicy, and flavorful meat. That, my friends, is the holy grail, and it’s precisely what our Crispy Buttermilk Fried Chicken recipe delivers.
What makes this particular recipe stand head and shoulders above the rest? It all starts with the humble, yet mighty, buttermilk. This tangy elixir isn’t just for baking; it’s the secret weapon in our arsenal for achieving chicken that’s moist and flavorful right down to the bone. The buttermilk works its magic by tenderizing the chicken fibers while infusing it with a subtle, tangy depth that balances the rich savory flavors of the seasoning. Then comes the seasoned flour dredge, creating a rugged, craggy surface that, when introduced to hot oil, transforms into that coveted shatteringly crisp exterior. Every bite is an experience – an audible crunch followed by a burst of savory juiciness.
Forget dry, bland, or greasy versions you might have encountered in the past. This recipe is designed to demystify the art of homemade fried chicken, making it accessible even for the novice cook. With a few key techniques and a little patience, you’ll be turning out restaurant-quality fried chicken that will have everyone begging for your secret. So roll up your sleeves, grab your apron, and prepare to embark on a culinary adventure that promises to deliver the ultimate crispy, tender, and undeniably delicious buttermilk fried chicken experience. Get ready to impress your taste buds and earn your stripes as a fried chicken connoisseur!
Nutritional Information
Per serving (approximate values, based on one drumstick and one thigh, fried in vegetable oil):
- Calories: 650-750
- Protein: 45-55g
- Carbohydrates: 30-40g
- Fat: 40-50g
- Fiber: 2-4g
- Sodium: 800-1100mg
Ingredients
- 3-4 pounds bone-in, skin-on chicken pieces (a mix of drumsticks and thighs works best)
- 4 cups buttermilk
- 1 tablespoon hot sauce (optional, for extra flavor)
- 2 tablespoons kosher salt, divided
- 1 tablespoon black pepper, divided
- 2 teaspoons garlic powder, divided
- 2 teaspoons onion powder, divided
- 1 teaspoon smoked paprika, divided
- 1/2 teaspoon cayenne pepper (optional, for a kick)
- 3 cups all-purpose flour
- 1/2 cup cornstarch (for extra crispiness)
- 2 teaspoons baking powder (for a lighter, crispier crust)
- 6-8 cups vegetable oil, peanut oil, or shortening, for frying (enough to submerge chicken halfway)
Instructions
- Prepare the Chicken: Thoroughly rinse the chicken pieces under cold water and pat them completely dry with paper towels. This step is crucial for achieving a crispy skin.
- Make the Buttermilk Marinade: In a large, non-reactive bowl or a gallon-sized freezer bag, combine the buttermilk, hot sauce (if using), 1 tablespoon of kosher salt, 1/2 tablespoon of black pepper, 1 teaspoon of garlic powder, 1 teaspoon of onion powder, 1/2 teaspoon of smoked paprika, and 1/4 teaspoon of cayenne pepper (if using). Stir well to combine all the seasonings.
- Marinate the Chicken: Add the dried chicken pieces to the buttermilk mixture, ensuring all pieces are fully submerged and coated. Cover the bowl or seal the bag and refrigerate for at least 4 hours, or preferably overnight (up to 24 hours). The longer the marination, the more tender and flavorful the chicken will be.
- Prepare the Dredging Station: In a large, shallow dish or pan, whisk together the all-purpose flour, cornstarch, baking powder, the remaining 1 tablespoon of kosher salt, 1/2 tablespoon of black pepper, 1 teaspoon of garlic powder, 1 teaspoon of onion powder, 1/2 teaspoon of smoked paprika, and 1/4 teaspoon of cayenne pepper (if using). Mix thoroughly to ensure all seasonings are evenly distributed.
- Set Up for Frying: Choose a heavy-bottomed pot, Dutch oven, or deep-fryer for frying. Pour the frying oil into the pot, ensuring there’s enough to submerge the chicken halfway (about 3-4 inches deep). Attach a deep-fry thermometer to the side of the pot.
- Dredge the Chicken: Working with one piece of chicken at a time, remove it from the buttermilk marinade, allowing any excess to drip off. Do not rinse the chicken. Place the chicken piece into the seasoned flour mixture, pressing firmly to ensure a thick, even coating. Make sure every crevice is covered. For an extra crispy crust, you can “double dredge”: after the first flour coating, dip the chicken back into the remaining buttermilk marinade briefly, then back into the flour for a second coating. Place the dredged chicken on a wire rack set over a baking sheet while you prepare the remaining pieces. Let the coated chicken rest for 10-15 minutes at room temperature; this helps the coating adhere better and prevents it from falling off during frying.
- Heat the Oil: Heat the oil over medium-high heat until it reaches a consistent temperature of 325-350°F (160-175°C). It is crucial to maintain this temperature throughout the frying process. If the oil is too cool, the chicken will be greasy; if it’s too hot, the outside will burn before the inside cooks.
- Fry the Chicken: Carefully lower 2-3 pieces of chicken into the hot oil using tongs. Do not overcrowd the pot, as this will lower the oil temperature and result in soggy chicken. Fry the chicken for 6-8 minutes per side, turning occasionally, until it is deep golden brown and cooked through. Drumsticks typically take 10-12 minutes total, and thighs 12-15 minutes total. The internal temperature should reach 165°F (74°C) when tested with an instant-read thermometer at the thickest part of the meat, away from the bone.
- Rest the Fried Chicken: Once cooked, remove the chicken from the oil and place it on a clean wire rack set over a baking sheet to allow excess oil to drain. This also helps keep the crust crispy. Do not place it directly on paper towels, as this can trap steam and make the chicken soggy.
- Repeat and Serve: Continue frying the remaining chicken in batches, allowing the oil to come back up to temperature between batches. Serve your Crispy Buttermilk Fried Chicken immediately, while it’s hot and at its crispiest!
Cooking Tips and Variations
Achieving fried chicken perfection is an art, but these tips will guide you to consistent success every time. The right preparation and attention to detail can elevate your homemade fried chicken from good to absolutely legendary.
- The Importance of Drying Chicken: Before marinating, thoroughly pat your chicken dry. Excess moisture on the skin can prevent the buttermilk and flour from adhering properly, leading to a less crispy crust.
- Marination Time is Key: While 4 hours is the minimum, marinating overnight (12-24 hours) in buttermilk truly makes a difference. The lactic acid in the buttermilk breaks down tough muscle fibers, resulting in incredibly tender and juicy chicken, while also infusing it with flavor.
- Don’t Skip the Cornstarch and Baking Powder: Cornstarch helps create a crispier crust by inhibiting gluten development in the flour, while baking powder contributes to a lighter, airier, and more shatteringly crisp coating. They are essential for that signature crunch.
- The Double Dredge for Extra Crisp: For an exceptionally thick and craggy crust, try the double-dredging technique. After the first flour coating, dip the chicken back into the remaining buttermilk marinade (ensure it’s still well-seasoned or add a pinch more salt), then back into the flour for a second, generous coating. This builds up more texture for maximum crunch.
- Resting the Dredged Chicken: After coating the chicken in flour, let it rest on a wire rack for 10-15 minutes at room temperature. This allows the flour to absorb some moisture from the chicken, creating a paste-like layer that adheres better during frying and prevents the coating from flaking off.
- Oil Temperature is Critical: Invest in a good deep-fry thermometer. Maintaining the oil temperature between 325-350°F (160-175°C) is the most crucial factor for crispy, non-greasy, and evenly cooked chicken. If the oil is too cold, the chicken will absorb too much oil and be greasy. If it’s too hot, the crust will burn before the inside cooks through.
- Don’t Overcrowd the Pot: Fry chicken in batches, leaving plenty of space between pieces. Overcrowding drops the oil temperature significantly, leading to soggy, poorly cooked chicken. Be patient and fry in small batches.
- Use a Wire Rack for Draining: Never place freshly fried chicken directly on paper towels. Paper towels trap steam, which makes the crispy crust soggy. A wire rack allows air to circulate around the chicken, letting excess oil drain off while maintaining crispiness.
- Season the Dredge Generously: Remember that the flour coating is where a lot of the flavor comes from. Don’t be shy with the seasonings in your flour mixture.
- Spice It Up: For those who love a bit of heat, increase the amount of cayenne pepper in both the marinade and the flour dredge. You can also add a pinch of chili powder or smoked chipotle powder for a different smoky heat profile.
- Herb Variations: Experiment with dried herbs in your flour dredge. A teaspoon of dried thyme or oregano can add a lovely aromatic layer to the crust.
- Gluten-Free Option: For a gluten-free version, substitute the all-purpose flour with a gluten-free all-purpose flour blend that contains xanthan gum. The results can be surprisingly good!
- Brining Before Marination: For an extra layer of moisture and seasoning, consider a quick brine (e.g., 30 minutes in a salt and sugar solution) before the buttermilk marinade. This is an advanced technique but yields incredibly juicy results.
Crispy Buttermilk Fried Chicken
Ingredients
Instructions
Prepare the Chicken: Thoroughly rinse the chicken pieces under cold water and pat them completely dry with paper towels. This step is crucial for achieving a crispy skin.
Make the Buttermilk Marinade: In a large, non-reactive bowl or a gallon-sized freezer bag, combine the buttermilk, hot sauce (if using), 1 tablespoon of kosher salt, 1/2 tablespoon of black pepper, 1 teaspoon of garlic powder, 1 teaspoon of onion powder, 1/2 teaspoon of smoked paprika, and 1/4 teaspoon of cayenne pepper (if using). Stir well to combine all the seasonings.
Marinate the Chicken: Add the dried chicken pieces to the buttermilk mixture, ensuring all pieces are fully submerged and coated. Cover the bowl or seal the bag and refrigerate for at least 4 hours, or preferably overnight (up to 24 hours). The longer the marination, the more tender and flavorful the chicken will be.
Prepare the Dredging Station: In a large, shallow dish or pan, whisk together the all-purpose flour, cornstarch, baking powder, the remaining 1 tablespoon of kosher salt, 1/2 tablespoon of black pepper, 1 teaspoon of garlic powder, 1 teaspoon of onion powder, 1/2 teaspoon of smoked paprika, and 1/4 teaspoon of cayenne pepper (if using). Mix thoroughly to ensure all seasonings are evenly distributed.
Set Up for Frying: Choose a heavy-bottomed pot, Dutch oven, or deep-fryer for frying. Pour the frying oil into the pot, ensuring there’s enough to submerge the chicken halfway (about 3-4 inches deep). Attach a deep-fry thermometer to the side of the pot.
Dredge the Chicken: Working with one piece of chicken at a time, remove it from the buttermilk marinade, allowing any excess to drip off. Do not rinse the chicken. Place the chicken piece into the seasoned flour mixture, pressing firmly to ensure a thick, even coating. Make sure every crevice is covered. For an extra crispy crust, you can “double dredge”: after the first flour coating, dip the chicken back into the remaining buttermilk marinade briefly, then back into the flour for a second coating. Place the dredged chicken on a wire rack set over a baking sheet while you prepare the remaining pieces. Let the coated chicken rest for 10-15 minutes at room temperature; this helps the coating adhere better and prevents it from falling off during frying.
Heat the Oil: Heat the oil over medium-high heat until it reaches a consistent temperature of 325-350°F (160-175°C). It is crucial to maintain this temperature throughout the frying process. If the oil is too cool, the chicken will be greasy; if it’s too hot, the outside will burn before the inside cooks.
Fry the Chicken: Carefully lower 2-3 pieces of chicken into the hot oil using tongs. Do not overcrowd the pot, as this will lower the oil temperature and result in soggy chicken. Fry the chicken for 6-8 minutes per side, turning occasionally, until it is deep golden brown and cooked through. Drumsticks typically take 10-12 minutes total, and thighs 12-15 minutes total. The internal temperature should reach 165°F (74°C) when tested with an instant-read thermometer at the thickest part of the meat, away from the bone.
Rest the Fried Chicken: Once cooked, remove the chicken from the oil and place it on a clean wire rack set over a baking sheet to allow excess oil to drain. This also helps keep the crust crispy. Do not place it directly on paper towels, as this can trap steam and make the chicken soggy.
Repeat and Serve: Continue frying the remaining chicken in batches, allowing the oil to come back up to temperature between batches. Serve your Crispy Buttermilk Fried Chicken immediately, while it’s hot and at its crispiest!