Introduction
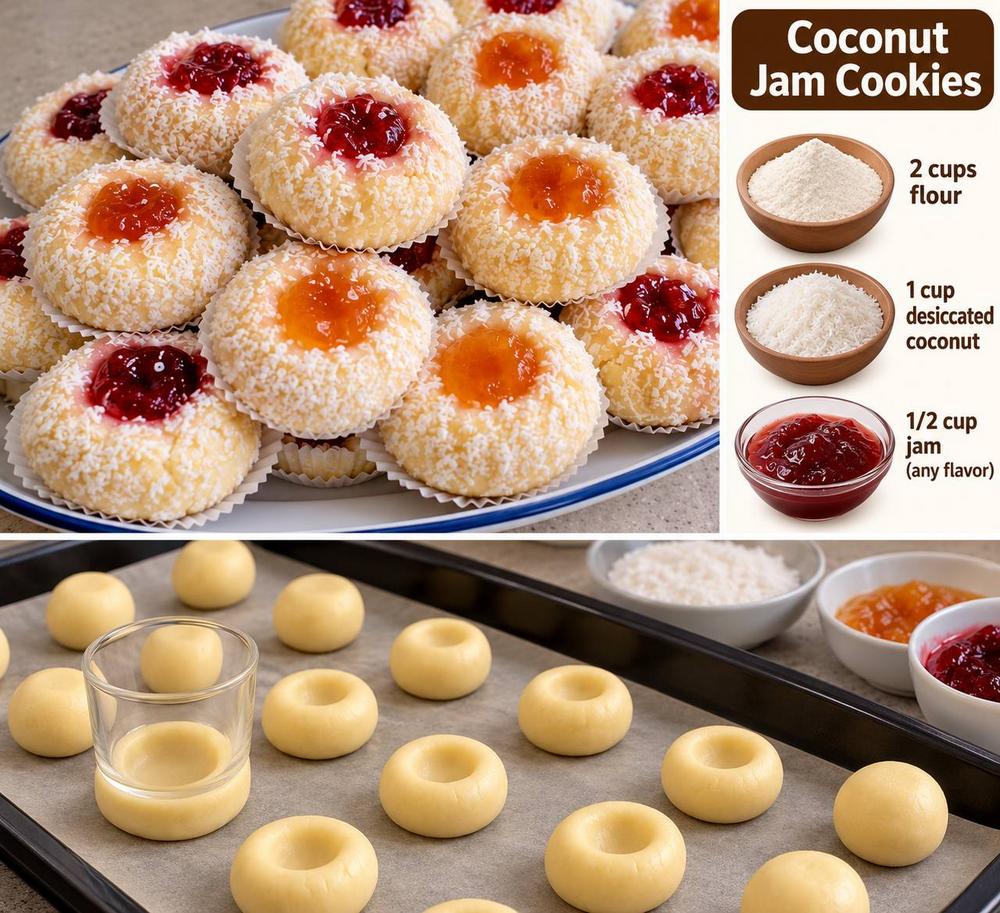
Step into a world where tropical sweetness meets classic comfort with our irresistible Coconut Jam Thumbprint Cookies! These delightful treats are a true celebration of flavor and texture, perfect for any occasion, from festive holiday gatherings to a simple afternoon pick-me-up. Imagine sinking your teeth into a golden, buttery cookie base, gently crisp at the edges and wonderfully chewy in the center, all while your palate is tantalized by a vibrant burst of fruity jam and the satisfying chew of toasted desiccated coconut. They’re not just cookies; they’re tiny edible jewels that promise a moment of pure bliss with every bite.
What makes these thumbprint cookies truly special is their charming visual appeal and the delightful interplay of contrasting elements. Each cookie is a miniature masterpiece, rolled in a generous coating of finely shredded coconut that bakes to a beautiful golden brown, adding both texture and a subtle nutty aroma. The “thumbprint” indentation, carefully pressed into the center of each dough ball, becomes a cozy nest for your favorite fruit jam – whether it’s the luscious tang of raspberry, the sun-kissed sweetness of apricot, or any other flavor that calls to you. The vibrant jewel-toned jam peeking from the center makes these cookies not just delicious, but also incredibly photogenic and a joy to share.
Beyond their stunning looks and incredible taste, these Coconut Jam Thumbprint Cookies are surprisingly easy to make, making them an ideal baking project for both seasoned bakers and enthusiastic beginners. The process is straightforward and incredibly rewarding, transforming simple pantry staples into something truly extraordinary. They’re robust enough for potlucks, elegant enough for tea parties, and comforting enough for a quiet evening at home. Get ready to fill your kitchen with the most enticing aromas and create a batch of cookies that will have everyone asking for the recipe!
Nutritional Information
Per serving (approximate values):
- Calories: 185
- Protein: 2.5g
- Carbohydrates: 25g
- Fat: 9g
- Fiber: 1g
- Sodium: 80mg
Ingredients
- 2 cups all-purpose flour
- 1 cup unsalted butter, softened
- 1/2 cup granulated sugar
- 1 large egg yolk
- 1 teaspoon vanilla extract
- 1/2 teaspoon baking powder
- 1/4 teaspoon salt
- 1 cup desiccated coconut, finely shredded
- 1/2 cup fruit jam (strawberry, raspberry, apricot, or your favorite), stirred well
Instructions
- In a large mixing bowl, cream together the softened butter and granulated sugar until light and fluffy. This usually takes about 2-3 minutes with an electric mixer. Ensure the butter is truly softened, not melted, to achieve the best cookie texture.
- Beat in the egg yolk and vanilla extract until well combined. Scrape down the sides of the bowl to ensure all ingredients are thoroughly incorporated.
- In a separate medium bowl, whisk together the all-purpose flour, baking powder, and salt. This step helps to evenly distribute the leavening agent and salt throughout the dry ingredients, preventing lumps.
- Gradually add the dry ingredients to the wet ingredients, mixing on low speed until just combined. Be careful not to overmix the dough, as this can lead to tough cookies. The dough should come together and be soft but not sticky.
- Cover the bowl with plastic wrap and chill the dough in the refrigerator for at least 30 minutes. Chilling the dough helps to prevent the cookies from spreading too much during baking and makes it easier to handle.
- Preheat your oven to 350°F (175°C). Line a baking sheet with parchment paper. Parchment paper is essential for preventing sticking and for easy cleanup.
- Place the desiccated coconut in a shallow bowl.
- Remove the chilled dough from the refrigerator. Roll the dough into small, uniform balls, about 1 inch in diameter. Aim for consistency in size so the cookies bake evenly.
- Roll each dough ball in the desiccated coconut, pressing gently so the coconut adheres well to the surface of the dough. Ensure the entire surface of the ball is coated.
- Place the coated dough balls about 2 inches apart on the prepared baking sheet.
- Using your thumb, the back of a small measuring spoon, or even the bottom of a small glass, create an indentation in the center of each dough ball. Make sure the indentation is deep enough to hold the jam but not so deep that it goes through to the bottom of the cookie. If the edges crack, gently smooth them with your fingers.
- Spoon about 1/2 teaspoon of your chosen fruit jam into each indentation. Don’t overfill, as the jam can bubble over during baking. Stirring the jam before spooning helps to make it smoother and easier to work with.
- Bake for 12-15 minutes, or until the edges of the cookies are lightly golden brown and the coconut is toasted. The jam will be bubbly. Baking time may vary depending on your oven, so keep an eye on them.
- Remove the baking sheet from the oven and let the cookies cool on the sheet for 5 minutes before carefully transferring them to a wire rack to cool completely. Cooling on the sheet initially helps them set and prevents them from breaking.
- Once completely cooled, store the cookies in an airtight container. Enjoy your homemade Coconut Jam Thumbprint Cookies!
Cooking Tips and Variations
Achieving the perfect Coconut Jam Thumbprint Cookie is all about a few key techniques and a dash of creativity. For starters, the quality of your ingredients truly matters. Use a good quality butter for a rich, tender cookie and select a jam with a vibrant flavor and good consistency. A jam that is too runny might spread too much, while one that is too thick might be hard to spoon. Stirring your jam well before filling the cookies helps to loosen it up and makes it easier to work with.
One crucial tip for preventing your cookies from spreading too much in the oven is to ensure your butter is softened, not melted, and to chill your dough. Softened butter helps create the right texture, while chilling firms up the butter in the dough, slowing down its spread once it hits the heat of the oven. If your kitchen is particularly warm, you might even consider chilling the formed, jam-filled cookies for 10-15 minutes before baking. When making the indentations, a small measuring spoon or the bottom of a wine cork can create a more uniform and neat well than a thumb, although using your thumb is perfectly traditional and charming.
Don’t be afraid to experiment with different jam flavors! While classic strawberry and raspberry are always a hit, consider apricot for a sunnier note, blueberry for a deeper hue, or even a citrus marmalade for a tangy twist. The visual appeal of mixed jam colors on a platter is simply stunning. For an extra touch of flavor, you could add a pinch of cinnamon or cardamom to the dry ingredients for a spiced cookie base, or a tiny amount of almond extract instead of vanilla for a different aromatic profile. If you’re looking for variations beyond jam, consider filling the centers with a small dollop of melted chocolate after baking and cooling, or a spoonful of lemon curd for a zesty alternative. For an even richer coconut flavor, you can toast a small portion of the desiccated coconut before rolling the dough balls in it, which deepens its aroma and adds a lovely nutty complexity.
To ensure even baking and a consistent golden color, rotate your baking sheet halfway through the baking time. Ovens often have hot spots, and rotating the sheet helps to cook all the cookies uniformly. When the cookies are fresh out of the oven, the jam will be very hot and gooey, so allow them to cool on the baking sheet for a few minutes before transferring to a wire rack. This initial cooling period allows the cookies to set and the jam to firm up slightly, making them less fragile. If you find the jam has sunk slightly after baking, you can gently press a small amount of additional jam into the indentation while the cookies are still warm, but be careful not to overfill.
Storage and Reheating
Proper storage is key to keeping your Coconut Jam Thumbprint Cookies fresh and delicious for as long as possible. Once the cookies have completely cooled to room temperature, they should be stored in an airtight container. This prevents them from drying out and helps maintain their tender texture and the integrity of the jam filling. You can store them at room temperature on your counter for up to 3-4 days. If you need to stack them, it’s a good idea to place a piece of parchment paper between the layers to prevent the jam from sticking to the cookies above. Avoid storing them in direct sunlight or near heat sources, as this can cause the jam to melt and the cookies to become soft.
If you wish to extend their shelf life, these cookies can also be stored in the refrigerator for up to a week. Again, an airtight container is essential to prevent them from absorbing any odors from the fridge. When storing in the refrigerator, the jam may become a bit firmer, and the cookies might be slightly chewier. To enjoy them at their best texture, you can let them come back to room temperature for about 15-20 minutes before serving. Reheating is generally not necessary or recommended for these cookies, as they are best enjoyed at room temperature. Heating them in the microwave can make the jam excessively hot and potentially alter the cookie’s texture, making it tough or overly soft. If you prefer a slightly warmed cookie, a very brief warm-up in a toaster oven at a low temperature for just a minute or two might work, but watch them very closely to prevent burning the coconut or the jam.
These cookies also freeze beautifully, which is excellent news if you like to bake ahead or have extra dough. You can freeze the baked and cooled cookies in an airtight container or freezer bag for up to 2-3 months. To prevent them from sticking together in the freezer, flash freeze them on a baking sheet for about an hour until solid, then transfer them to your container. When you’re ready to enjoy them, simply take them out of the freezer and let them thaw at room temperature for a few hours. The jam might soften slightly upon thawing, but the overall texture and flavor will remain excellent. Alternatively, you can freeze the unbaked dough balls (without the jam). Once the dough balls are rolled and coated in coconut, arrange them on a baking sheet and freeze until solid. Then transfer them to a freezer bag. When you’re ready to bake, place the frozen dough balls on a baking sheet, create the indentations, fill with jam, and bake as usual, adding a few extra minutes to the baking time.
Frequently Asked Questions
Can I use fresh coconut instead of desiccated coconut?
While fresh coconut might seem like a delicious alternative, it’s generally not recommended for this recipe. Desiccated coconut, which is dried and shredded, has a lower moisture content and a different texture that bakes up beautifully, becoming toasted and chewy. Fresh coconut has a much higher moisture content and will likely not toast properly, potentially making the cookies soggy or altering their texture significantly. For the best results and the classic thumbprint cookie appeal, stick with desiccated coconut.
How do I prevent the jam from sinking or burning during baking?
To prevent the jam from sinking, ensure your indentations are deep enough but not so deep that they create a very thin base for the jam. Also, make sure your dough is well-chilled, as warmer dough tends to spread more, potentially flattening the jam well. To prevent burning, avoid overfilling the indentations. A good rule of thumb is about 1/2 teaspoon of jam per cookie. If your oven tends to run hot, or if you notice the jam browning too quickly, you can loosely tent the cookies with aluminum foil during the last few minutes of baking. Using a good quality, thicker jam can also help, as very runny jams are more prone to bubbling over or burning.
Can I make the cookie dough ahead of time?
Absolutely! This is a fantastic make-ahead recipe. You can prepare the cookie dough, wrap it tightly in plastic wrap, and store it in the refrigerator for up to 3-4 days. When you’re ready to bake, simply remove the dough from the fridge, let it soften slightly at room temperature for about 10-15 minutes (if it’s too firm to roll), then proceed with rolling, coating, indenting, and filling with jam as per the instructions. Alternatively, you can form the dough into balls, roll them in coconut, and freeze them (without the jam) for up to 2-3 months. When ready to bake, place the frozen dough balls on a baking sheet, create the indentations, fill with jam, and bake, adding a few extra minutes to the baking time.
My cookies spread too much! What went wrong?
Several factors can cause cookies to spread excessively. The most common culprit is butter that is too warm or melted. Ensure your butter is softened but still cool to the touch, not oily or liquid. Overmixing the dough can also develop the gluten too much, leading to more spread. Another reason is not chilling the dough sufficiently; chilling helps the butter firm up, preventing rapid spreading. Finally, an oven that isn’t at the correct temperature (too low) can also contribute to spreading, as the cookies take longer to set. Make sure your oven is preheated to the correct temperature before placing the cookies inside.
Conclusion
And there you have it – a recipe for Coconut Jam Thumbprint Cookies that promises to bring a burst of sunshine and sweetness into your home! These delightful treats are more than just a simple cookie; they’re a testament to the joy of homemade baking, offering a perfect harmony of textures and flavors. From the buttery, tender cookie base to the chewy, toasted coconut coating and the vibrant, gooey jam center, each bite is a little escape to a tropical paradise. They’re the kind of cookies that spark conversation, bring smiles, and disappear from the plate almost as quickly as they’re made.
Whether you’re baking them for a special occasion, a thoughtful gift, or simply to treat yourself and your loved ones, the process of creating these beautiful cookies is incredibly rewarding. There’s something truly magical about transforming humble ingredients into such an elegant and delicious confection. So, gather your ingredients, put on your apron, and let the enticing aromas fill your kitchen. Don’t be shy about experimenting with your favorite jam flavors or adding your own personal touch. The beauty of these thumbprint cookies lies in their versatility and the simple pleasure they bring.
We encourage you to embark on this delightful baking adventure and experience the pure satisfaction of biting into your very own homemade masterpiece. Share your creations with friends and family, and watch their faces light up with every delicious mouthful. Happy baking, and may your kitchen be filled with the sweet scent of success and the warmth of shared moments!
Coconut Jam Thumbprint Cookies
Ingredients
Instructions
In a large mixing bowl, cream together the softened butter and granulated sugar until light and fluffy. This usually takes about 2-3 minutes with an electric mixer. Ensure the butter is truly softened, not melted, to achieve the best cookie texture.
Beat in the egg yolk and vanilla extract until well combined. Scrape down the sides of the bowl to ensure all ingredients are thoroughly incorporated.
In a separate medium bowl, whisk together the all-purpose flour, baking powder, and salt. This step helps to evenly distribute the leavening agent and salt throughout the dry ingredients, preventing lumps.
Gradually add the dry ingredients to the wet ingredients, mixing on low speed until just combined. Be careful not to overmix the dough, as this can lead to tough cookies. The dough should come together and be soft but not sticky.
Cover the bowl with plastic wrap and chill the dough in the refrigerator for at least 30 minutes. Chilling the dough helps to prevent the cookies from spreading too much during baking and makes it easier to handle.
Preheat your oven to 350°F (175°C). Line a baking sheet with parchment paper. Parchment paper is essential for preventing sticking and for easy cleanup.
Place the desiccated coconut in a shallow bowl.
Remove the chilled dough from the refrigerator. Roll the dough into small, uniform balls, about 1 inch in diameter. Aim for consistency in size so the cookies bake evenly.
Roll each dough ball in the desiccated coconut, pressing gently so the coconut adheres well to the surface of the dough. Ensure the entire surface of the ball is coated.
Place the coated dough balls about 2 inches apart on the prepared baking sheet.
Using your thumb, the back of a small measuring spoon, or even the bottom of a small glass, create an indentation in the center of each dough ball. Make sure the indentation is deep enough to hold the jam but not so deep that it goes through to the bottom of the cookie. If the edges crack, gently smooth them with your fingers.
Spoon about 1/2 teaspoon of your chosen fruit jam into each indentation. Don’t overfill, as the jam can bubble over during baking. Stirring the jam before spooning helps to make it smoother and easier to work with.
Bake for 12-15 minutes, or until the edges of the cookies are lightly golden brown and the coconut is toasted. The jam will be bubbly. Baking time may vary depending on your oven, so keep an eye on them.
Remove the baking sheet from the oven and let the cookies cool on the sheet for 5 minutes before carefully transferring them to a wire rack to cool completely. Cooling on the sheet initially helps them set and prevents them from breaking.
Once completely cooled, store the cookies in an airtight container. Enjoy your homemade Coconut Jam Thumbprint Cookies!