- 0 Facebook
- 5 Pinterest
- 5 Email
- Copy Link
- 10 shares
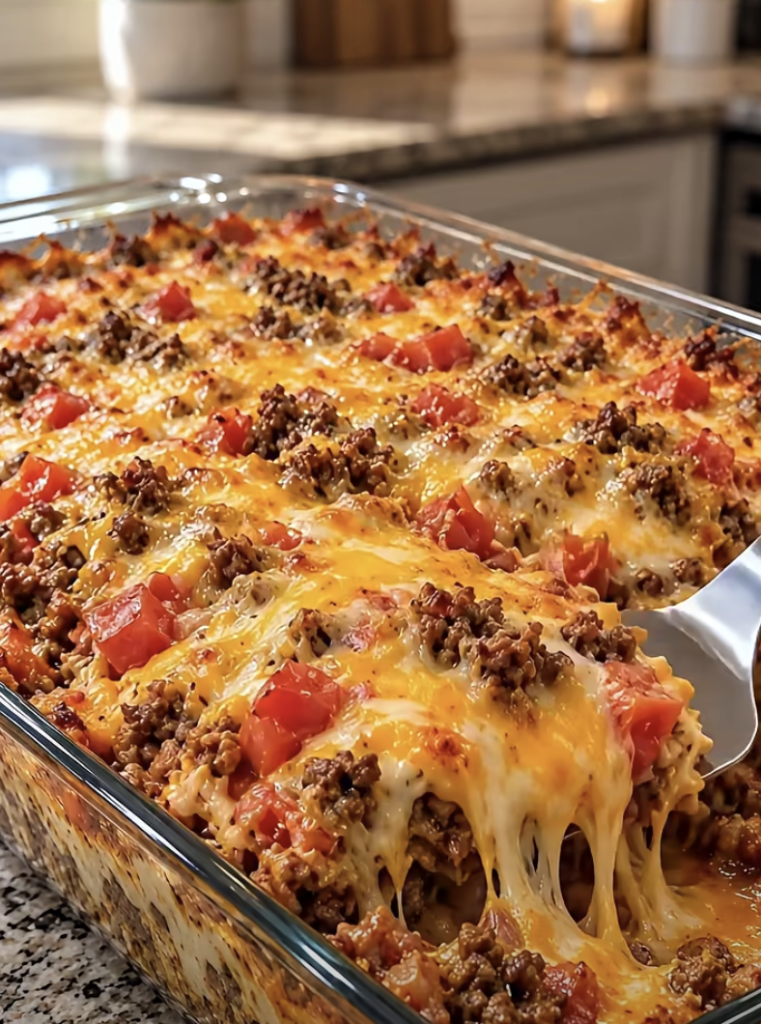
Crunchy tortilla chips, bubbling cheese, and seasoned beef all tucked into one baking dish : this taco casserole delivers every bit of taco-night fun without the shell-juggling. Savory ground beef, black beans, and sweet corn get layered with crisp chips and a blanket of melty Mexican-blend cheese, then baked until golden and gooey at the edges. It’s the kind of homemade comfort that makes drive-thru runs feel pointless, especially with a dollop of cool sour cream and fresh diced tomatoes on top.
Why Love This Cheesy Loaded Taco Casserole?
This Cheesy Loaded Taco Casserole is a favorite because it turns familiar taco night flavors into an easy, one-dish meal with 20 minutes of prep and about 30 in the oven . Browning the beef with onion before adding the taco seasoning and a splash of water builds a savory, well-coated base. Draining the tomatoes with green chilies, along with the black beans and corn, keeps the layers from turning watery. Lightly crushed tortilla chips add crunch and soak up just enough sauce to stay pleasantly textured. Splitting the Mexican-blend cheese between the middle and the top gives you gooey pockets inside and a golden, bubbly crust. Finish with cool sour cream and fresh diced tomatoes for a bright contrast. It feeds six, reheats well for up to 3 days, and is an easy win for picky eaters and anyone tired of drive-thru dinners.
Ingredient Notes
The right ingredients, prepped the right way, are what make this Cheesy Loaded Taco Casserole bubbly and flavorful instead of soggy or bland. Here’s what each one brings to the dish and how to get the best results.
The Savory Base
- Ground beef (1 lb) : This is the hearty, savory backbone of the casserole. Choose 85/15 or 80/20 for the best flavor, and drain any excess fat after browning so the layers stay rich but not greasy. Ground turkey or chicken works as a lighter swap; add a teaspoon of oil to keep it juicy.
- Small onion, diced : Onion adds sweetness and aroma as it softens in the beef drippings. Dice it small and evenly so it melts into the filling, and cook until translucent before adding the seasoning. Yellow onion is ideal, though white onion gives a slightly sharper bite.
- Taco seasoning (1 oz packet) : This delivers the signature chili, cumin, and garlic flavor in one step. Look for a low-sodium version if you like to control the salt, since the cheese and chips already contribute plenty. Out of packets? About 2½ tablespoons of homemade taco seasoning is a good stand-in.
- Water (¼ cup) : A small splash helps the seasoning dissolve and cling to the meat, forming a light sauce instead of a dry crumble. Simmer it just until it thickens slightly so the casserole doesn’t turn watery in the oven .
The Hearty Mix-Ins
- Diced tomatoes with green chilies (10 oz can), drained : These add gentle heat, tang, and moisture. Draining thoroughly is key to keeping the layers from turning soggy. Choose mild or hot depending on your crowd, or use plain diced tomatoes plus a spoonful of canned green chiles.
- Black beans (15 oz can), drained and rinsed : Beans bring earthy flavor, fiber, and a creamy bite that makes the casserole more filling. Rinsing removes the starchy canning liquid and reduces sodium, which gives you a cleaner flavor and better texture. Pinto beans are an easy substitute.
- Corn (1 cup), drained : Corn adds pops of sweetness that balance the spice and savory beef. Canned, thawed frozen, or fresh kernels all work; just pat them dry so they don’t add extra liquid.
The Creamy and Crunchy Layers
- Sour cream (½ cup) : It adds cool, tangy creaminess that mellows the spice and rounds out each bite. Full-fat sour cream gives the best flavor and texture, but plain Greek yogurt is a good lighter option. Let it sit out for a few minutes before using so it spreads or dollops more easily.
- Tortilla chips, lightly crushed (3 cups) : The chips create crunchy-yet-tender layers that soak up just enough sauce without dissolving. Choose sturdy, restaurant-style chips and crush them into bite-sized pieces rather than crumbs. Lightly salted chips keep the dish from becoming too salty.
The Cheesy Finish
- Mexican-blend cheese, shredded (2 cups, divided) : This blend of melty cheeses creates gooey pockets inside and a golden, bubbly crust on top. Shredding it from a block usually melts smoother than bagged cheese, which contains anti-caking agents. Use half between the layers and save the rest for the final blanket.
- Fresh diced tomatoes (½ cup) : These add bright, juicy freshness that cuts through the richness of the cheese and beef. Roma tomatoes work especially well because they’re meaty and less watery. Add them right before serving so they stay crisp and vibrant.
Step-by-Step Instructions
- Preheat the oven to 350°F and lightly grease a 9×13-inch baking dish . Pat the drained corn and diced tomatoes with green chilies dry with a paper towel so extra moisture doesn’t sneak into the layers.
- Brown the ground beef with the diced onion in a large skillet over medium-high heat for 6 to 8 minutes. Break the meat into small crumbles until no pink remains and the onion turns translucent, then drain off the excess fat.
- Stir in the taco seasoning and ¼ cup water, then simmer for 2 to 3 minutes. I like to wait until the liquid reduces to a glossy coating on the meat, since a thin, watery sauce is the quickest way to a soggy casserole.
- Fold in the drained tomatoes with green chilies, black beans, and corn, and cook for 1 to 2 minutes until heated through. The mixture should look hearty and scoopable, not soupy.
- Scatter half of the crushed tortilla chips across the bottom of the dish, then spoon half of the beef mixture on top. Dollop on about ¼ cup of the sour cream and sprinkle with 1 cup of the cheese.
- Repeat with the remaining beef mixture and chips, then finish with the remaining 1 cup of cheese. I usually press the top layer down lightly with a spatula so the cheese melts evenly over every corner.
- Bake uncovered for 25 to 30 minutes, until the cheese is bubbling and the edges turn golden. If the top browns faster than you’d like, tent it loosely with foil for the last few minutes.
- Let the casserole rest for 5 minutes so the layers set and slice cleanly. Top with the fresh diced tomatoes and a dollop of the remaining sour cream just before serving, so the tomatoes stay crisp and bright.
Tip: For extra-crunchy chips on top, hold back about ½ cup of the crushed chips and sprinkle them over the cheese during the last 5 minutes of baking.
Reminder: Store leftovers in an airtight container in the refrigerator for up to 3 days, and add the fresh tomatoes and sour cream only when serving.
Perfect Pairings & Serving Ideas
- Plate it with a little contrast: Let the casserole rest the full 5 minutes, then cut it into generous squares with a sturdy spatula so the layers stay intact. Serve this Cheesy Loaded Taco Casserole family-style from the 9×13 dish, or lift squares onto warm, shallow bowls. Add the fresh diced tomatoes and a spoonful of sour cream at the table so they stay cool and crisp against the hot cheese. A lime wedge, a pinch of chopped cilantro, or a few slices of ripe avocado make it look as good as it tastes.
- Add something crisp and acidic: The cheese, beef, and beans are rich, so I like a sharp, fresh side to balance them. A romaine and cucumber salad tossed with lime juice, olive oil, and a pinch of salt works well. So does a quick slaw of shredded cabbage, jicama, and cilantro. Fresh pico de gallo or guacamole with extra tortilla chips also fits, but you don’t need more starch, since the casserole is already hearty with beans, corn, and chips.
- Choose drinks that cool the spice: An ice-cold Mexican lager with a squeeze of lime cuts through the richness and softens the green chile heat. For wine, a dry rosé or an off-dry Riesling is refreshing next to the taco seasoning. For a non-alcoholic option, try sparkling limeade or a pitcher of cucumber-lime agua fresca.
- Match the serving style to the occasion: On a busy weeknight, a square of casserole with a simple green salad is a full meal for six. For a crowd, I set out a small topping bar with salsa, pickled jalapeños, sliced green onions, hot sauce, and extra sour cream, so everyone can customize their plate. Leftover squares are great for next-day lunches with a fresh handful of crushed chips on top.
Storage & Freezing
- Refrigerate: Let the Cheesy Loaded Taco Casserole cool for about 30 minutes, then cover the baking dish tightly or transfer portions to an airtight container. Leftovers keep for up to 3 days in the fridge. The chips soften as they absorb the beef juices, which makes the layers more like a tender, tamale-style bake. The flavor deepens overnight. Keep the fresh diced tomatoes and extra sour cream off until serving, since the tomatoes turn watery and dull when stored on top.
- Freeze: Cooled portions freeze well for up to 2 months in freezer-safe containers, or wrap the whole dish in plastic wrap and then foil. The beef, black beans, corn, and cheese all handle freezing nicely. The sour cream layer can turn slightly grainy after thawing, and fresh tomatoes turn mushy, so they are best added after reheating. I freeze individual squares without any garnish. Thaw them overnight in the fridge before reheating, because reheating from frozen leaves the center cold while the edges dry out.
- Reheat: The oven gives the best texture. Cover with foil and warm at 350°F for 15 to 20 minutes for single portions (25 to 30 for the full dish), until the center reaches 165°F. Uncover for the last 5 minutes so the cheese bubbles again. To revive the crunch, scatter a small handful of fresh crushed chips over the top during that uncovered stretch. A microwave works for a quick lunch, heating in 60 to 90 second bursts, but the chips will stay soft. Finish with fresh tomatoes and a spoonful of sour cream to bring back the bright contrast.
Expert Tips
- Dry your mix-ins : Pat the drained corn and tomatoes with green chilies dry; hidden moisture is the top reason a Cheesy Loaded Taco Casserole turns soggy.
- Reduce the sauce : I simmer the beef with taco seasoning and water until it forms a glossy coating, not a puddle, so the chips stay crisp-tender.
- Crush chips by hand : Aim for bite-sized pieces, not crumbs. Sturdy, restaurant-style chips hold their structure under the beef and sour cream far better than thin ones.
- Shred your own cheese : Block Mexican-blend cheese shredded at home melts smoother and browns more evenly than bagged, which carries anti-caking starch.
- Save chips for topping : I hold back ½ cup crushed chips and scatter them over the cheese for the last 5 minutes, giving a crunchy top that doesn’t burn.
Variations & Substitutions
This Cheesy Loaded Taco Casserole is wonderfully forgiving, so adjust it to fit your pantry, your diet, or your heat tolerance. These swaps keep the layers crisp-tender and the cheese bubbly.
- Make it vegetarian : Replace the beef with 8 ounces of finely chopped sautéed mushrooms and an extra can of drained black beans for a hearty, meaty texture.
- Go gluten-free : Choose certified gluten-free corn tortilla chips and a gluten-free taco seasoning, then check the labels on your canned goods and shredded cheese.
- Turn up the heat : I stir in a diced jalapeño with the onion, or swap in pepper jack for half the cheese, when I want a spicier bake.
- Try chorizo instead : Replace half the ground beef with fresh Mexican chorizo or spicy pork sausage, browned and drained well, for deeper smoky flavor.
- Dairy-free version : Swap in a dairy-free Mexican-style shredded cheese and plant-based sour cream; melting varies by brand, so expect a slightly softer, less golden top.
- Add bell pepper : Sauté one diced red or green bell pepper alongside the onion for added sweetness, color, and texture without changing the cook times.
Make Ahead Options
This Cheesy Loaded Taco Casserole is perfect for meal prep, saving you precious time on busy weeknights! You can prepare the beef, onion, tomato, bean, and corn mixture up to 24 hours in advance, then cool it completely and refrigerate it in an airtight container. For the best texture, keep the crushed chips, cheese, and sour cream separate until baking, since this prevents sogginess. When you’re ready to serve, simply layer everything in your greased dish, then bake at 350°F for 30 to 35 minutes (the chilled filling needs a few extra minutes). Add the fresh tomatoes and sour cream afterward, and it’s just as delicious!
Recipe FAQs
Why does my Cheesy Loaded Taco Casserole turn soggy? Hidden moisture; pat corn and tomatoes dry.
Can I use ground turkey instead of beef? Yes, add a teaspoon of oil for juiciness.
Which tortilla chips work best here? Sturdy, restaurant-style chips hold their crunch.
How do I get a crunchier top? I save ½ cup chips for the last 5 minutes.
Can I freeze leftovers? Yes, up to 2 months; skip fresh garnishes.
How long do leftovers last in the fridge? Up to 3 days, stored airtight.
- 0 Facebook
- 5 Pinterest
- 5 Email
- Copy Link
- 10 shares
Irresistibly Cheesy Loaded Taco Casserole Everyone Craves
Ingredients
Instructions
Preheat the oven to 350°F and lightly grease a 9×13-inch baking dish. Pat the drained corn and diced tomatoes with green chilies dry with a paper towel so extra moisture doesn’t sneak into the layers.
Brown the ground beef with the diced onion in a large skillet over medium-high heat for 6 to 8 minutes. Break the meat into small crumbles until no pink remains and the onion turns translucent, then drain off the excess fat.
Stir in the taco seasoning and 1/4 cup water, then simmer for 2 to 3 minutes until the liquid reduces to a glossy coating on the meat so the mixture is not watery.
Fold in the drained diced tomatoes with green chilies, black beans, and corn, and cook for 1 to 2 minutes until heated through. The mixture should look hearty and scoopable, not soupy.
Scatter half of the crushed tortilla chips across the bottom of the dish, then spoon half of the beef mixture on top. Dollop about 1/4 cup of the sour cream over the beef and sprinkle with 1 cup of the cheese.
Repeat with the remaining beef mixture and chips, then finish with the remaining 1 cup of cheese. Press the top layer down lightly with a spatula so the cheese melts evenly over every corner.
Bake uncovered for 25 to 30 minutes, until the cheese is bubbling and the edges turn golden. If the top browns faster than you’d like, tent it loosely with foil for the last few minutes.
Let the casserole rest for 5 minutes so the layers set and slice cleanly. Top each serving with the fresh diced tomatoes and a dollop of the remaining sour cream just before serving to keep the tomatoes crisp and bright.
Notes
Dry your mix-ins: Pat the drained corn and tomatoes with green chilies dry; hidden moisture is the top reason this casserole turns soggy.
Reduce the sauce: Simmer the beef with taco seasoning and water until it forms a glossy coating, not a puddle, so the chips stay crisp-tender.
Crush chips by hand: Aim for bite-sized pieces, not crumbs. Sturdy, restaurant-style chips hold up best.
Shred your own cheese: Block Mexican-blend cheese shredded at home melts smoother and browns more evenly than pre-shredded bagged cheese.
Save chips for topping: Hold back about 1/2 cup of crushed chips and scatter them over the cheese for the last 5 minutes of baking to get an extra-crunchy top.
Refrigerate: Cool for about 30 minutes, then cover or transfer leftovers to an airtight container; keep fresh tomatoes and extra sour cream off until serving. Leftovers keep up to 3 days.
Freeze: Cooled portions freeze up to 2 months; thaw overnight in the fridge before reheating for best texture. Do not freeze with fresh tomatoes or sour cream garnish.
Reheat: Warm in a 350°F oven covered with foil (15–20 minutes for single portions, 25–30 for the full dish) until the center reaches 165°F, then uncover for the last 5 minutes to re-bubble the cheese. A microwave works for speed but will soften the chips.
Nutrition
| Serving Size | 1/6 of casserole (about 1 1/2 cups) |
|---|---|
| Calories | Approx. 530 kcal |
| Sugar Content | 4 g |
| Sodium Content | 820 mg |
| Fat Content | 35 g |
| Saturated Fat Content | 14 g |
| Unsaturated Fat Content | 18 g |
| Trans Fat Content | 0.5 g |
| Carbohydrate Content | 36 g |
| Fiber Content | 6 g |
| Protein Content | 31 g |
| Cholesterol Content | 90 mg |