- 0 Facebook
- 714 Pinterest
- 2 Email
- Copy Link
- 716 shares
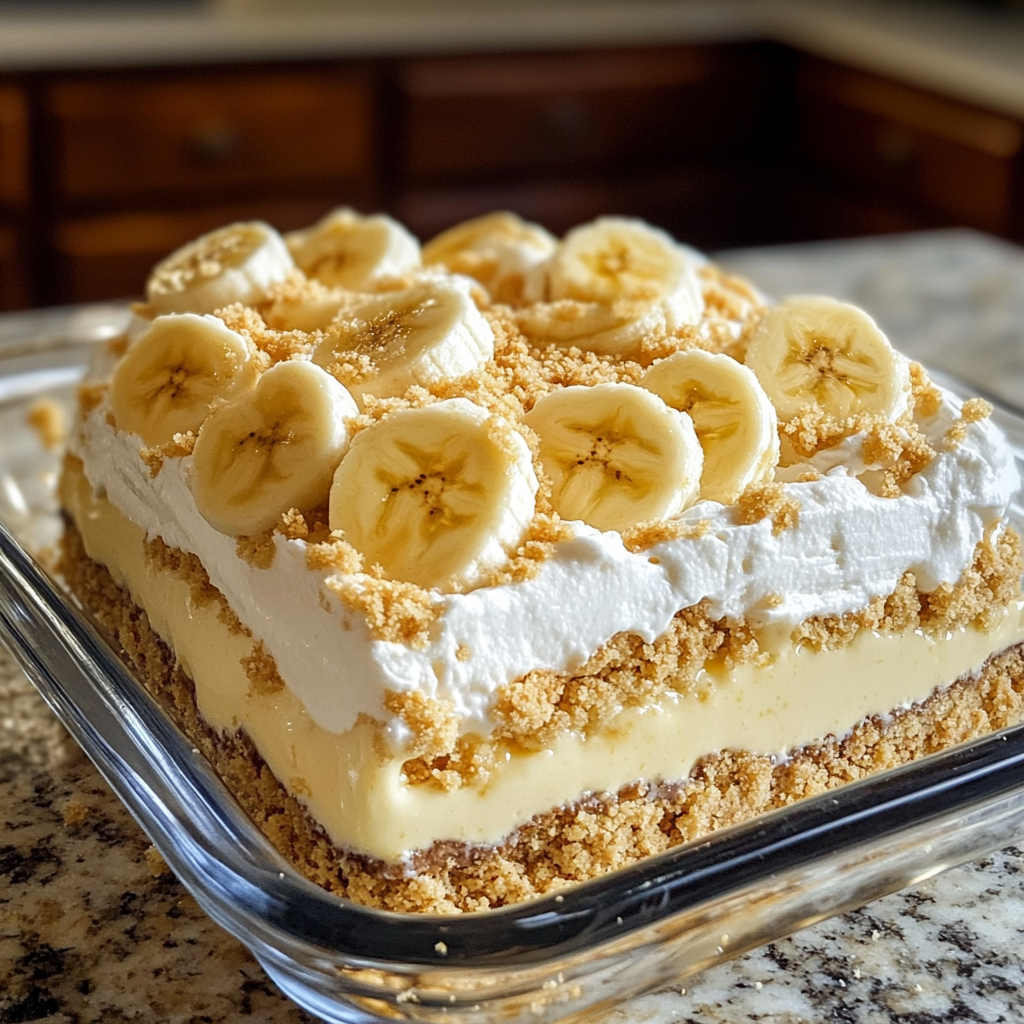
I still remember the first time I made Banana Pudding Lush for a family gathering last summer. The dessert disappeared so quickly I barely got a piece for myself! Since then, it’s become my go-to dessert when I need something impressive yet incredibly simple to prepare. What I love most about this layered treat is how the creamy banana pudding nestles between a buttery vanilla wafer crust and a cloud-like whipped topping, creating a dessert that’s both comforting and indulgent. With minimal active prep time and no baking required (except for a quick crust), it’s perfect for those hot summer days when I don’t want to turn on the oven . I’ve served it at birthday celebrations, casual gatherings, and even as a midweek pick-me-up, often experimenting with different fruits on top—though the classic banana version remains my favorite!
Why You’ll Love This Recipe
I’ve found so many reasons to love this Banana Pudding Lush over the years:
- Simplicity at Its Best: Even with multiple layers, this dessert comes together in minutes. I appreciate how it offers the impression of complexity while requiring minimal effort.
- Make-Ahead Magic: I can prepare it a day in advance, giving the flavors time to meld and saving myself from last-minute dessert stress. It’s like having a secret weapon in my refrigerator !
- Crowd-Pleasing Appeal: I’ve never seen leftovers when I bring this to gatherings. The nostalgic flavor of banana pudding reimagined as a layered dessert connects with everyone’s inner child.
- No-Bake Option: While I prefer to briefly bake the crust for extra stability, during summer’s heat, I often press it firmly and chill it instead. Both approaches deliver that satisfying buttery crunch.
- Versatile Serving: I’ve discovered it’s equally impressive served in a glass trifle dish showcasing the beautiful layers or portioned into individual glasses for a more elegant presentation.
Ingredients for This Recipe
For the crust:
- Vanilla Wafers, 1 box : The sweet, nostalgic foundation that pays homage to traditional banana pudding. I find that crushing them in a food processor creates the most consistent texture.
- Butter, ½ cup melted: The binding agent that transforms those crumbs into a cohesive crust. I always use unsalted butter for better control over the final flavor.
For the layers:
- Cream Cheese, 8 oz softened: The stabilizing base of the middle layer. I leave it out for at least an hour before mixing for that perfectly smooth, lump-free texture.
- Powdered Sugar, 1 cup: Sweetens the cream cheese layer without the grittiness of granulated sugar. I sift it first to eliminate any lumps for the silkiest texture.
- Whipped Topping, 1 (8 oz) tub, divided: Creates lightness throughout the dessert. I’ve found that real whipped cream can be substituted but doesn’t hold up as well for extended periods.
- Instant Banana Pudding Mix, 2 (3.4 oz) boxes: The star flavor component that infuses the dessert with that unmistakable banana essence. I prefer instant for its reliability and smoother set.
- Cold Milk, 3 cups: Activates the pudding mix and creates the perfect consistency. I use whole milk for richness, but 2% works well too for a lighter option.
For the topping:
- Ripe Bananas, 2 sliced: Provides fresh fruit flavor and authentic banana goodness. I look for bananas with light brown spots for the perfect sweetness balance.
- Crushed Vanilla Wafers (for garnish): Adds texture contrast and visual appeal while reinforcing the flavor profile. I crush these more coarsely than the crust for an attractive finish.
How to Make This Recipe
Prepare the Crust
- Start by crushing the vanilla wafers into fine crumbs. I use a food processor for speed, but a sealed plastic bag and rolling pin works perfectly fine too.
- Mix the crumbs with melted butter until they resemble wet sand. The mixture should hold together when pressed between your fingers.
- Press this mixture firmly into the bottom of a 9×13 inch baking dish , creating an even layer. The back of a measuring cup helps achieve a smooth, compact crust.
- Bake at 350°F for 8-10 minutes until lightly golden and fragrant, then cool completely. (For a no-bake option, simply refrigerate for 30 minutes until firm.)
Create the Cream Cheese Layer
- Beat the softened cream cheese until smooth and fluffy, ensuring no lumps remain. This creates the velvety foundation for our first layer.
- Add powdered sugar gradually while mixing on medium speed. The mixture should be sweet but not overpowering.
- Fold in 1 cup of the whipped topping gently until fully incorporated. This lightens the mixture while maintaining its structure.
- Spread this mixture evenly over the cooled crust, creating a smooth layer that reaches all edges.
Prepare the Pudding Layer
- In a separate bowl, whisk together the banana pudding mix and cold milk for about 2 minutes until it begins to thicken. The mixture should coat the back of a spoon but still be pourable.
- Pour the pudding mixture over the cream cheese layer, smoothing with a spatula. Take your time to ensure even coverage.
- Refrigerate for 15-20 minutes to allow the pudding to set slightly before adding the final toppings.
Add the Finishing Touches
- Spread the remaining whipped topping over the set pudding layer, creating gentle swirls for visual appeal.
- Just before serving, arrange the sliced bananas on top and sprinkle with crushed vanilla wafers. I find this final touch brings everything together beautifully.
- Refrigerate for at least 4 hours, though overnight is better, allowing all the flavors to meld together into a harmonious dessert experience.
Expert Cooking Tips
- Prevent Banana Browning: I dip my banana slices in lemon juice before arranging them on top. This acidity prevents that unappealing browning while adding a subtle brightness.
- Perfect Pudding Consistency: I whisk the pudding vigorously for exactly 2 minutes by the clock. Undermixing leaves lumps, while overmixing can make it too thick to spread properly.
- Cutting Clean Slices: I’ve found that chilling the dessert overnight and using a knife dipped in hot water between cuts creates those picture-perfect servings.
- Wafer Selection: I prefer Nilla wafers for their consistent quality, but any vanilla wafer works. I’ve discovered that slightly stale wafers actually make a better crust!
- Layering Technique: I always ensure each layer is completely set before adding the next. Patience here prevents the dreaded layer blending that ruins the distinct texture experience.
Proper Storage
- Refrigerator Storage: I keep this dessert covered tightly with plastic wrap in the refrigerator for up to 3 days. The crust will gradually soften, creating an even more pudding-like texture.
- Freezer Option: I’ve successfully frozen portions without the fresh banana topping for up to 1 month. I wrap individual servings in plastic, then foil, to prevent freezer burn.
- Banana Strategy: For make-ahead preparation, I add the banana slices just before serving. This prevents discoloration and maintains that fresh fruit texture.
- Serving From Cold: I remove the dessert from the refrigerator about 10 minutes before serving. The slightly tempered texture enhances the creamy mouthfeel.
Variations and Substitutions
- Chocolate Lover’s Version: I sometimes substitute chocolate pudding mix and add a layer of chocolate ganache over the crust. The chocolate-banana combination is absolutely divine!
- Lighter Option: I’ve successfully used Neufchâtel cheese instead of full-fat cream cheese and sugar-free pudding mix with skim milk. The texture remains surprisingly creamy with fewer calories.
- Gluten-Free Adaptation: For gluten-sensitive friends, I create the crust using gluten-free graham crackers. The slight flavor change complements the banana beautifully.
- Tropical Twist: One summer, I added a layer of crushed pineapple (well-drained) between the pudding and whipped topping. The hint of acidity balanced the sweetness perfectly.
- Individual Parfaits: For elegant dinner parties, I layer the ingredients in clear glasses, creating stunning individual desserts that always impress my guests.
What Goes with This Recipe
- Fresh Berries: I serve strawberries or blueberries alongside for a pop of color and tartness that cuts through the creamy sweetness.
- Hot Coffee: The bitter notes of a strong coffee create the perfect flavor counterpoint. I find the temperature contrast particularly satisfying.
- Vanilla Bean Ice Cream: For an indulgent dessert experience, I add a small scoop alongside each serving. The melting cream creates a delightful sauce.
- Caramel Sauce: A light drizzle over the top elevates this homey dessert to restaurant quality. I warm it slightly for the perfect consistency.
- Toasted Nuts: I occasionally sprinkle chopped toasted pecans on top for added crunch and nutty depth that complements the sweet bananas.
FAQ
Can I make this without banana pudding mix? Yes! I sometimes use vanilla pudding and fold in mashed ripe bananas for a more natural flavor profile.
How do I prevent soggy crust? I find that baking the crust briefly and cooling completely before adding wet layers makes all the difference.
Can I use fresh whipped cream instead of whipped topping? Absolutely, though I stabilize it with gelatin if the dessert needs to hold up for several hours.
What if my bananas ripen too quickly? I keep this adaptable by using banana extract in the pudding and omitting fresh bananas when necessary.
Will this travel well to a potluck? I transport it in a cooler and add the final banana garnish upon arrival for the best presentation.
- 0 Facebook
- 714 Pinterest
- 2 Email
- Copy Link
- 716 shares
Banana Pudding Lush
Ingredients
Instructions
Crush vanilla wafers and mix with melted butter. Press into 9×13 dish and bake at 350°F for 8-10 minutes. Cool completely.
Beat cream cheese until smooth. Add powdered sugar and mix well. Fold in 1 cup whipped topping and spread over cooled crust.
Whisk pudding mix and milk for 2 minutes. Pour over cream cheese layer and refrigerate for 15-20 minutes.
Spread remaining whipped topping over pudding layer.
Just before serving, top with sliced bananas and crushed wafers.
Refrigerate at least 4 hours or overnight before serving.