- 0 Facebook
- 645 Pinterest
- 4 Email
- Copy Link
- 649 shares
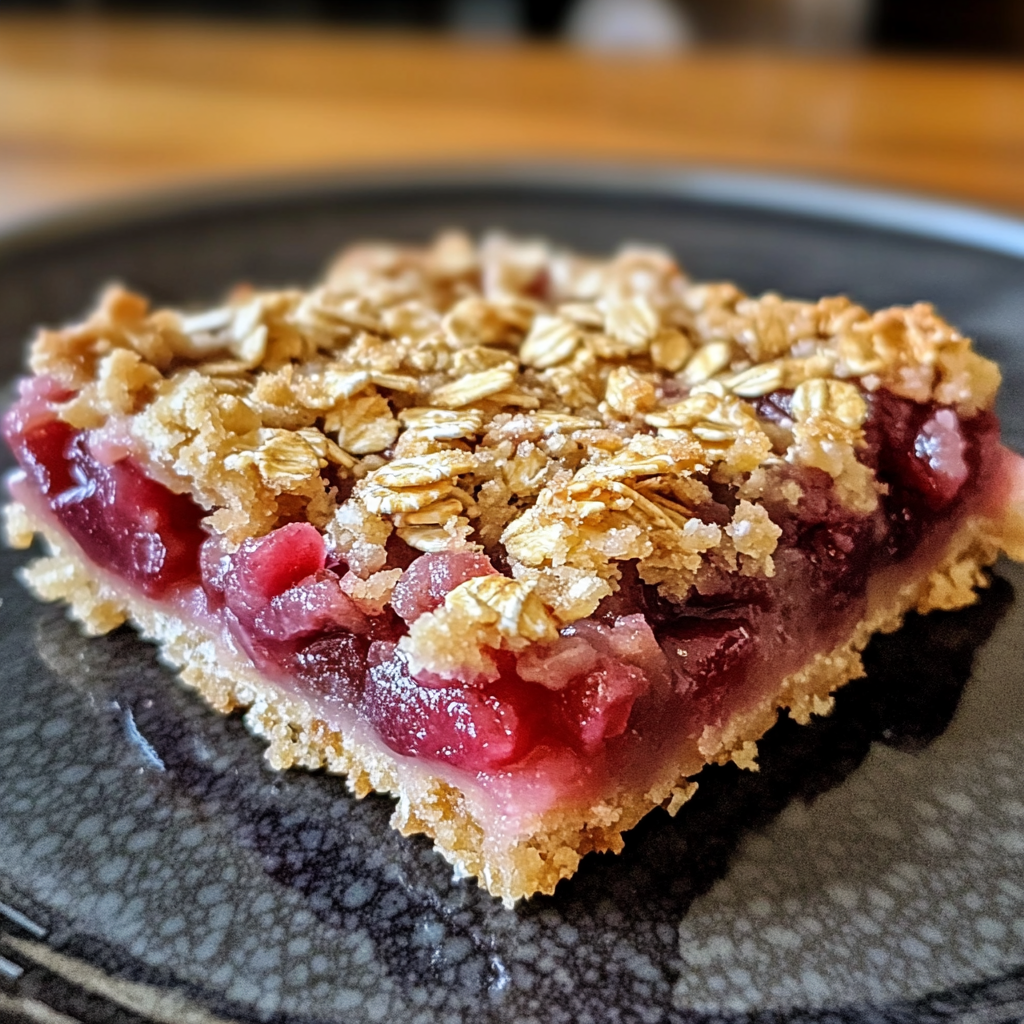
I first stumbled upon these Amish Oatmeal Rhubarb Bars during a spring visit to Pennsylvania’s countryside, and I’ve been smitten ever since. For years, I kept the recipe tucked away, only bringing it out when rhubarb season arrived. Now I find myself wondering why I limited these delightful treats to just one season! The buttery oatmeal crumble paired with tart-sweet rhubarb creates this irresistible harmony that transports me back to simpler times with every bite. What makes these bars truly special is how effortlessly they come together—just 15 minutes of prep before they’re ready for the oven . I love serving them slightly warm with a scoop of vanilla ice cream for dessert, though they’re equally divine with morning coffee or packed in lunch boxes. Whether you stick with classic rhubarb or experiment with strawberry-rhubarb for a sweeter twist, these bars never disappoint.
Why You’ll Love This Recipe
- Perfectly Balanced Flavors: I find the tartness of rhubarb against the sweet, buttery crumble creates a flavor combination that’s absolutely magical—neither too sweet nor too tart.
- Nostalgic Comfort: These bars remind me of countryside bakeries and family gatherings. There’s something so warmly familiar about the aroma that fills my kitchen when they’re baking.
- Simple Ingredients: I love that these bars rely on pantry staples plus fresh rhubarb. No fancy equipment or obscure ingredients required—just honest, straightforward baking.
- Versatile Treat: I’ve served these at brunch, packed them for picnics, and presented them as dessert. They’re rustic enough for casual gatherings but special enough for company.
- Make-Ahead Friendly: I often bake these the day before serving. The flavors meld beautifully overnight, which means less stress when entertaining.
Ingredients for This Recipe
- Rolled Oats: The backbone of our crumble mixture. I always use old-fashioned rolled oats rather than quick-cooking for that perfect hearty texture and rustic appearance.
- All-Purpose Flour: Provides structure to our bars. I’ve found that unbleached flour works beautifully here, though regular all-purpose is perfectly fine too.
- Brown Sugar: Adds a rich molasses flavor to the crumble. I always pack it firmly in the measuring cup for accuracy—loose measurements can dramatically affect sweetness.
- Baking Soda: Just a touch helps the crumble achieve that perfect tender-crisp texture. I make sure mine is fresh by replacing it every six months.
- Salt: Enhances all other flavors. I prefer kosher salt for its clean taste, but table salt works well if that’s what you have on hand.
- Unsalted Butter: Creates that irresistible rich flavor and binds our crumble together. I melt it completely but let it cool slightly before mixing to prevent “cooking” the oats.
- Rhubarb: The star of the show! I look for firm, bright red stalks which indicate freshness and provide that gorgeous rosy color to the filling.
- Granulated Sugar: Balances rhubarb’s natural tartness. I sometimes adjust this amount slightly depending on how sweet my rhubarb appears to be.
- Cornstarch: Thickens the filling to a perfect, sliceable consistency. I always mix it with sugar first to prevent clumping when combined with liquid.
- Lemon Juice: Brightens the filling with a subtle tang. I use fresh-squeezed whenever possible—the difference in flavor is noticeable to me.
- Vanilla Extract: Adds depth to the filling. I’m partial to pure vanilla extract rather than imitation for its rich, complex flavor profile.
How to Make This Recipe
1. Prepare the Pan and Oven
I always start by preheating my oven to 350°F (175°C) and lining an 8×8-inch baking pan with parchment paper, leaving some overhang for easy removal later. This simple step makes cutting perfect bars so much easier.
2. Make the Crumble Base
In a large bowl, I combine the rolled oats, all-purpose flour, brown sugar, baking soda, and salt, whisking them together until evenly distributed. Then I pour in the melted butter and stir until the mixture resembles coarse crumbs that hold together when pressed. The texture should be slightly damp but crumbly—like wet sand at the beach.
3. Create the First Layer
I firmly press about two-thirds of this oat mixture into the bottom of my prepared pan, creating an even base layer. I use the bottom of a measuring cup to really compact it down, which helps the bars hold together beautifully after baking.
4. Prepare the Rhubarb Filling
In a medium bowl, I toss the chopped rhubarb with granulated sugar and cornstarch until every piece is well-coated. Then I stir in the lemon juice and vanilla extract, noting how the rhubarb begins to glisten as the sugar starts to draw out its juices—a promising sign of the flavor developing.
5. Assemble the Bars
I spread the rhubarb mixture evenly over the pressed oat base, making sure to scrape all those precious juices from the bowl. Then I sprinkle the remaining oat mixture over the top, creating a rustic, crumbly topping that will bake to golden perfection.
6. Bake to Perfection
Into the oven they go for 35-40 minutes, until the top is golden brown and the edges are slightly darker. I look for bubbling around the edges of the filling—that’s when I know the rhubarb has released its juices and the cornstarch has worked its thickening magic.
7. Cool Before Cutting
Patience is key here! I allow the bars to cool completely in the pan set on a wire rack, usually about 2 hours. This cooling period allows the filling to set properly, making for clean, beautiful cuts. For extra-neat squares, I sometimes chill the bars in the refrigerator for an hour before cutting.
Expert Cooking Tips
- Toast the oats first. I sometimes toast the oats in a dry skillet for 5 minutes before using them. This extra step deepens their nutty flavor and adds incredible dimension to the bars.
- Don’t overmix the crumble. I mix just until the butter is incorporated. Overmixing can make the crumble tough rather than tender and crumbly.
- Cut rhubarb consistently. I aim for pieces about 1/2-inch in size. Uniform pieces ensure even cooking and prevent some pieces from becoming too mushy while others remain too firm.
- Let the bars set completely. I’ve learned through countless impatient moments that cutting too soon results in a messy filling that doesn’t showcase the beautiful layers.
- Use the parchment overhang as handles. I lift the entire batch out of the pan before cutting. This trick allows me to cut clean edges on all sides, not just the middle sections.
Proper Storage
- Room Temperature: I store these bars in an airtight container for up to 2 days. The crumble topping stays crisp, but the filling remains perfectly moist.
- Refrigerator Method: For longer freshness (up to 5 days), I refrigerate the bars in a sealed container with parchment between layers to prevent sticking.
- Freezer Storage: I wrap individual bars tightly in plastic, then foil, before freezing for up to 3 months. This double-wrapping prevents freezer burn effectively.
- Thawing Technique: I thaw frozen bars overnight in the refrigerator , then let them come to room temperature for 30 minutes before serving for the best texture.
- Refreshing Leftovers: When bars lose their crispness, I pop them in a 300°F oven for 5-7 minutes. This restores that fresh-baked quality beautifully.
Variations and Substitutions
Fruit Variations
I love experimenting with different fruit combinations. Strawberry-rhubarb is a classic pairing—I use half rhubarb and half strawberries. For a more autumnal twist, I sometimes substitute apples for rhubarb, adding a teaspoon of cinnamon to the filling. The versatility of this recipe never ceases to amaze me.
Dietary Adaptations
For gluten-free bars, I substitute the all-purpose flour with a reliable 1:1 gluten-free baking blend and use certified gluten-free oats. Vegan friends aren’t left out either—I’ve successfully used plant-based butter with excellent results, though I find it needs an extra tablespoon to achieve the right crumble consistency.
Flavor Enhancements
I sometimes add a touch of warming spices like cinnamon, nutmeg, or cardamom to the crumble mixture—about 1/2 teaspoon is perfect. For textural contrast, I occasionally mix 1/2 cup of chopped nuts like pecans or walnuts into the topping portion of the crumble. The added crunch elevates these bars to new heights.
Sweet Adjustments
When I’m serving these to people who prefer things less tart, I increase the granulated sugar in the filling to 3/4 cup. Conversely, for those who appreciate rhubarb’s natural tang, I reduce it to 1/3 cup. I’ve found this flexibility makes these bars universally appealing.
What Goes with This Recipe
- Vanilla Ice Cream: A scoop of good-quality vanilla bean ice cream creates a magical hot-cold contrast with slightly warm bars. The melting creaminess against the tart filling is simply divine.
- Fresh Whipped Cream: I whip heavy cream with just a touch of powdered sugar until soft peaks form. The light, billowy texture pairs beautifully with the dense, fruity bars.
- Hot Tea or Coffee: The robust flavor of these bars stands up wonderfully to a strong cup of black tea or coffee. I find this pairing especially comforting on rainy afternoons.
- Cheese Board Components: For a sophisticated dessert offering, I serve these bars alongside aged cheddar or creamy brie. The sweet-tart bars balance the richness of good cheese perfectly.
- Fresh Berries: A simple side of fresh berries—particularly raspberries or blackberries—complements the rhubarb’s tartness while adding vibrant color to the plate.
FAQ
Can I use frozen rhubarb? Yes! I thaw it first and drain excess liquid to prevent soggy bars. No need to adjust other ingredients.
Why did my filling turn out runny? Likely the cornstarch wasn’t fully activated. Make sure the filling bubbles at the edges during baking.
Can I double this recipe? Absolutely! I use a 9×13-inch pan and increase baking time by about 5-10 minutes.
Are these bars too tart for kids? My little ones enjoy them, but you can increase sugar to 3/4 cup for a sweeter version.
Can I make these a day ahead? Definitely! I find the flavors actually improve overnight as they meld together beautifully.
Is it necessary to use parchment paper? I highly recommend it for easy removal and cleanup, but a well-greased pan works in a pinch.
- 0 Facebook
- 645 Pinterest
- 4 Email
- Copy Link
- 649 shares
Amish Oatmeal Rhubarb Bars
Ingredients
Instructions
Preheat oven to 350°F. Line 8×8-inch baking pan with parchment paper.
Combine oats, flour, brown sugar, baking soda, and salt. Add melted butter and mix until crumbly.
Press two-thirds of mixture into prepared pan.
Mix rhubarb, granulated sugar, cornstarch, lemon juice, and vanilla.
Spread rhubarb mixture over base and top with remaining crumble.
Bake 35-40 minutes until golden and bubbly.
Cool completely before cutting into bars.