Introduction
As the leaves begin to turn and a crisp chill fills the air, our thoughts inevitably drift to one of the most delightfully spooky holidays of the year: Halloween! While costumes and candy corn are certainly staples, for many of us, the true magic of this season lies in the kitchen. There’s nothing quite like whipping up a batch of festive treats to get into the spirit, and this year, we’re taking a classic beloved by all and giving it a hauntingly beautiful makeover. Get ready to sink your fangs into these enchanting Halloween Spider Web Sugar Cookies!
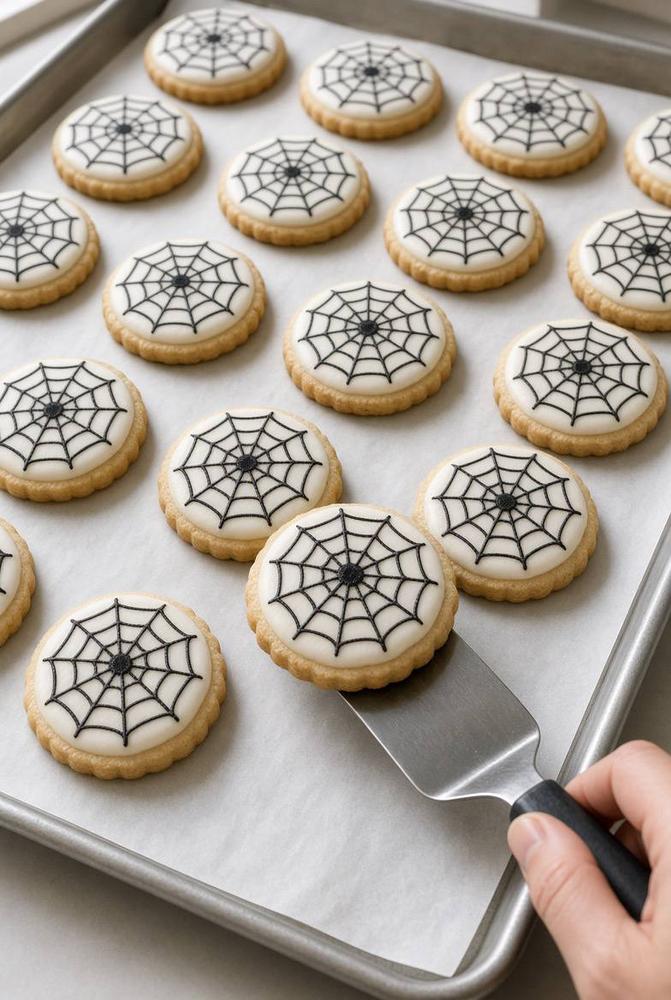
These aren’t just any sugar cookies; they’re edible works of art that perfectly capture the eerie elegance of a spider’s silken creation. Imagine a perfectly baked, buttery sugar cookie, its edges delicately scalloped, providing the ideal canvas. Then, picture it meticulously decorated with smooth, pristine white royal icing, upon which a striking black spider web design unfurls. Using a clever wet-on-wet technique, concentric black circles are transformed with a drag of a toothpick into a mesmerizing, intricate web that looks straight out of a haunted mansion. They’re visually stunning, irresistibly delicious, and surprisingly fun to create!
Whether you’re hosting a ghoulish gathering, preparing for a flurry of trick-or-treaters, or simply looking for a fun and creative baking project to do with the family, these Halloween Spider Web Sugar Cookies are guaranteed to be a showstopper. They combine the comforting familiarity of a classic sugar cookie with the exciting artistry of royal icing decoration, making them a treat that’s as delightful to look at as it is to eat. Prepare to impress everyone with these spooky sweet masterpieces!
Nutritional Information
Per serving (approximate values):
- Calories: 220
- Protein: 2g
- Carbohydrates: 35g
- Fat: 9g
- Fiber: 0g
- Sodium: 60mg
Ingredients
For the Sugar Cookies:
- 2 ½ cups all-purpose flour, plus more for dusting
- 1 teaspoon baking powder
- ½ teaspoon salt
- 1 cup (2 sticks) unsalted butter, softened
- 1 ½ cups granulated sugar
- 1 large egg
- 1 teaspoon pure vanilla extract
For the Royal Icing:
- 4 cups powdered sugar (confectioners’ sugar), sifted
- 3 tablespoons meringue powder
- ½ cup warm water, plus more if needed
- ½ teaspoon pure vanilla extract (clear extract for pure white icing)
- White gel food coloring (optional, to whiten)
- Black gel food coloring
Instructions
Prepare the Sugar Cookie Dough:
- In a medium bowl, whisk together the flour, baking powder, and salt. Set aside.
- In a large bowl, using an electric mixer, cream together the softened butter and granulated sugar until light and fluffy, about 2-3 minutes.
- Beat in the egg and vanilla extract until well combined. Scrape down the sides of the bowl as needed.
- Gradually add the dry ingredients to the wet ingredients, mixing on low speed until just combined and a soft dough forms. Be careful not to overmix.
- Divide the dough in half, flatten each half into a disc, wrap tightly in plastic wrap, and refrigerate for at least 1 hour, or up to 2 days. Chilling the dough is crucial for preventing the cookies from spreading.
Bake the Sugar Cookies:
- Preheat your oven to 375°F (190°C). Line baking sheets with parchment paper.
- On a lightly floured surface, roll out one disc of chilled dough to about ¼ inch thickness.
- Using a 3-inch round scalloped cookie cutter, cut out shapes and carefully transfer them to the prepared baking sheets, leaving about 1 inch between cookies. Gather and re-roll scraps once.
- Bake for 8-10 minutes, or until the edges are lightly golden. Do not overbake; the centers should still be pale.
- Remove from the oven and let the cookies cool on the baking sheets for 5 minutes before transferring them to a wire rack to cool completely. Repeat with the remaining dough. Ensure cookies are completely cool before icing.
Prepare the Royal Icing:
- In a large bowl, combine the sifted powdered sugar and meringue powder.
- Gradually add ½ cup warm water and vanilla extract. Beat with an electric mixer on low speed until combined, then increase to medium-high and beat for 5-7 minutes, until the icing is thick, glossy, and holds stiff peaks.
- At this point, you have stiff consistency icing. To achieve a flood consistency, add warm water, a teaspoon at a time, mixing well after each addition, until the icing drips smoothly from the spoon and a ribbon of icing disappears back into the bowl within 10-15 seconds. This is often called “10-15 second icing.”
- Divide the flood consistency icing into two bowls. Leave the larger portion white (add white gel food coloring if you want a brighter white). Tint the smaller portion with black gel food coloring until you achieve a deep black.
- Transfer both white and black flood consistency icing into separate piping bags fitted with small round tips (or simply snip a tiny corner off the bag).
Decorate the Spider Web Sugar Cookies:
- Take a completely cooled sugar cookie. Using the white icing, outline the perimeter of the cookie, then immediately flood the entire surface with white icing, using a small spatula or toothpick to spread it evenly to the edges. Work quickly, as royal icing dries fast.
- While the white icing is still wet (this is crucial for the wet-on-wet technique), immediately take the black icing. Pipe 3-4 concentric circles on top of the wet white icing, starting from the center and working your way outwards. The circles should be evenly spaced.
- Immediately after piping the black circles, take a clean toothpick or a thin skewer. Starting from the very center of the cookie, drag the toothpick outwards through the black circles to the edge of the cookie.
- Clean the toothpick and repeat this dragging motion 7-9 more times, evenly spaced around the cookie, always dragging from the center outwards. This will create the spider web effect.
- Carefully transfer the decorated cookie back to the wire rack or parchment-lined baking sheet to dry.
- Repeat the process for all remaining cookies.
- Allow the royal icing to dry completely at room temperature for at least 8-12 hours, or preferably overnight, before stacking or storing. The icing should be hard to the touch.
Cooking Tips and Variations
Tips for Success:
- Chill Your Dough: Do not skip chilling the cookie dough! This prevents the cookies from spreading too much in the oven and helps them maintain their crisp, defined edges. For even better results, chill the cut-out cookies on the baking sheet for 10-15 minutes before baking.
- Don’t Overbake: Sugar cookies are best when they are just barely golden at the edges and still pale in the center. Overbaking will make them dry and crumbly.
- Icing Consistency is Key: Royal icing is finicky, but getting the right consistency is vital. For flooding, it should be thin enough to spread easily but thick enough to stay within the piped outline. For the spider web effect, both the white and black icing need to be “flood” consistency and applied quickly while both are still wet.
- Work Quickly with Wet-on-Wet: The spider web technique relies on the white icing still being wet when you pipe the black circles and drag the toothpick. If the white icing starts to set, the black will sit on top rather than blend, and you won’t get the smooth web effect.
- Clean Your Toothpick: For crisp, clean web lines, wipe your toothpick clean after each drag through the icing.
- Patience for Drying: Royal icing needs significant time to dry and harden completely. Rushing this step will result in smudged designs.
- Use Gel Food Coloring: Gel food colorings are concentrated and won’t thin out your royal icing like liquid food colorings can.
Variations:
- Different Cookie Shapes: While round scalloped cookies are classic, feel free to use other Halloween-themed cutters like ghosts, pumpkins, or even bats. Adjust the web design to fit the shape.
- Color Schemes: Get creative with your colors! Try orange and black, purple and green, or even a spooky vibrant green with black webs.
- Buttercream Alternative: If royal icing feels too intimidating, you can use a sturdy buttercream frosting for the base. Pipe a base layer, then pipe black concentric circles and drag a toothpick through before the buttercream crusts over. Note that buttercream won’t dry as hard or shiny as royal icing.
- Add a Spider: For an extra spooky touch, once the web is completely dry, you can pipe a small black royal icing spider onto one of the webs. You can even add edible googly eyes!
- Edible Glitter: Lightly dust the finished, dried cookies with edible glitter for a shimmering, magical effect.
Storage and Reheating
These Halloween Spider Web Sugar Cookies, once completely dry, are quite robust and store well.
- At Room Temperature: Store the fully dried cookies in an airtight container at room temperature for up to 1-2 weeks. To prevent damage to the delicate icing, place parchment paper or wax paper between layers of cookies if stacking. Keep them away from direct sunlight or heat sources.
- Freezing Dough: The unbaked cookie dough can be wrapped tightly and frozen for up to 3 months. Thaw overnight in the refrigerator before rolling and baking.
- Freezing Baked Cookies (Un-iced): You can bake the cookies ahead of time and freeze them un-iced. Once completely cooled, place them in a single layer on a baking sheet to flash freeze for about 30 minutes, then transfer to an airtight freezer-safe bag or container. They can be frozen for up to 3 months. Thaw at room temperature before decorating.
- Freezing Decorated Cookies: While possible, freezing decorated royal icing cookies can sometimes lead to condensation issues upon thawing, which might dull the shine or cause colors to bleed slightly. If you must freeze them, ensure they are completely dry, then place them in an airtight container with parchment between layers. Thaw slowly in the refrigerator, then bring to room temperature before opening the container to minimize condensation.
- Reheating: These cookies are meant to be enjoyed at room temperature and do not require reheating.
Frequently Asked Questions
How do I know if my royal icing is the right consistency for flooding?
The “10-15 second rule” is your best friend for flood consistency. When you lift your spoon or spatula and let a ribbon of icing fall back into the bowl, the surface of the icing should become smooth again within 10-15 seconds. If it takes longer, it’s too thick; add a tiny bit more water. If it disappears faster, it’s too thin; add a little more sifted powdered sugar.
My royal icing is drying too fast while I’m trying to make the web. What am I doing wrong?
Working quickly is key for the wet-on-wet technique. If your icing is drying too fast, it could be a few things: your environment might be very dry, or you might be taking too long to apply the black circles and drag the toothpick after flooding with white. Try flooding one cookie at a time, immediately piping the black circles, and then creating the web before moving to the next cookie. You can also try adding a tiny bit more water to your white flood icing to make it slightly thinner (aim for 15-20 second consistency) to give you a little more working time, but be careful not to make it too thin.
Can I use regular food coloring instead of gel food coloring for the icing?
It’s highly recommended to use gel food coloring for royal icing. Liquid food colorings can alter the consistency of your icing, making it too thin and difficult to work with, especially for intricate designs. Gel colors are highly concentrated, so you need less of them, and they won’t add excess liquid to your carefully balanced icing consistency.
My cookies spread in the oven and lost their shape. What happened?
The most common culprits for cookie spreading are warm dough, too much butter, or not enough flour. Ensure your butter is softened but not melted. Always chill your dough thoroughly (at least 1 hour, or even overnight) before rolling and cutting. For extra insurance, you can also chill the cut-out cookies on the baking sheet for 10-15 minutes before baking. If your kitchen is very warm, the dough can warm up quickly, so work efficiently.