- 0 Facebook
- 13 Pinterest
- 2 Email
- Copy Link
- 15 shares
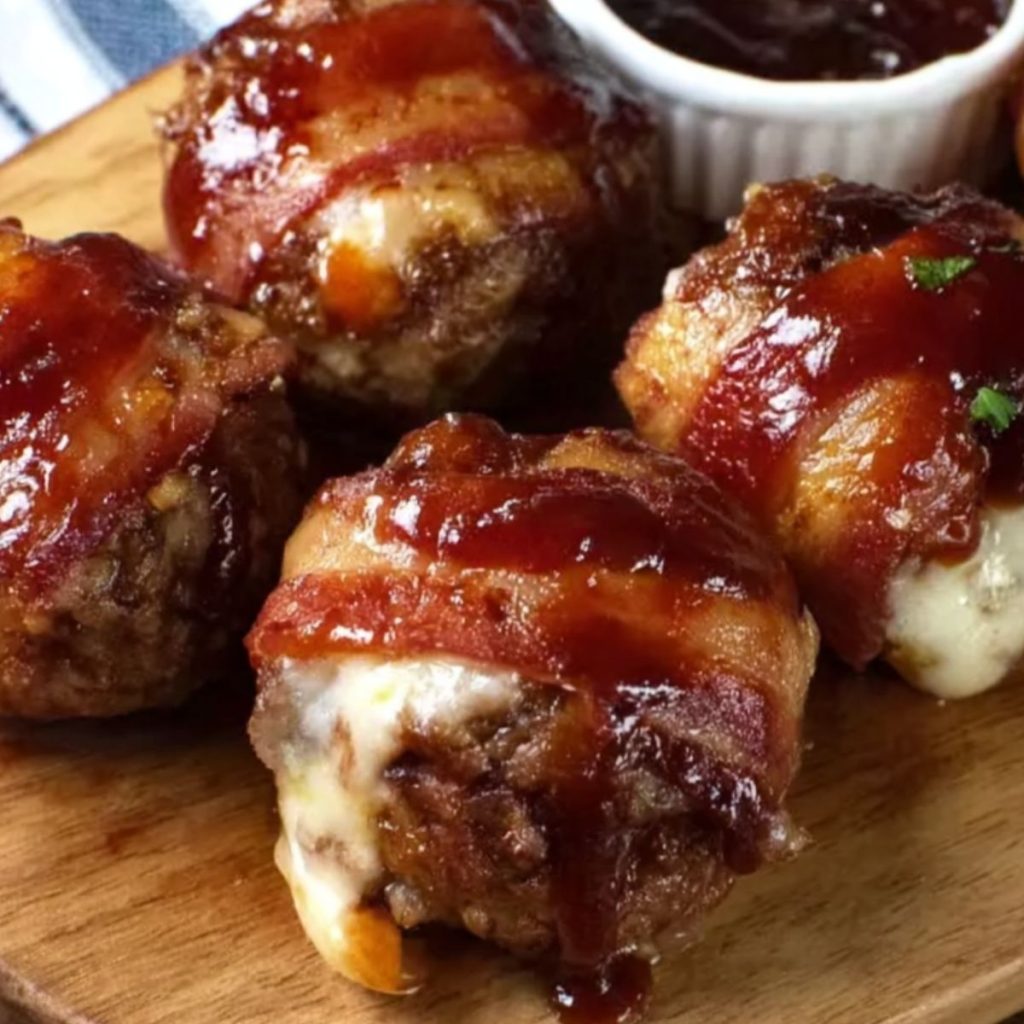
These BBQ Bacon Bombs deliver explosive flavor in every bite—juicy meatballs with a molten cheddar center, all wrapped in crispy bacon and glazed with tangy barbecue sauce. The combination of smoky, savory, and cheesy elements creates an irresistible appetizer that disappears from plates in seconds. Golden-brown on the outside and perfectly tender within, these meaty delights strike the perfect balance between indulgence and ease of preparation, making them ideal for game days or dinner parties alongside a refreshing coleslaw.
Why You’ll Love This Recipe
These Cheddar-Stuffed BBQ Bacon Bombs deliver that perfect combination of indulgence and simplicity that makes a recipe instantly memorable. Here’s why you’ll want to add them to your regular rotation:
- Flavor Explosion Guaranteed : Each bite delivers the perfect balance of savory beef, smoky bacon, tangy BBQ sauce, and that irresistible molten cheddar center.
- Crowd-Pleasing Power : These meaty bombs have been tested at countless gatherings where they’re consistently the first appetizer to disappear from the serving platter.
- Quick Assembly Method : The 15-minute prep time means you can focus on enjoying your company rather than being stuck in the kitchen all evening.
- Meal-Planning Friendly : While perfect as appetizers, these protein-packed bites also make a satisfying main course when paired with simple sides like coleslaw or a green salad.
- Foolproof Technique : The method of wrapping the bacon around the meatball creates a natural seal that keeps all that delicious cheese from escaping during baking.
- Storage Simplicity : These bombs reheat beautifully, making them ideal for meal prep—just store in the refrigerator and enjoy restaurant-quality bites for up to three days.
Ingredient Breakdown with Tips
The magic of Cheddar-Stuffed BBQ Bacon Bombs comes from quality ingredients working together to create that perfect explosion of flavor. Each component plays a crucial role in developing the juicy, smoky, cheesy perfection that makes this recipe so addictive.
- Ground beef : Select 80/20 ground beef for the ideal balance of flavor and juiciness. The slight fat content prevents the meatballs from drying out during baking while providing rich, savory flavor.
- Breadcrumbs : Plain or Italian-seasoned breadcrumbs help bind the meatballs together. For a gluten-free option, substitute with crushed pork rinds or gluten-free breadcrumbs without compromising texture.
- Egg : Acts as the essential binder that holds the meatball mixture together. Always use room temperature eggs for better incorporation into the meat mixture.
- Shredded cheddar cheese : Opt for medium or sharp cheddar for maximum flavor impact. Block cheese freshly shredded at home melts more smoothly than pre-packaged varieties coated with anti-caking agents.
- Bacon : Choose regular-cut bacon rather than thick-cut for proper wrapping and cooking. The bacon provides a crispy exterior while adding smoky flavor and helping seal in the cheese.
- BBQ sauce : Serves as both flavoring and a glaze that caramelizes beautifully during baking. Choose a sauce with a balance of sweetness and tanginess—homemade or quality store-bought both work well.
- Garlic powder : Adds aromatic depth to the meat mixture without the texture of fresh garlic. A little goes a long way in enhancing the savory profile of the beef.
- Onion powder : Provides subtle onion flavor throughout the meatballs without adding moisture or chunks. This helps maintain the perfect texture while boosting flavor complexity.
- Worcestershire sauce : Just a dash brings umami richness to the meat mixture. This fermented condiment enhances the beefy flavor without overpowering other ingredients.
- Salt and pepper : Season carefully as both the cheese and bacon contribute saltiness to the final Cheddar-Stuffed BBQ Bacon Bombs. Freshly ground black pepper provides superior flavor compared to pre-ground varieties.
Let’s Cook It
- Preheat your oven to 400°F (200°C) and line a baking sheet with parchment paper or aluminum foil for easy cleanup.
- Combine the ground beef, breadcrumbs, egg, garlic powder, onion powder, Worcestershire sauce, salt, and pepper in a large bowl. Mix gently with your hands until just combined—I’ve found overmixing makes the meatballs tough.
- Cut the cheddar cheese into 1/2-inch cubes. Take about 2 tablespoons of the meat mixture and flatten it in your palm, place a cheese cube in the center, then fold the meat around it, sealing well and rolling into a ball.
- Wrap each meatball with a strip of bacon, making sure to completely cover the meat and secure the bacon with a toothpick if needed.
- Brush each bacon-wrapped meatball generously with BBQ sauce, making sure to coat all sides. The sauce will caramelize beautifully in the oven .
- Place the prepared bombs on the baking sheet, spacing them about an inch apart. Bake for 25-30 minutes until the bacon is crispy and the internal temperature reaches 160°F.
- About halfway through cooking, brush the bombs with another layer of BBQ sauce for an extra punch of flavor and glossy finish.
- Let the bombs rest for 3-5 minutes before serving—trust me, this helps the cheese settle while keeping it perfectly melty rather than scalding hot.
Tips for the Best Cheddar-Stuffed BBQ Bacon Bombs
These insider tricks will help you achieve perfectly juicy, cheesy bacon bombs every time:
- Chill before wrapping : After forming the cheese-stuffed meatballs, refrigerate them for 15 minutes to firm up – I’ve found this makes bacon wrapping significantly easier.
- Cheese selection matters : Opt for a block of aged cheddar and cube it yourself; pre-shredded cheese contains anti-caking agents that prevent that gloriously gooey melt.
- Secure that bacon : Wrap the bacon starting from one end of each meatball, slightly overlapping as you go around to create a seal that prevents cheese leakage.
- Use a wire rack : Elevating your BBQ Bacon Bombs on a wire rack over your baking sheet allows heat to circulate, delivering evenly crispy bacon on all sides.
- Rest before serving : Allow these bombs to cool for 5 minutes after baking – the molten center needs time to set slightly while remaining deliciously oozy.
- BBQ sauce strategy : Reserve some sauce for serving alongside the finished bombs – that extra dipping option takes these already amazing bites to the next level.
Make Ahead Options for Cheddar-Stuffed BBQ Bacon Bombs
These Cheddar-Stuffed BBQ Bacon Bombs are a meal prepper’s dream, perfect for busy weeknights or party planning! You can assemble the bacon-wrapped meatballs completely up to 24 hours in advance and refrigerate them on the lined baking sheet (cover tightly with plastic wrap to prevent the bacon from drying out). The cheese stays perfectly contained, and the flavors actually improve overnight as the seasonings meld together. When ready to serve, simply brush with BBQ sauce and bake as directed, adding an extra 5 minutes to the cooking time since they’ll be starting from cold. You can also freeze the assembled bombs for up to 3 months—just thaw overnight in the refrigerator before brushing with sauce and baking for restaurant-quality results with minimal effort.
Variations & Substitutions
These Cheddar-Stuffed BBQ Bacon Bombs are incredibly versatile and can be customized to suit your taste preferences or whatever you have in your pantry. Don’t be afraid to make this recipe your own!
- Cheese swap magic : While cheddar creates that classic melt, try pepper jack for a spicy kick or smoked gouda for a deeper smoky flavor that complements the bacon beautifully.
- Meat alternatives : Ground turkey or chicken works wonderfully for a lighter version – I just add a tablespoon of olive oil to the mixture to maintain juiciness since these leaner meats can dry out more easily.
- Bacon variations : Turkey bacon can substitute for traditional pork bacon if you’re watching fat content, though you may want to partially cook it first to ensure it crisps properly in the oven .
- Make it spicy : Add a teaspoon of cayenne pepper to the meat mixture and use a spicy BBQ sauce for bombs with serious heat. You can even tuck a small jalapeño slice in with the cheese!
- Go fancy with fillings : Beyond cheese, consider tucking small extras into the center alongside your cheddar – caramelized onions, roasted garlic, or even a small piece of pickle add unexpected flavor bursts.
- BBQ sauce alternatives : No BBQ sauce? Try brushing with a mixture of ketchup, brown sugar, and Worcestershire sauce. Hoisin or teriyaki sauce creates an interesting Asian-inspired variation that’s surprisingly delicious.
Serving Suggestions
These Cheddar-Stuffed BBQ Bacon Bombs are showstoppers on their own, but with the right accompaniments, they transform into a complete meal experience that balances their rich, meaty goodness.
For casual gatherings, I like to serve these bombs on a wooden board with toothpicks and a small bowl of extra BBQ sauce for dipping. The tanginess of a classic coleslaw provides the perfect refreshing counterpoint to the savory bombs – the crisp, cool texture cuts through the richness beautifully. For a more substantial spread, pair them with a simple green salad dressed with a light vinaigrette.
Looking to impress dinner guests? Serve these Cheddar-Stuffed BBQ Bacon Bombs alongside garlic mashed potatoes and roasted seasonal vegetables for a comfort food feast that elevates these appetizer-style bites to main course status. The bombs are also fantastic alongside mac and cheese for the ultimate indulgent meal – something I’ve found both kids and adults can’t resist!
For beverage pairings, a cold craft beer with hoppy notes works wonderfully to cut through the richness, while those preferring wine might enjoy a fruity Zinfandel that stands up to the bold BBQ flavors. For a non-alcoholic option, a tall glass of freshly brewed sweet tea provides that perfect Southern complement to these smoky, cheesy delights.
Storage & Freezing
These Cheddar-Stuffed BBQ Bacon Bombs can be refrigerated in an airtight container for up to 3-4 days. The bacon will lose some crispness over time, but the flavor remains excellent. I’ve found that storing them with paper towels between layers helps absorb excess moisture and maintains better texture.
For longer storage, these meaty treats freeze surprisingly well for up to 2 months. Allow them to cool completely, then arrange in a single layer on a baking sheet to flash-freeze before transferring to freezer bags or containers. This prevents them from sticking together and allows for easy portion control later.
To reheat refrigerated bombs, place them in a 350°F oven for 10-12 minutes until heated through. For frozen bombs, thaw overnight in the refrigerator before reheating, or add 5-7 minutes to the reheating time if cooking from frozen. A light brush of fresh BBQ sauce before reheating will revive that tangy glaze and add moisture back to the bacon.
Recipe FAQs
Can I make these ahead of time? Yes, prep a day ahead and bake when needed.
What cheese works best besides cheddar? Monterey Jack or pepper jack offer excellent melt.
How do I prevent cheese leakage? Seal meat thoroughly around cheese before wrapping bacon.
Can I use ground turkey instead? Yes, but add 1 tablespoon oil for juiciness.
What’s the best way to reheat leftovers? I reheat at 350°F for 10 minutes.
Are these gluten-free? Use gluten-free breadcrumbs and check BBQ sauce ingredients.
- 0 Facebook
- 13 Pinterest
- 2 Email
- Copy Link
- 15 shares
Explosive Cheddar BBQ Bacon Bombs: The Ultimate Meaty Appetizer
Ingredients
Instructions
Preheat your oven to 400°F (200°C) and line a baking sheet with parchment paper or aluminum foil for easy cleanup.
Combine the ground beef, breadcrumbs, egg, garlic powder, onion powder, Worcestershire sauce, salt, and pepper in a large bowl. Mix gently with your hands until just combined—I’ve found overmixing makes the meatballs tough.
Cut the cheddar cheese into 1/2-inch cubes. Take about 2 tablespoons of the meat mixture and flatten it in your palm, place a cheese cube in the center, then fold the meat around it, sealing well and rolling into a ball.
Wrap each meatball with a strip of bacon, making sure to completely cover the meat and secure the bacon with a toothpick if needed.
Brush each bacon-wrapped meatball generously with BBQ sauce, making sure to coat all sides. The sauce will caramelize beautifully in the oven.
Place the prepared bombs on the baking sheet, spacing them about an inch apart. Bake for 25-30 minutes until the bacon is crispy and the internal temperature reaches 160°F.
About halfway through cooking, brush the bombs with another layer of BBQ sauce for an extra punch of flavor and glossy finish.
Let the bombs rest for 3-5 minutes before serving—trust me, this helps the cheese settle while keeping it perfectly melty rather than scalding hot.
Notes
Chill before wrapping: After forming the cheese-stuffed meatballs, refrigerate them for 15 minutes to firm up – I’ve found this makes bacon wrapping significantly easier.
Cheese selection matters: Opt for a block of aged cheddar and cube it yourself; pre-shredded cheese contains anti-caking agents that prevent that gloriously gooey melt.
Secure that bacon: Wrap the bacon starting from one end of each meatball, slightly overlapping as you go around to create a seal that prevents cheese leakage.
Use a wire rack: Elevating your BBQ Bacon Bombs on a wire rack over your baking sheet allows heat to circulate, delivering evenly crispy bacon on all sides.
Rest before serving: Allow these bombs to cool for 5 minutes after baking – the molten center needs time to set slightly while remaining deliciously oozy.
BBQ sauce strategy: Reserve some sauce for serving alongside the finished bombs – that extra dipping option takes these already amazing bites to the next level.
Nutrition
| Serving Size | 1 bomb |
|---|---|
| Calories | 250 calories |
| Sugar Content | 2g |
| Sodium Content | 600mg |
| Fat Content | 18g |
| Saturated Fat Content | 7g |
| Unsaturated Fat Content | 9g |
| Trans Fat Content | 0g |
| Carbohydrate Content | 6g |
| Fiber Content | 0g |
| Protein Content | 15g |
| Cholesterol Content | 40mg |