- 0 Facebook
- 61 Pinterest
- 1 Email
- Copy Link
- 62 shares
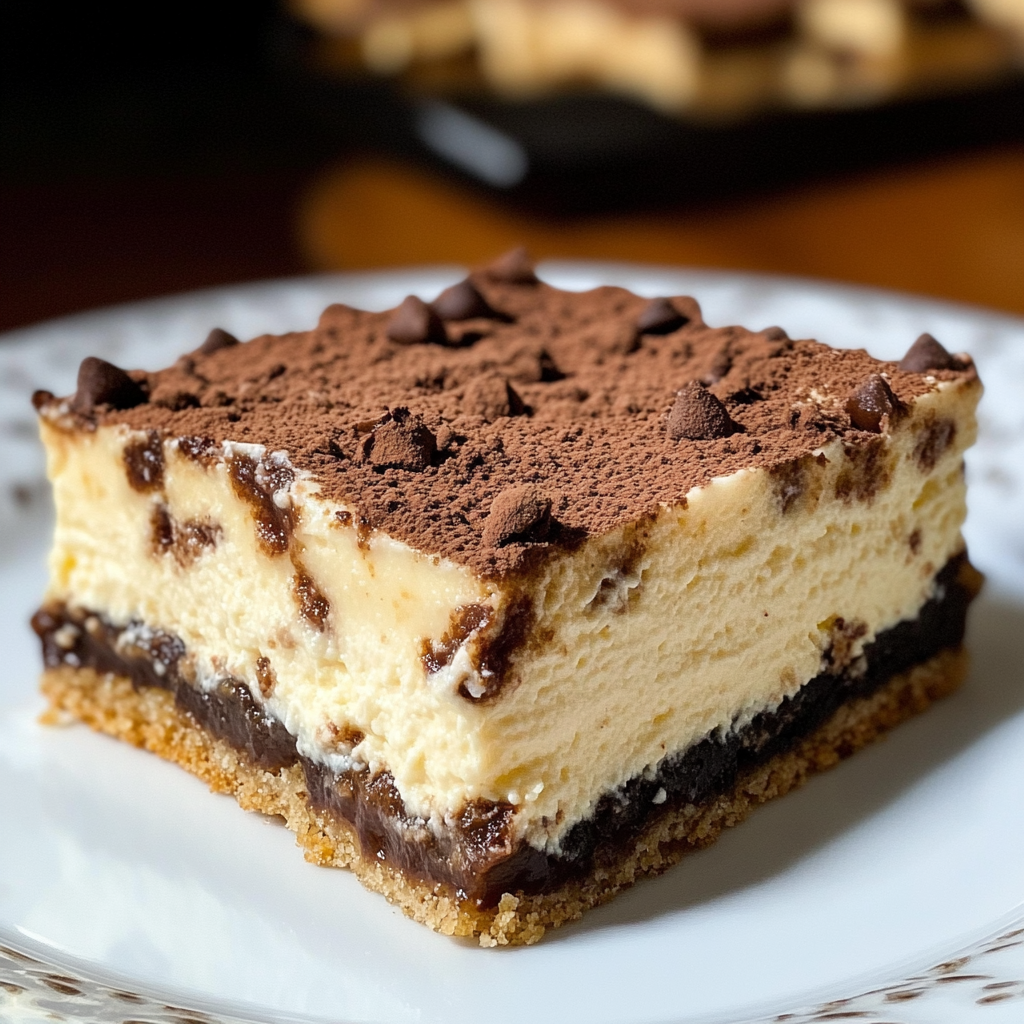
I’ve always believed that the most magical desserts are the ones that transport you somewhere special with a single bite. These Cannoli Cheesecake Bars do exactly that—whisking me away to little Italian bakeries with their creamy, rich texture and that unmistakable hint of cinnamon that warms your soul. Have you ever craved something that’s both familiar and exciting at the same time? That’s what these bars deliver. The first time I made them for a family gathering, they disappeared faster than I could say “cannoli!” They’ve since become my signature dessert for celebrations, though I’ve been known to whip them up on random Tuesdays when life calls for a little sweetness.
Why You’ll Love This Recipe
I cherish these Cannoli Cheesecake Bars because:
- They brilliantly merge two beloved desserts into one irresistible treat
- The science behind their perfection lies in the balance: A crisp graham cracker base that supports without overwhelming A filling where tangy cream cheese mellows ricotta’s distinctive character
- They manage to be both light and indulgent simultaneously
- The mini chocolate chips distribute pockets of sweetness throughout
- They create little moments of joy in each bite
- They deliver professional results with straightforward techniques
- They’re equally delicious cold from the refrigerator or at room temperature
- They’re perfect for advance preparation when entertaining
Ingredients for This Recipe
- Graham Cracker Crumbs : The foundation of our bars, providing that distinctive honeyed sweetness and satisfying crunch. I always opt for fine crumbs for a more compact, stable base.
- Unsalted Butter : The binding agent that transforms our crumbs into a proper crust. I recommend unsalted to control the overall sweetness and saltiness of the final product.
- Granulated Sugar (crust) : Just enough to enhance the graham flavor without making the base too sweet. I find this small amount perfectly balances the richness to come.
- Ricotta Cheese : The star ingredient that gives these bars their authentic cannoli flavor. I insist on draining it thoroughly—this removes excess moisture that would make your bars soggy.
- Cream Cheese : Provides structure and creaminess that pure ricotta lacks. I always bring it to room temperature for a silky-smooth filling without any lumps.
- Granulated Sugar (filling) : Sweetens the filling perfectly without overtaking the delicate cheese flavors. I’ve found this exact amount lets the tanginess shine through.
- Vanilla Extract : Adds warmth and depth to the filling. I use pure extract rather than imitation for a more complex, authentic flavor profile.
- Ground Cinnamon : That quintessential cannoli spice that elevates these bars from simple cheesecake to something special. Its subtle warmth complements the chocolate beautifully.
- Eggs : Provide structure and richness to the filling. I always use room temperature eggs for the smoothest incorporation into the batter.
- Mini Chocolate Chips : These tiny morsels distribute perfectly throughout the filling, ensuring chocolate in every bite. I prefer mini chips over regular size for better texture distribution.
- Additional Mini Chocolate Chips : Optional for topping, but I find they add both visual appeal and extra texture to the finished bars.
- Powdered Sugar : That final flourish that nods to traditional cannoli presentation. I love how it melts slightly into the top, creating a delicate sweetness.
How to Make This Recipe
Prepare the Crust
- Preheat the Oven : Start by heating your oven to 325°F (165°C). The moderate temperature ensures our crust will bake evenly without burning.
- Line the Pan : I always line an 8×8 inch baking pan with parchment paper, leaving overhang on the sides. This creates handles for easy removal later—a trick I learned after many frustrated attempts at perfect squares!
- Mix the Crust : In a medium bowl, combine graham cracker crumbs, melted butter, and sugar until it resembles wet sand. The mixture should hold together when pressed between your fingers—if it seems too dry, add a touch more melted butter.
- Press into Pan : Transfer the mixture to your prepared pan and press firmly into an even layer. I use the bottom of a measuring cup for a perfectly smooth, compact base.
- Pre-bake the Crust : Bake for 10 minutes until just set and slightly fragrant. You’ll notice the edges beginning to turn a deeper golden color. Cool slightly while preparing the filling.
Make the Filling
- Prepare the Cheese Mixture : In a large bowl, beat the ricotta and cream cheese together until completely smooth and fluffy, about 2-3 minutes. The texture should be like thick whipped cream with no lumps in sight.
- Add Sweetness and Flavor : Mix in the sugar, vanilla extract, and cinnamon until well combined. The mixture will take on a light caramel color from the cinnamon.
- Incorporate Eggs : Add eggs one at a time, beating well after each addition. I’ve found this gradual approach creates the silkiest texture—the mixture should now be glossy and smooth.
- Fold in Chocolate : Gently fold in the mini chocolate chips with a spatula. I love watching them suspend themselves throughout the batter like tiny treasures.
Bake and Finish
- Pour and Bake : Pour the filling over the pre-baked crust, smoothing the top with a spatula. If desired, sprinkle additional mini chocolate chips on top.
- Bake to Perfection : Bake for 35-40 minutes, until the edges are set but the center still has a slight jiggle. The secret to avoiding cracks is to never overbake!
- Cool Gradually : Turn off the oven , crack the door open, and let the cheesecake cool inside for about 20 minutes. This gentle cooling prevents the dreaded surface crack.
- Chill Thoroughly : Remove from the oven and cool completely at room temperature before refrigerating for at least 4 hours, preferably overnight. Patience here is crucial—the flavors meld and texture perfects during this time.
- Serve with Flair : Just before serving, dust with powdered sugar. Use the parchment overhang to lift the entire dessert out, then slice into bars with a warm, clean knife for the neatest edges.
Expert Cooking Tips
- Drain the Ricotta Thoroughly : I place mine in a fine-mesh strainer lined with cheesecloth for at least 2 hours in the refrigerator . Excess moisture is the enemy of perfect texture!
- Room Temperature Ingredients : I always allow my cheese and eggs to come to room temperature. Cold ingredients refuse to blend smoothly and create a lumpy filling.
- Water Bath Option : For even more insurance against cracks, I sometimes place the pan in a larger baking dish filled with about 1 inch of hot water before baking.
- Check for Doneness Early : I start checking at 30 minutes. The perfect cheesecake jiggles slightly in the center but isn’t liquid—overcooking leads to dryness.
- Clean Slicing Technique : I run my knife under hot water and wipe clean between each cut for photo-worthy slices with distinct layers.
Proper Storage
- Refrigerator Storage : Keep bars in an airtight container for up to 5 days. I place parchment between layers to prevent sticking and preserve that beautiful powdered sugar topping.
- Freezer Option : Wrap individual bars tightly in plastic wrap, then foil, and freeze for up to 3 months. The double-wrapping prevents freezer burn and preserves that creamy texture.
- Thawing Method : I thaw frozen bars overnight in the refrigerator , never at room temperature, which can cause condensation and a soggy crust.
- Refreshing Leftovers : For bars that have been stored a few days, I add a fresh dusting of powdered sugar just before serving to restore their visual appeal.
Variations and Substitutions
- Chocolate Lover’s Version : I sometimes add 2 tablespoons of cocoa powder to the crust mixture and increase the chocolate chips to 1/2 cup for an even more decadent experience.
- Citrus Twist : For a brighter flavor profile closer to traditional cannoli, I occasionally add 1 tablespoon of orange or lemon zest to the filling. The citrus oils cut through the richness beautifully.
- Dairy-Free Adaptation : I’ve successfully substituted dairy-free cream cheese and almond ricotta with just a slight texture difference. Add an extra egg for binding if the mixture seems too loose.
- Nut Enhancement : For texture contrast, try folding in 1/4 cup finely chopped pistachios or toasted almonds along with the chocolate chips. They add a delightful crunch that complements the creamy filling.
- Shortbread Base : Swap the graham cracker crust for crushed shortbread cookies mixed with butter for a more delicate, buttery foundation that still supports the rich filling.
What Goes with This Recipe
- Espresso or Cappuccino : The bitter coffee notes balance the sweetness perfectly. I serve mine with a shot of espresso for an authentic Italian pairing experience.
- Fresh Berries : A handful of raspberries or strawberries adds a bright, acidic counterpoint to the rich bars. Their juicy freshness cuts through the dense creaminess.
- Amaretto Liqueur : A small glass alongside these bars creates a sophisticated dessert experience. The almond notes complement both the cheese and chocolate elements.
- Vanilla Bean Ice Cream : For an indulgent dessert plate, add a small scoop. The cold, pure vanilla flavor enhances the cannoli filling’s complexity.
- Chocolate Sauce : A light drizzle of warm chocolate sauce takes these bars into special occasion territory. I make a simple ganache with equal parts cream and chocolate.
FAQ
Can I use regular ricotta instead of draining it? No, draining is essential. Excess moisture will prevent proper setting and create a soggy texture.
Why did my cheesecake crack? Likely overbeating or overbaking. Beat just until combined and look for a slight jiggle in the center when done.
Can I use full-size chocolate chips? Yes, but mini chips distribute better throughout the filling and provide more consistent chocolate flavor in each bite.
How far ahead can I make these? Up to three days ahead. Store covered in the refrigerator and add the powdered sugar just before serving.
Are these bars gluten-free? Not with regular graham crackers. Substitute gluten-free graham crackers or cookies for the crust to make them gluten-free.
- 0 Facebook
- 61 Pinterest
- 1 Email
- Copy Link
- 62 shares
Cannoli Cheesecake Bars
Ingredients
Instructions
Preheat oven to 325°F. Line 8×8 pan with parchment paper.
Mix graham cracker crumbs, melted butter, and sugar. Press into pan. Bake 10 minutes.
Beat ricotta and cream cheese until smooth. Add sugar, vanilla, and cinnamon.
Add eggs one at a time, beating well after each. Fold in chocolate chips.
Pour over crust. Sprinkle more chips on top if desired.
Bake 35-40 minutes until edges are set but center jiggles slightly.
Cool in turned-off oven with door cracked for 20 minutes.
Cool completely, then refrigerate 4+ hours or overnight.
Dust with powdered sugar before serving.