- 0 Facebook
- 5 Pinterest
- 0 Email
- Copy Link
- 5 shares
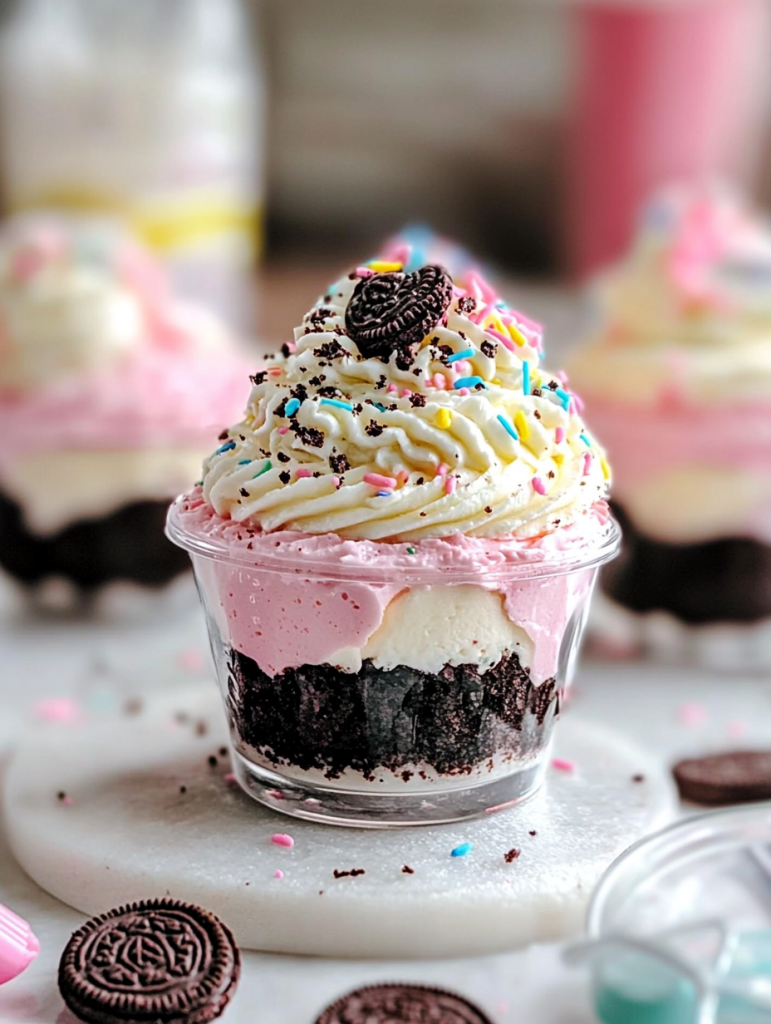
I remember the first time I stumbled upon these No-Bake Pastel Oreo Cheesecake Cups at my sister’s spring garden party. The delicate pastel swirls caught my eye from across the yard, and I found myself going back for seconds… and then thirds! I can’t believe it took me so long to ask for the recipe, but now that I have it, it’s become my go-to dessert for practically everything.
I’ve discovered that these cheesecake cups are not only gorgeous to look at but also incredibly simple to prepare—no baking required! The creamy filling sits atop a chocolate cookie crust that provides the perfect crunchy contrast in every bite. What I love most is how versatile they are; I’ve served them at birthday celebrations, baby showers, and even as a fancy weeknight treat when I’m craving something special. The combination of rich cream cheese, sweet Oreos, and those beautiful pastel colors creates a dessert that’s both visually stunning and impossibly delicious.
Why You’ll Love This Recipe
I believe you’ll fall head over heels for these No-Bake Pastel Oreo Cheesecake Cups for so many reasons:
- Quick preparation that doesn’t require turning on the oven —perfect for hot summer days when I can’t bear to add more heat to my kitchen.
- Stunning presentation with minimal effort—the pastel swirls look complicated but are actually incredibly easy to create.
- Make-ahead friendly —I often prepare these a day before serving, which makes entertaining so much less stressful.
- Perfectly portioned individual servings that eliminate the need for cutting and serving a full cheesecake.
- Customizable colors that can be adapted for any holiday or celebration—I’ve done orange and black for Halloween and red and green for Christmas!
- The ideal balance of rich, creamy filling and crunchy chocolate cookie base that satisfies every texture craving in a single dessert.
Ingredients for This Recipe
- Chocolate sandwich cookies : The foundation of these cups, providing that distinctive Oreo flavor. I always use the original variety, but chocolate cream-filled works beautifully too.
- Unsalted butter : The binding agent for our crust. I find unsalted allows better control over the final flavor profile.
- Cream cheese : The creamy backbone that binds everything together. I select a high-quality, full-fat brand for richness and flavor.
- Powdered sugar : Its fine texture incorporates seamlessly into the filling without the grittiness of granulated sugar. I sift mine to ensure absolute smoothness.
- Vanilla extract : A warm, aromatic addition that enhances the overall flavor profile. Pure extract rather than imitation makes a noticeable difference.
- Lemon juice : Just a touch adds brightness and balances the richness. Fresh-squeezed elevates the flavor dramatically compared to bottled.
- Heavy whipping cream : Creates that luscious, mousse-like texture when whipped into the filling. The higher the fat content, the more stable the result.
- Whipped cream/stabilized frosting : Forms those beautiful decorative swoops on top. I prefer stabilized whipped cream for its holding power.
- Food coloring (pink and green) : Creates those eye-catching pastel hues. Gel colors provide vibrant results with minimal addition to avoid thinning the mixture.
- Piping bags with star tips : Essential tools for creating professional-looking decorative elements. Large star tips create the most impressive swirls.
- Optional toppings : Mini sandwich cookies and colorful sprinkles add that perfect finishing touch. I often choose sprinkles that complement the season or occasion.
How to Make This Recipe
Prepare the Cookie Crust
- Place the chocolate sandwich cookies in a food processor and pulse until they form fine, sand-like crumbs. The finer the crumbs, the more cohesive your crust will be.
- Transfer the cookie crumbs to a medium bowl and pour in the melted butter. Mix thoroughly until the mixture resembles wet sand and holds together when pressed between your fingers.
- Divide the crust mixture evenly among 8-10 small serving glasses or jars. Press firmly into the bottom using the back of a spoon or a small measuring cup to create a compact, even layer. Set aside.
Create the Cheesecake Filling
- In a large mixing bowl, beat the softened cream cheese until smooth and fluffy, about 2 minutes. Ensure it’s completely lump-free for the silkiest texture.
- Gradually add the powdered sugar while continuing to beat, scraping down the sides of the bowl as needed. The mixture should be smooth and well combined.
- Add the vanilla extract and lemon juice, mixing until incorporated. These flavor enhancers add depth without overpowering the cream cheese.
- In a separate bowl, whip the cold heavy cream until stiff peaks form. The cream should hold its shape firmly when the beater is lifted.
- Gently fold the whipped cream into the cream cheese mixture using a spatula, maintaining as much air as possible for a light, fluffy texture.
Add Color and Assemble
- Divide the cheesecake filling into three portions. Leave one white, tint one with pink food coloring, and the other with pastel green food coloring, stirring gently to distribute the color evenly.
- Spoon or pipe alternating dollops of each colored filling on top of the cookie crusts, creating a marbled effect. Fill each cup about three-quarters full.
- Use a toothpick or skewer to gently swirl the colors together, creating a beautiful pastel marble pattern. Less is more—too much swirling will blend the colors completely.
- Refrigerate the cups for at least 4 hours or preferably overnight to set the filling completely. The texture will firm up while maintaining its creamy mouthfeel.
Decorate
- Once set, prepare your stabilized whipped cream or frosting and divide between two piping bags fitted with star tips.
- Tint one bag with pink coloring and one with green, then pipe decorative swirls on top of each cheesecake cup.
- Garnish with mini sandwich cookies and colorful sprinkles for that perfect finishing touch that makes these treats truly irresistible.
Expert Cooking Tips
- Temperature matters! I always ensure my cream cheese is properly softened at room temperature for at least an hour to avoid lumps in the filling.
- For the smoothest filling , I beat the cream cheese alone first before adding any other ingredients. This extra step eliminates those pesky lumps completely.
- When adding food coloring , I start with a tiny amount and gradually build to my desired shade. Remember, you can always add more, but you can’t take it away!
- I’ve found that chilling the assembled cups for 30 minutes before adding the final decorative toppings makes piping much easier and gives cleaner results.
- For picture-perfect presentation , I insert the cookie garnish just before serving to maintain its crunch and prevent it from softening in the refrigerator .
Proper Storage
- Refrigerator storage: Keep these cheesecake cups covered in the refrigerator for up to 3 days. I find they’re actually best on day two when the flavors have melded perfectly.
- To prevent them from absorbing refrigerator odors , I cover each cup individually with plastic wrap or store them in an airtight container.
- These cups can be frozen for up to 1 month. I freeze them without the whipped topping and garnishes, which I add after thawing.
- For thawing , I transfer frozen cups to the refrigerator overnight rather than using room temperature to maintain that perfect creamy texture.
- If making ahead for an event , I prepare the bases and filling up to 2 days in advance, adding the decorative toppings on the day of serving.
Variations and Substitutions
Flavor Variations
I love experimenting with different flavors for these cheesecake cups. Try folding 1/4 cup of strawberry puree into one portion of the filling for a fruity twist, or add 2 tablespoons of cocoa powder to create a chocolate layer. For a coffee version, dissolve 1 tablespoon of espresso powder in the vanilla extract before adding.
Dietary Adaptations
For a lower-fat version, I sometimes substitute Neufchâtel cheese for regular cream cheese and use light whipped topping instead of heavy cream. If you’re looking for a gluten-free option, simply swap the traditional Oreos for gluten-free chocolate sandwich cookies—the result is equally delicious!
Seasonal Twists
During winter holidays, I love adding a drop of peppermint extract and using red and white colors for a candy cane theme. For autumn gatherings, I switch to orange and yellow with a hint of cinnamon. The versatility of this basic recipe never ceases to amaze me.
What Goes with This Recipe
- Fresh berries provide a tart contrast to the rich cheesecake. I particularly love pairing these cups with plump raspberries or sliced strawberries for freshness.
- Hot chocolate with these cheesecake cups creates the ultimate cozy dessert experience. The warm, rich cocoa complements the cool, creamy texture perfectly.
- Coffee or espresso cuts through the sweetness with its subtle bitterness. I find that a dark roast particularly enhances the chocolate cookie base.
- Chocolate sauce drizzled over the top adds another layer of decadence. I warm it slightly for easier drizzling over the cold cheesecake.
- A glass of champagne elevates these cups to a celebratory treat. The bubbles and acidity provide the perfect palate cleanse between creamy bites.
FAQ
Can I make these without food coloring? Absolutely! The flavor will be identical, and you can still create beautiful designs using natural mix-ins instead.
How far in advance can I make these? I recommend preparing them up to 2 days ahead, adding the final decorations shortly before serving.
My filling isn’t firm enough. What happened? Likely the heavy cream wasn’t whipped to stiff peaks or the cups need more chilling time.
Can I use a different cookie for the base? Yes! Graham crackers, digestive biscuits, or any crisp cookie works beautifully.
How do I prevent the colors from mixing completely? Use a light touch when swirling and don’t overdo it—just 2-3 passes with a toothpick is perfect.
- 0 Facebook
- 5 Pinterest
- 0 Email
- Copy Link
- 5 shares
No-Bake Pastel Oreo Cheesecake Cups
Ingredients
Instructions
Combine cookie crumbs with melted butter; press into serving cups.
Beat cream cheese until smooth; add powdered sugar, vanilla, and lemon juice.
Whip heavy cream separately until stiff; fold into cream cheese mixture.
Divide filling into three portions; color one pink, one green, leave one white.
Layer colored fillings into cups; swirl gently for marble effect.
Refrigerate 4+ hours until set.
Pipe colored whipped cream on top; garnish with mini cookies and sprinkles.