- 0 Facebook
- 10 Pinterest
- 0 Email
- Copy Link
- 10 shares
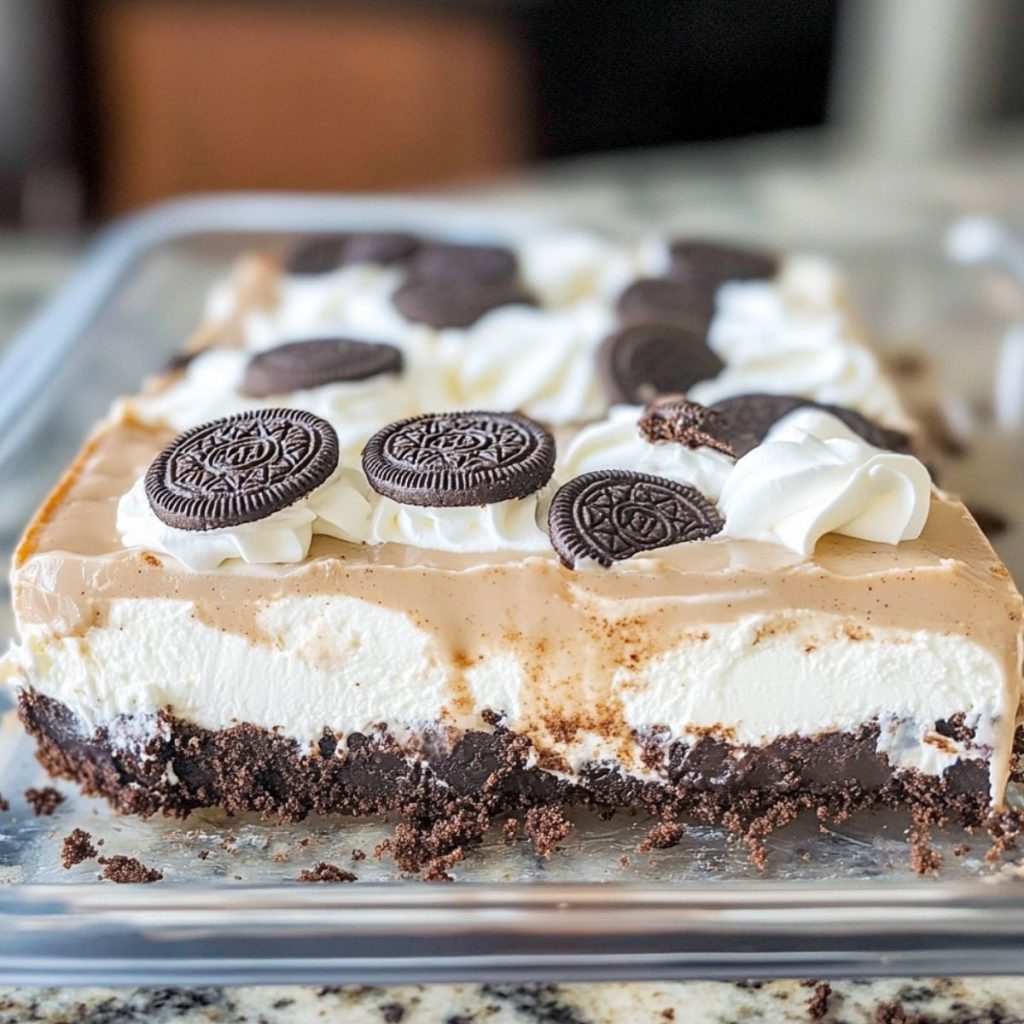
I remember the first summer I discovered the magic of no-bake desserts. It was during a particularly sweltering July when turning on the oven seemed like a cruel punishment. With hungry nieces and nephews coming over and limited options, I stumbled upon the idea of creating something with my favorite cookies – Oreos. What began as a desperate attempt to feed a crowd without melting my kitchen transformed into this Irresistible No-Bake Oreo Delight that has become my signature dessert. I’ve spent years perfecting the balance between the crunchy cookie base and the cloud-like layers above, creating something that’s not just incredibly easy but surprisingly elegant. Whether you’re looking for a quick dessert fix or something to impress at a potluck, this layered delight delivers both simplicity and that “wow” factor in every bite.
Why You’ll Love This Recipe
I believe this No-Bake Oreo Delight deserves a special place in your recipe collection for so many reasons:
- No Oven Required: I created this specifically for hot summer days when turning on the oven feels like a punishment. Just mix, layer, and chill!
- Crowd-Pleaser: I’ve never met anyone – from picky children to discerning adults – who could resist the combination of chocolate cookies and creamy layers.
- Make-Ahead Magic: I love that I can prepare this the day before an event, allowing the flavors to meld and saving me precious time when hosting.
- Simple Ingredients: Every component can be found at your local grocery store, no specialty shops required for this impressive dessert.
- Foolproof Results: I’ve found this recipe to be nearly impossible to mess up, making it perfect for beginner bakers or cooking with kids.
Ingredients for This Recipe
For the Crust:
- Double Stuffed Oreo Cookies: The foundation of our dessert with that perfect balance of chocolate cookie and cream filling. I always use Double Stuffed for extra richness.
- Unsalted Butter: The binding agent that transforms crushed cookies into a cohesive, sliceable crust. I prefer unsalted to control the overall sweetness.
For the Cream Cheese Layer:
- Cream Cheese: The tangy backbone that brings depth and balances the sweetness. I always ensure it’s at room temperature for the smoothest texture.
- Powdered Sugar: Dissolves seamlessly into the cream cheese, creating silky sweetness without any graininess. I sift mine to prevent lumps.
- Cool Whip: Creates an ethereally light texture that makes this layer irresistible. I’ve found that the stabilized nature of Cool Whip maintains structure better than homemade whipped cream.
For the Pudding Layer:
- Instant Chocolate Pudding: Provides that deep chocolate flavor without additional work. I select the “instant” variety specifically for its reliable set and smooth finish.
- Milk: Activates the pudding mix and determines the final consistency. I use whole milk for the richest result, but 2% works well too.
For the Topping:
- Cool Whip: The perfect cloud-like finish that completes the visual appeal and texture contrast. I always allow it to thaw completely for the easiest spreading.
How to Make This Recipe
Prepare the Crust
- Crush the Cookies: Place Oreos in a food processor and pulse until they become fine crumbs with no large chunks remaining. The texture should resemble wet sand when fully processed.
- Mix with Butter: Transfer the crushed cookies to a mixing bowl and pour in the melted butter. Stir until the mixture resembles wet sand and holds together when pressed.
- Form the Base: Press this mixture firmly and evenly into the bottom of a 9×13 inch dish. I use the bottom of a measuring cup to create a smooth, compact surface.
- Chill the Base: Place the dish in the refrigerator while preparing the next layer. This quick chill helps the crust set up properly.
Create the Cream Cheese Layer
- Beat the Cream Cheese: In a large bowl, beat the cream cheese until completely smooth and free of lumps. Ensure it’s at room temperature for the silkiest result.
- Add Sweetness: Gradually add the powdered sugar while continuing to beat until fully incorporated and the mixture is light and fluffy.
- Fold in Cool Whip: Gently fold in one container of Cool Whip until just combined. The mixture should be light and mousse-like with no streaks remaining.
- Layer Over Crust: Carefully spread this mixture over the chilled Oreo crust, creating an even layer. Use an offset spatula for the smoothest finish.
Make the Pudding Layer
- Mix the Pudding: In a separate bowl, whisk together the instant chocolate pudding mix and cold milk for about 2 minutes until it begins to thicken.
- Let it Set: Allow the pudding to sit for 5 minutes to reach a spreadable consistency. It should be thick but still pourable.
- Apply the Layer: Pour and spread the pudding mixture evenly over the cream cheese layer, being careful not to disturb the layers beneath.
Add the Finishing Touch
- Top with Cool Whip: Spread the remaining container of Cool Whip over the pudding layer, creating gentle swirls for visual appeal.
- Garnish (Optional): Crush a few additional Oreos and sprinkle over the top for decoration and to hint at what’s inside.
- Chill Thoroughly: Refrigerate the dessert for at least 4 hours, preferably overnight, allowing all layers to set properly and flavors to meld together.
Expert Cooking Tips
- Cookie Crushing Perfection: I always leave some small cookie chunks in the crust for texture contrast. Complete powder makes a dense, hard-to-cut base.
- Room Temperature Matters: I ensure my cream cheese sits out for at least 30 minutes before beating. Cold cream cheese creates lumps that never fully incorporate.
- Layer Protection: When adding each new layer, I start from the center and work outward. This prevents breaking through to lower layers.
- Clean-Cut Slices: I dip my knife in hot water and wipe clean between each cut for picture-perfect slices that showcase all the beautiful layers.
- Patience Pays Off: I’ve learned that overnight refrigeration delivers significantly better flavor and texture than just the minimum 4 hours. Trust me, the wait is worth it.
Proper Storage
- Refrigerator Storage: Keep covered tightly with plastic wrap for up to 5 days. I find the flavor actually improves after the first 24 hours!
- Freezer Option: Cut into individual portions and freeze for up to 3 months. I place parchment between slices to prevent sticking.
- Thawing Method: Transfer frozen portions to the refrigerator overnight. Quick thawing at room temperature causes weeping and texture changes.
- Serving Temperature: Take out of the refrigerator 15 minutes before serving. I’ve found this slight temperature rise enhances the creamy texture.
Variations and Substitutions
- Golden Oreo Version: Swap chocolate Oreos for Golden Oreos and use vanilla pudding instead. I love this bright, vanilla-forward variation for spring gatherings.
- Mint Chocolate: Add 1/4 teaspoon mint extract to the cream cheese layer and use Mint Oreos. I find this creates a refreshing after-dinner dessert option.
- Lighter Option: Use Neufchâtel cheese instead of cream cheese and sugar-free pudding. I can barely taste the difference but appreciate the calorie reduction.
- Dairy Concerns: Lactose-free milk works perfectly in the pudding layer. I’ve successfully used dairy-free butter in the crust for guests with mild sensitivities.
- Seasonal Twist: Add 1/2 cup of crushed peppermint candies between layers during the holidays. The subtle crunch and festive flavor always earns compliments.
What Goes with This Recipe
- Fresh Berries: Strawberries, raspberries, or blackberries provide a tart contrast. I love how their acidity cuts through the richness.
- Hot Coffee: A simple cup of black coffee balances the sweetness perfectly. I find the bitter notes complement the chocolate wonderfully.
- Vanilla Bean Ice Cream: For the ultimate indulgence. I sometimes serve a small scoop alongside for temperature and texture contrast.
- Chocolate Sauce: A light drizzle elevates the presentation. I warm good quality chocolate sauce and apply just before serving.
- Fresh Mint Garnish: Adds a pop of color and refreshing aroma. I grow mint specifically for garnishing my desserts year-round.
FAQ
- Can I make this without Cool Whip? Substitute with 3 cups freshly whipped heavy cream with 1/4 cup sugar. Stabilize with 1 teaspoon gelatin for best results.
- Why is my crust crumbly? Add an extra tablespoon of melted butter. I find different Oreo varieties sometimes need slightly different amounts.
- Can I use regular Oreos instead of Double Stuffed? Absolutely! You might need 2-3 more cookies for the same volume of crust.
- How do I prevent the layers from mixing? Chill each layer for 15-20 minutes before adding the next. I always ensure each layer is properly set.
- Can this be made in advance? Yes, up to 2 days ahead. I find it actually tastes better after the flavors have time to meld.
- 0 Facebook
- 10 Pinterest
- 0 Email
- Copy Link
- 10 shares
Irresistible No-Bake Oreo Delight
Ingredients
Instructions
Crush the Cookies: Place Oreos in a food processor and pulse until they become fine crumbs with no large chunks remaining. The texture should resemble wet sand when fully processed.
Mix with Butter: Transfer the crushed cookies to a mixing bowl and pour in the melted butter. Stir until the mixture resembles wet sand and holds together when pressed.
Form the Base: Press this mixture firmly and evenly into the bottom of a 9×13 inch dish. I use the bottom of a measuring cup to create a smooth, compact surface.
Chill the Base: Place the dish in the refrigerator while preparing the next layer. This quick chill helps the crust set up properly.
Beat the Cream Cheese: In a large bowl, beat the cream cheese until completely smooth and free of lumps. Ensure it’s at room temperature for the silkiest result.
Add Sweetness: Gradually add the powdered sugar while continuing to beat until fully incorporated and the mixture is light and fluffy.
Fold in Cool Whip: Gently fold in one container of Cool Whip until just combined. The mixture should be light and mousse-like with no streaks remaining.
Layer Over Crust: Carefully spread this mixture over the chilled Oreo crust, creating an even layer. Use an offset spatula for the smoothest finish.
Mix the Pudding: In a separate bowl, whisk together the instant chocolate pudding mix and cold milk for about 2 minutes until it begins to thicken.
Let it Set: Allow the pudding to sit for 5 minutes to reach a spreadable consistency. It should be thick but still pourable.
Apply the Layer: Pour and spread the pudding mixture evenly over the cream cheese layer, being careful not to disturb the layers beneath.
Top with Cool Whip: Spread the remaining container of Cool Whip over the pudding layer, creating gentle swirls for visual appeal.
Garnish (Optional): Crush a few additional Oreos and sprinkle over the top for decoration and to hint at what’s inside.