- 0 Facebook
- 1 Pinterest
- 0 Email
- Copy Link
- 1 share
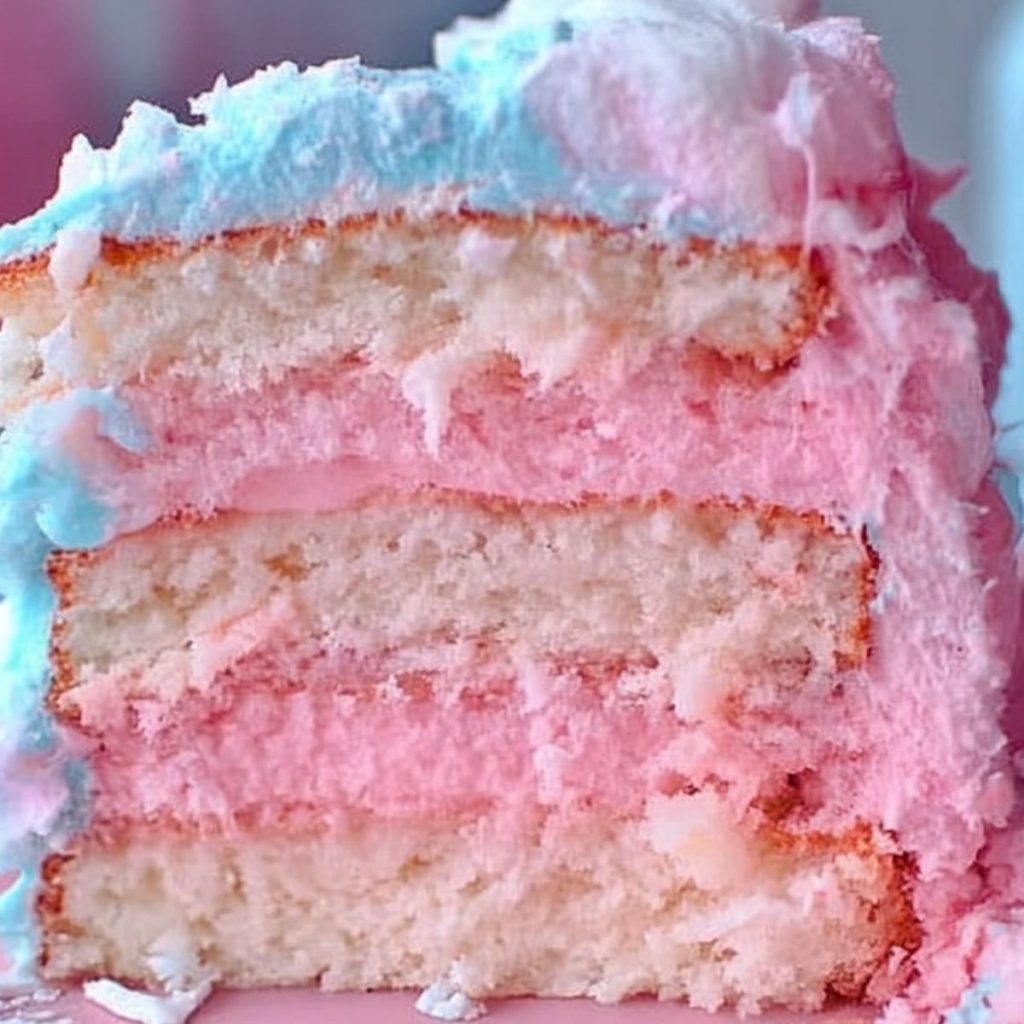
This spectacular Dreamy Cotton Candy Cake transforms nostalgic carnival flavors into an enchanting dessert that’s sure to spark joy with every bite. Fluffy, melt-in-your-mouth layers are delicately infused with sweet cotton candy essence and swirled with vibrant pink and blue hues that mimic the spun sugar treat. Wrapped in a cloud-like frosting and crowned with wisps of real cotton candy, this showstopper brings all the whimsy of the fairground to your table — perfect alongside a scoop of vanilla ice cream for a celebration that captures pure childhood magic.
Why You’ll Love This Recipe
This Dreamy Cotton Candy Cake brings the enchantment of carnival treats right to your kitchen table, no ticket required! Each slice delivers a magical experience that’s worth the moderate effort.
- Show-Stopping Appearance : The swirled pink and blue layers create an Instagram-worthy dessert that guarantees gasps when you slice into it.
- Nostalgic Flavor Balance : Real cotton candy pieces melt into the batter, infusing the cake with authentic fairground flavor without becoming overwhelmingly sweet.
- Make-Ahead Friendly : The cake layers can be baked up to two days in advance and stored wrapped in the refrigerator until you’re ready to assemble and frost.
- Celebration Versatile : This cake works beautifully for birthday parties, baby gender reveals, summer gatherings, or anytime you need to add a touch of whimsy to the dessert table.
- Impressive Yet Achievable : The step-by-step method breaks down what looks like a professional bakery creation into manageable techniques any home baker can master.
Ingredient Breakdown with Tips
Every ingredient in this Cotton Candy Cake Recipe plays a vital role in creating that perfect balance of structure, sweetness, and carnival-inspired magic. Quality ingredients and proper preparation will ensure your cake captures the whimsical essence of cotton candy with each bite.
- All-purpose flour : Provides the foundation and structure for your cake. For the lightest texture, sift before measuring to remove any lumps and aerate the flour.
- Baking powder : Creates the perfect rise and airy texture in this cake. Check the expiration date before using—fresh baking powder yields significantly better results.
- Salt : Enhances all the flavors and balances the sweetness. Fine sea salt dissolves more evenly throughout the batter than coarse kosher salt.
- Unsalted butter, softened : Contributes richness and helps create a tender crumb. Allow butter to reach room temperature naturally (about 1 hour) rather than microwaving for the best texture.
- Granulated sugar : Provides sweetness and helps create air pockets when creamed with butter. Using superfine sugar will create an even smoother texture if available.
- Egg whites : Give structure while maintaining the cake’s light, fluffy texture and pristine white base. Room temperature egg whites will incorporate more air when beaten.
- Vanilla extract : Adds depth and enhances the cotton candy flavor profile. Pure extract (rather than imitation) offers superior flavor complexity.
- Milk : Adds moisture and helps create a tender crumb. Whole milk works best, but 2% can be substituted with minimal texture difference.
- Cotton candy : The star ingredient that infuses authentic carnival flavor throughout the cake. Fresh cotton candy works best; if using pre-packaged, choose brands without artificial aftertaste.
- Pink and blue food coloring : Creates the signature cotton candy color swirl. Gel food coloring provides vibrant hues without thinning the batter like liquid varieties.
- Powdered sugar : The foundation for silky-smooth frosting. Sifting before measuring prevents lumps and creates a more professional finish.
- Unsalted butter (for frosting) : Creates a stable, pipeable frosting. Softened to cool room temperature (not too warm) for the perfect consistency without separation.
- Milk (for frosting) : Adjusts the frosting consistency. Add gradually, starting with the minimum amount, to achieve the perfect spreading texture.
Step-by-Step Instructions
- Preheat your oven to 350°F (175°C). Grease and line two 9-inch round cake pans with parchment paper, then lightly flour the sides for easy release.
- Whisk together the flour, baking powder, and salt in a medium bowl until well combined. This ensures your leavening agents are evenly distributed throughout the batter.
- Cream the butter and sugar in a large mixing bowl using an electric mixer on medium-high speed for 3-4 minutes until light and fluffy. I find that scraping down the sides halfway through gives the best results.
- Add the egg whites one at a time , mixing well after each addition, then blend in the vanilla extract. The mixture should look smooth and slightly increased in volume.
- Alternate adding the dry ingredients and milk to the butter mixture, beginning and ending with the flour mixture (3 additions of flour, 2 of milk). Mix on low speed just until incorporated to avoid overmixing.
- Divide the batter evenly between two bowls. Gently fold chopped cotton candy into each portion, then tint one bowl with pink food coloring and the other with blue. The cotton candy will partially dissolve, infusing the batter with its signature flavor.
- Drop alternating spoonfuls of pink and blue batter into the prepared pans, then use a knife to create gentle swirls. Don’t overmix or you’ll lose the distinct color pattern.
- Bake for 25-30 minutes until a toothpick inserted in the center comes out clean. The tops should spring back when lightly touched and the edges will just begin to pull away from the sides of the pan.
For the fluffiest texture, make sure all refrigerated ingredients reach room temperature before you begin mixing. Cold ingredients won’t incorporate properly, resulting in a denser cake.
Serving Suggestions
This whimsical Cotton Candy Cake deserves a presentation as magical as its flavors! Transform an ordinary dessert moment into a carnival-inspired celebration with these serving ideas.
For birthday parties or special celebrations, serve slices on pastel-colored plates with a small scoop of vanilla ice cream on the side. The coolness of the ice cream beautifully complements the sweet cotton candy flavors in the cake. I like to add a fresh cotton candy tuft on top of each slice just before serving – this creates that perfect “wow” moment as guests receive their dessert.
For an enchanting dessert table, surround the Cotton Candy Cake with complementary treats like strawberry milk shooters, blue raspberry macarons, or white chocolate dipped strawberries. The pink and blue color scheme creates a cohesive, Instagram-worthy display that’s perfect for baby showers or gender reveal parties.
If serving to adults, pair slices with a signature cotton candy cocktail made with vanilla vodka and a splash of cream – the sophisticated nod to the nostalgic fairground treat creates a perfect full-circle dessert experience that will have everyone reminiscing about childhood carnival days.
Storage & Freezing
This Cotton Candy Cake maintains its magical texture and flavor when stored properly. At room temperature, store the fully assembled cake in a cake keeper or loosely covered with plastic wrap for up to 3 days. The frosting creates a protective seal that helps keep the cake layers moist.
For longer storage, the unfrosted cake layers can be refrigerated for up to 5 days when wrapped tightly in plastic wrap. I’ve found that bringing refrigerated cake to room temperature about 1 hour before serving delivers the best flavor and texture experience.
Want to prepare this Cotton Candy Cake ahead for a special occasion? Individual unfrosted layers freeze beautifully for up to 2 months when double-wrapped in plastic wrap and placed in freezer bags. Thaw overnight in the refrigerator , then allow to come to room temperature before frosting. Note that cotton candy garnishes should always be added just before serving, as they’ll dissolve quickly once exposed to air.
Expert Tips
After making this Cotton Candy Cake dozens of times for birthdays and special events, I’ve discovered these game-changing tricks:
- Timing matters with cotton candy : Add the chopped cotton candy just before baking—I’ve found that folding it in too early causes excessive melting and flavor loss.
- Perfect your swirl technique : For those stunning pink and blue marbled layers, use a butter knife held vertically and make just 3-4 figure-eight motions through the batter—anymore creates muddy colors.
- Protect your frosting : When garnishing with fresh cotton candy, I always add it right before serving—the moisture from the frosting will make it dissolve within 30 minutes.
- Room temperature is non-negotiable : Those 5 egg whites must be at room temperature to properly incorporate air—I’ve rushed this step before and ended up with a significantly denser cake.
- Balance your sweetness : If you find the Cotton Candy Cake Recipe too sweet, add an extra 1/4 teaspoon of salt to the batter to create the perfect flavor counterpoint.
Variations & Substitutions
Don’t be afraid to put your own spin on this magical Cotton Candy Cake! The recipe is wonderfully adaptable to suit different preferences, dietary needs, or whatever ingredients you have on hand.
- Gluten-free version : Substitute the all-purpose flour with your favorite cup-for-cup gluten-free flour blend. I’ve tested this with Bob’s Red Mill 1-to-1 Baking Flour and found the results nearly identical to the original—just add an extra egg white for binding.
- Dairy-free adaptation : Replace the butter with equal amounts of plant-based butter sticks (not spread) and substitute the milk with almond or oat milk. The frosting works beautifully with vegan butter alternatives for a completely dairy-free celebration cake.
- Cotton candy alternatives : If you can’t find cotton candy or it’s too humid to work with, try using 1-2 teaspoons of cotton candy flavoring extract plus 3 tablespoons of colored sugar crystals for a similar effect with more reliable results.
- Cupcake conversion : Transform this into approximately 24 cotton candy cupcakes by filling lined muffin tins 2/3 full with alternating spoonfuls of colored batter. Reduce baking time to 18-20 minutes and top with cotton candy tufts just before serving.
- Color variations : Create custom color combinations for different themes—purple and teal for mermaid parties, red and green for holiday celebrations, or team colors for sports events. The base recipe remains the same, just swap out the food coloring.
- Flavor enhancements : Try adding 1/2 teaspoon of almond extract alongside the vanilla for a subtle complexity that beautifully complements the cotton candy flavor profile.
Make Ahead Options
This Cotton Candy Cake Recipe is a meal prep dream for busy home cooks planning celebrations! The cake layers can be baked up to 2 days ahead and wrapped tightly in plastic wrap, then refrigerated to maintain freshness. You can also prepare the buttercream frosting up to 3 days in advance and store it covered in the refrigerator (bring to room temperature and re-whip before using). For maximum time savings, chop your cotton candy garnish and store it in an airtight container at room temperature for up to 24 hours before serving. When ready to assemble, simply frost the cooled layers and add fresh cotton candy decorations—you’ll have a stunning centerpiece with minimal last-minute effort!
Recipe FAQs
Can I use store-bought cotton candy? Yes! Fresh works best for garnish.
Will the cotton candy dissolve in the batter? Partially – that’s what creates the flavor.
Can I make this cake ahead? Bake layers 2 days ahead, frost day-of.
Do I need special food coloring? Gel colors work best for vibrant swirls.
Can I substitute the egg whites? No substitutes – they’re essential for texture.
How do I prevent the cotton candy garnish from melting? Add it just before serving.
- 0 Facebook
- 1 Pinterest
- 0 Email
- Copy Link
- 1 share
Dreamy Cotton Candy Cake Recipe: Carnival Magic at Home
Ingredients
Instructions
- Preheat your oven to 350°F (175°C)
Grease and line two 9-inch round cake pans with parchment paper, then lightly flour the sides for easy release.
- Whisk together the flour, baking powder, and salt
in a medium bowl until well combined.
- Cream the butter and sugar
in a large mixing bowl using an electric mixer on medium-high speed for 3-4 minutes until light and fluffy.
- Add the egg whites one at a time
, mixing well after each addition, then blend in the vanilla extract.
- Alternate adding the dry ingredients and milk
to the butter mixture, beginning and ending with the flour mixture.
- Divide the batter evenly between two bowls
Gently fold chopped cotton candy into each portion, then tint one bowl with pink food coloring and the other with blue.
- Drop alternating spoonfuls of pink and blue batter
into the prepared pans, then use a knife to create gentle swirls.
- Bake for 25-30 minutes
until a toothpick inserted in the center comes out clean.
Notes
Timing matters with cotton candy : Add the chopped cotton candy just before baking.
Perfect your swirl technique : Use a butter knife held vertically and make just 3-4 figure-eight motions through the batter.
Protect your frosting : When garnishing with fresh cotton candy, add it right before serving.
Room temperature is non-negotiable : Those 5 egg whites must be at room temperature to properly incorporate air.
Balance your sweetness : If the cake is too sweet, add an extra 1/4 teaspoon of salt to the batter.
Nutrition
| Serving Size | 1 slice |
|---|---|
| Calories | 350 calories |
| Sugar Content | 30g |
| Sodium Content | 180mg |
| Fat Content | 20g |
| Saturated Fat Content | 12g |
| Unsaturated Fat Content | 5g |
| Trans Fat Content | 0g |
| Carbohydrate Content | 40g |
| Fiber Content | 1g |
| Protein Content | 3g |
| Cholesterol Content | 75mg |