- 0 Facebook
- 0 Pinterest
- 3 Email
- Copy Link
- 3 shares
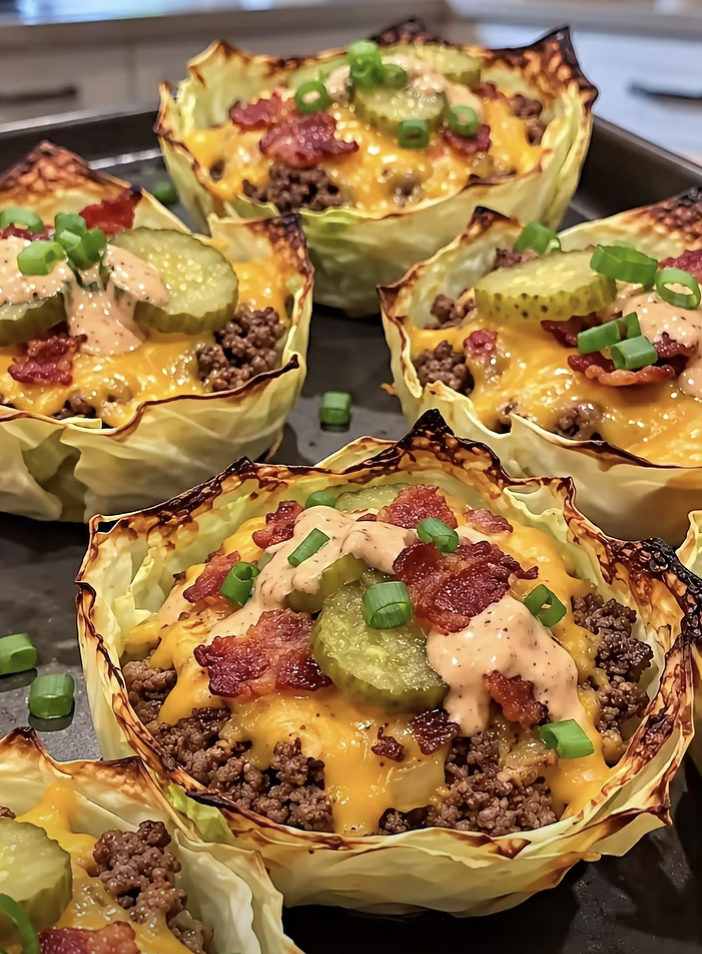
Smoky bacon, juicy beef, and gooey cheddar get all the cheeseburger glory here, only they’re tucked into tender cabbage instead of a bun. The filling simmers together in one skillet (onion, garlic, Worcestershire, and pickles doing the heavy lifting), then bakes under a blanket of melted cheese until bubbly. A drizzle of tangy, creamy burger sauce ties it all together, and a side of crispy fries or a crisp green salad makes the plate feel complete.
What Are Loaded Cheeseburger Cabbage Bowls?
Think of them as everything you love about a classic cheeseburger, served in a bowl you can actually feel good about. Tender green cabbage replaces the bun and gives the dish a gentle sweetness and satisfying bite. Seasoned ground beef, crumbled bacon, and tangy pickles go on top, finished with a blanket of cheddar that melts into golden, bubbly pockets in the oven . The homemade burger sauce, a quick mix of mayo, ketchup, mustard, and relish, adds that familiar drive-thru tang without the processed shortcuts. It’s an easy, budget-friendly dinner that works for busy weeknights, and it’s hearty enough to win over skeptical eaters and seasoned cooks alike.
Ingredient Notes
Great cheeseburger flavor starts with choosing the right ingredients, and each one in these Loaded Cheeseburger Cabbage Bowls has a job, from the juicy beef to the tangy sauce. A few quick tips will help every layer taste like your favorite burger joint.
Quick note: bacon, cheese, pickles, and Worcestershire are all naturally salty, so taste before adding extra salt.
The Base and Filling
- Green cabbage : Tender cabbage replaces the bun, adding gentle sweetness and a satisfying bite. Choose a heavy, tightly packed head with crisp leaves, and soften the leaves briefly in hot water or the microwave so they bend without tearing.
- Ground beef : This is the juicy, savory heart of the dish. Ground beef at 80/20 or 85/15 gives the best flavor, and draining any excess fat after browning keeps the bowls from turning greasy. Ground turkey works as a leaner swap, though a splash of extra olive oil helps keep it moist.
- Bacon : Crispy, smoky crumbles add salt and crunch in every bite. Thick-cut bacon holds its texture better once baked, so cook it until fully crisp and let it cool before crumbling.
- Cheddar cheese : Sharp cheddar melts into golden, bubbly pockets and gives the bowls their classic cheeseburger flavor. Shredding it from a block melts more smoothly than pre-shredded bags, which contain anti-caking agents.
- Onion : Finely diced onion adds sweetness and savory depth that mimic a grilled burger. Dicing it small helps it soften quickly and blend into the beef instead of leaving crunchy bites.
- Garlic : Fresh minced garlic brings aroma and a warm, mellow bite once sautéed. Add it after the onion softens, and cook it just until fragrant so it doesn’t turn bitter.
- Olive oil : A little oil helps the onion and garlic sauté without sticking and builds a flavorful base for the filling. Any neutral cooking oil, like avocado or canola, can step in if needed.
- Dill pickles : Sliced pickles bring the tangy, briny crunch that makes a cheeseburger taste like a cheeseburger. Pat them dry before adding so extra brine doesn’t make the filling watery.
- Green onions : Chopped green onions add a fresh, mild bite and a pop of color at the end. Scatter them on after baking so they stay bright and crisp, and use chives in a pinch.
Seasonings and Flavor Boosters
- Worcestershire sauce : This adds the deep, savory, slightly tangy flavor that makes ground beef taste richer and more “grill-style.” Look for a classic bottle, and note that traditional versions contain anchovies if you’re serving guests with dietary concerns.
- Smoked paprika : Smoked paprika lends a subtle campfire flavor and a warm reddish hue. It’s noticeably different from sweet paprika, so keep the smoked variety for that backyard-burger taste.
- Garlic powder : Garlic powder spreads even, mellow garlic flavor through the beef and complements the fresh garlic. Check that the jar is fresh and fragrant, since old powder loses its punch.
- Salt : Salt sharpens every flavor in the bowl. Kosher salt is easy to pinch and control, and it’s best added gradually because the bacon, cheese, and pickles bring their own saltiness.
- Black pepper : Freshly ground black pepper adds gentle heat and a little bite to the beef. Grinding it just before using gives a livelier, more aromatic flavor than pre-ground.
The Cheeseburger Sauce
- Mayonnaise : Mayo makes the sauce creamy and rich, and it carries the other flavors. Full-fat mayo gives the smoothest texture, while plain Greek yogurt can replace part of it for a lighter drizzle.
- Ketchup : Ketchup adds sweetness, acidity, and the familiar red-tinted tang of a classic burger sauce. Stick with a standard tomato ketchup for the most recognizable flavor.
- Yellow mustard : Yellow mustard brings a sharp, vinegary kick that cuts through the richness of the cheese and bacon. A little goes a long way, so measure it for a balanced sauce.
- Pickle relish : Relish adds a subtle sweetness and pickle crunch throughout the sauce. Dill relish makes it tangier, while sweet relish gives a milder, drive-thru-style flavor.
- Garlic powder (for the sauce): Garlic powder blends smoothly into the sauce without any harsh raw bite. Stir it in and let the sauce rest a few minutes so the flavors can meld.
- Smoked paprika (for the sauce): A small amount adds light smokiness and a warm color to the finished drizzle. For the best flavor, whisk the sauce a few minutes ahead, or chill it briefly before serving.
Step-by-Step Instructions
- Preheat the oven to 375°F (190°C) and core the cabbage. Peel off 6 large outer leaves, soften them in hot water or the microwave for 1 to 2 minutes until they bend without tearing, then pat dry.
- Whisk the mayonnaise, ketchup, yellow mustard, pickle relish, garlic powder, and smoked paprika in a small bowl until smooth. Refrigerate it while you cook, since the flavors meld as it rests.
- Heat the olive oil in a large skillet over medium heat and sauté the diced onion for 3 to 4 minutes, until soft and translucent. I like to add the minced garlic only once the onion softens and cook it for about 30 seconds, just until fragrant, so it never turns bitter.
- Crumble in the ground beef and cook for 6 to 8 minutes, breaking it up as it browns, until no pink remains. Spoon off any excess fat so the bowls stay juicy rather than greasy.
- Stir in the Worcestershire sauce, smoked paprika, garlic powder, salt, and pepper, then fold in the crumbled bacon and patted-dry pickles. Cook for 1 to 2 minutes, until the mixture smells smoky and looks glossy but not wet.
- Slice the leftover cabbage into thin ribbons and spread them in a baking dish , then nestle the softened leaves on top like little bowls. Spoon in the beef filling and cover each one with the shredded cheddar.
- Bake for 15 to 18 minutes, until the cheese is melted and bubbling at the edges. I often switch to the broiler for the last minute to get those golden, browned spots, but I stay close because cheese goes from perfect to burnt fast.
- Let the bowls rest for 3 to 5 minutes so the filling firms up. Drizzle with the cheeseburger sauce, scatter the chopped green onions on top, and serve warm.
Tip: If your cabbage leaves tear, patch them with a second leaf. The filling holds everything together once the cheese melts.
Store leftovers in an airtight container in the refrigerator for up to 3 days, and keep the sauce separate until serving so the cabbage stays crisp-tender.
Make Ahead Options
These Loaded Cheeseburger Cabbage Bowls are perfect for meal prep, and yes, you can make them ahead of time! Cook the beef filling (onion, garlic, beef, bacon, and pickles) up to 3 days in advance, then cool it completely and refrigerate in an airtight container. Whisk the burger sauce separately, since it keeps beautifully for up to 3 days and tastes even better as the flavors meld. To prevent tearing, soften the cabbage leaves the day before, pat them dry, and refrigerate them wrapped in paper towels. When you’re ready to serve, assemble the bowls, top with cheddar, and bake 18 to 20 minutes (a few minutes longer than usual since the filling is cold), then drizzle with sauce before serving.
Expert Tips
A few small habits make the biggest difference when you’re making Loaded Cheeseburger Cabbage Bowls at home.
- Dry the leaves well : Soften the cabbage leaves only until they bend, then pat them completely dry so no water pools under the beef filling.
- Drain the beef : Spoon off the rendered fat after browning the ground beef. The bacon adds more richness, and a greasy filling slides right out of the leaves.
- Blot those pickles : I press the sliced dill pickles between paper towels before folding them in, because extra brine thins the filling and mutes the Worcestershire.
- Shred your own cheddar : Cheddar shredded from a block melts smoother and browns more evenly than bagged, giving you golden, bubbly edges under the broiler.
- Sauce comes last : Whisk the burger sauce early and chill it, then drizzle it after the 3 to 5 minute rest. I find that mayo turns oily on piping-hot cheese.
Storage & Freezing
- Refrigerating: Let the baked bowls cool for about 20 minutes, then store them within 2 hours of cooking in an airtight container for up to 3 days. Keep the cheeseburger sauce in a separate jar, since mayo-based sauce turns oily on warm cheese and makes the cabbage soggy. Expect the leaves to soften a bit as they sit, and the bacon will lose its crunch. The ribbons underneath soak up the beef juices, which keeps the filling moist.
- Freezing: These Loaded Cheeseburger Cabbage Bowls freeze best as the filling alone. I portion the cooled beef, bacon, and pickle mixture into flat freezer bags, press out the air, and freeze for up to 2 months. When I want dinner, I thaw it overnight, wrap it in fresh softened leaves, and top it with new cheese. Fully assembled bowls can be frozen too, but the cabbage turns tender like stuffed cabbage, and the cheese can go slightly grainy. Don’t freeze the sauce, because mayonnaise separates when thawed. Skip freezing the green onions as well, and add fresh ones after reheating.
- Reheating: Thaw frozen portions overnight in the fridge, then bake covered with foil at 350°F (175°C) for 15 to 20 minutes, until the center reaches 165°F (74°C). For a single bowl, the microwave works at 70% power in 1-minute bursts, though the cheese won’t brown. Blot any liquid that pools around the leaves before reheating, since cabbage releases water as it warms.
- Reviving the flavor: I uncover the bowls for the last 3 to 4 minutes and sprinkle on a small handful of fresh cheddar, then give them a quick broiler finish while I watch closely. Re-crisping a few bacon crumbles in a dry skillet brings back the smoky bite. Finish with cold sauce and green onions so the bowls taste freshly made, not like leftovers.
Serving Suggestions
- Plate them like a burger platter: Let the bowls rest the full 3 to 5 minutes, then use a wide spatula to lift each one onto a plate with its bed of cabbage ribbons underneath. Drizzle the chilled cheeseburger sauce over the top in a zigzag, then scatter on the green onions and a few extra pickle slices. Saucing after the rest keeps the mayo from turning oily on the hot cheese. For a crowd, set the sauce in a squeeze bottle or small ramekin so everyone can add as much as they like.
- Add crunch and acidity on the side: These bowls are rich with beef, bacon, and cheddar, so I like something crisp and bright next to them. Oven -baked fries or potato wedges dusted with smoked paprika echo the filling and give you that classic burger-and-fries feel. A simple arugula or romaine salad with lemon vinaigrette, cherry tomatoes, and thinly sliced red onion cuts through the richness. Skip heavy creamy sides, since the sauce and cheese already cover that.
- Pick a drink that refreshes: A cold lager or pale ale is a natural match for the smoky bacon and tangy pickles. If you’d rather pour wine, a lightly chilled Beaujolais or a fruity Zinfandel handles the beef and Worcestershire without overpowering them. For a non-alcoholic option, sparkling water with lime or unsweetened iced tea refreshes the palate between bites.
- Match the serving style to the occasion: For a weeknight, one bowl with a handful of fries or a quick side salad is a complete dinner. For game day or a casual get-together, bake the Loaded Cheeseburger Cabbage Bowls in a large dish and set out extra sauce, pickles, and shredded cheddar so guests can top their own. For a more polished dinner, serve one bowl per person on a warmed plate, finishing with a few fresh green onion rings and a crack of black pepper.
Variations & Substitutions
These bowls are easy to adapt, so use what’s in your fridge or tweak them for your table. Here are a few tested swaps that keep the cheeseburger flavor intact.
- Change the protein : Ground turkey or chicken replaces beef well; add an extra teaspoon of olive oil, since leaner meat dries out faster.
- Swap the cheese : Pepper jack adds gentle heat, while Swiss gives a nutty, melty twist. Shred either from a block for smoother melting.
- Make it vegetarian : I swap the beef and bacon for finely chopped cremini mushrooms and cooked brown lentils, then use vegetarian Worcestershire to skip the anchovies.
- Go dairy-free : Use a dairy-free cheddar shred that melts well, and confirm your mayonnaise has no milk ingredients; most brands are naturally dairy-free.
- Lighter burger sauce : I replace half the mayonnaise with plain Greek yogurt for a tangier, lighter drizzle, and use sugar-free ketchup when watching carbs.
- Gluten-free adjustment : Choose a gluten-free Worcestershire sauce, since some versions use malt vinegar, and check labels on your bacon, relish, and ketchup.
Common Questions About Loaded Cheeseburger Cabbage Bowls: Juicy and Irresistible
- How do I keep the cabbage leaves from tearing? Soften 1–2 minutes, then patch tears with another leaf.
- Can I swap ground turkey for the beef? Yes, add extra olive oil for moisture.
- Why blot the dill pickles before folding them in? I blot them so the filling stays thick.
- How should I store leftovers and the sauce? Refrigerate up to 3 days, sauce kept separate.
- 0 Facebook
- 0 Pinterest
- 3 Email
- Copy Link
- 3 shares
Loaded Cheeseburger Cabbage Bowls: Juicy and Irresistible
Ingredients
Instructions
Preheat the oven to 375°F (190°C) and core the cabbage. Peel off 6 large outer leaves, soften them in hot water or the microwave for 1 to 2 minutes until they bend without tearing, then pat dry.
Whisk the mayonnaise, ketchup, yellow mustard, pickle relish, garlic powder, and smoked paprika in a small bowl until smooth. Refrigerate it while you cook, since the flavors meld as it rests.
Heat the olive oil in a large skillet over medium heat and saute the diced onion for 3 to 4 minutes, until soft and translucent. Add the minced garlic once the onion softens and cook about 30 seconds, just until fragrant.
Crumble in the ground beef and cook for 6 to 8 minutes, breaking it up as it browns, until no pink remains. Spoon off any excess fat so the bowls stay juicy rather than greasy.
Stir in the Worcestershire sauce, smoked paprika, garlic powder, salt, and pepper, then fold in the crumbled bacon and patted-dry pickles. Cook for 1 to 2 minutes, until the mixture smells smoky and looks glossy but not wet.
Slice the leftover cabbage into thin ribbons and spread them in a baking dish, then nestle the softened leaves on top like little bowls. Spoon in the beef filling and cover each one with the shredded cheddar.
Bake for 15 to 18 minutes, until the cheese is melted and bubbling at the edges. Optionally switch to the broiler for the last minute to brown the tops, watching closely so the cheese doesn’t burn.
Let the bowls rest for 3 to 5 minutes so the filling firms up. Drizzle with the cheeseburger sauce, scatter the chopped green onions on top, and serve warm.
Notes
Dry the leaves well: Soften the cabbage leaves only until they bend, then pat them completely dry so no water pools under the beef filling.
Drain the beef: Spoon off the rendered fat after browning the ground beef. The bacon adds more richness, and a greasy filling slides right out of the leaves.
Blot those pickles: Press the sliced dill pickles between paper towels before folding them in to avoid thinning the filling with extra brine.
Shred your own cheddar: Cheddar shredded from a block melts smoother and browns more evenly than bagged cheese.
Sauce comes last: Whisk the burger sauce early and chill it, then drizzle it after the 3 to 5 minute rest so the mayo doesn’t turn oily on hot cheese.
Storage – Refrigerating: Let baked bowls cool about 20 minutes, store within 2 hours in an airtight container for up to 3 days; keep the sauce separate.
Storage – Freezing: Freeze the filling alone for up to 2 months in flat freezer bags. Fully assembled bowls can be frozen but cabbage softens and cheese may change texture; don’t freeze the sauce.
Reheating: Thaw overnight and bake covered at 350°F (175°C) for 15 to 20 minutes until 165°F (74°C), or microwave single bowls at 70% power in 1-minute bursts. Add fresh cheddar and a quick broil finish to revive browning when reheating.
Nutrition
| Serving Size | 1 bowl (about 1/4 of recipe) |
|---|---|
| Calories | ≈700 kcal per serving |
| Sugar Content | ≈5 g per serving |
| Sodium Content | ≈950 mg per serving |
| Fat Content | ≈57 g per serving |
| Saturated Fat Content | ≈25 g per serving |
| Unsaturated Fat Content | ≈30 g per serving |
| Trans Fat Content | ≈0.5 g per serving |
| Carbohydrate Content | ≈12 g per serving |
| Fiber Content | ≈3 g per serving |
| Protein Content | ≈44 g per serving |
| Cholesterol Content | ≈180 mg per serving |