Introduction
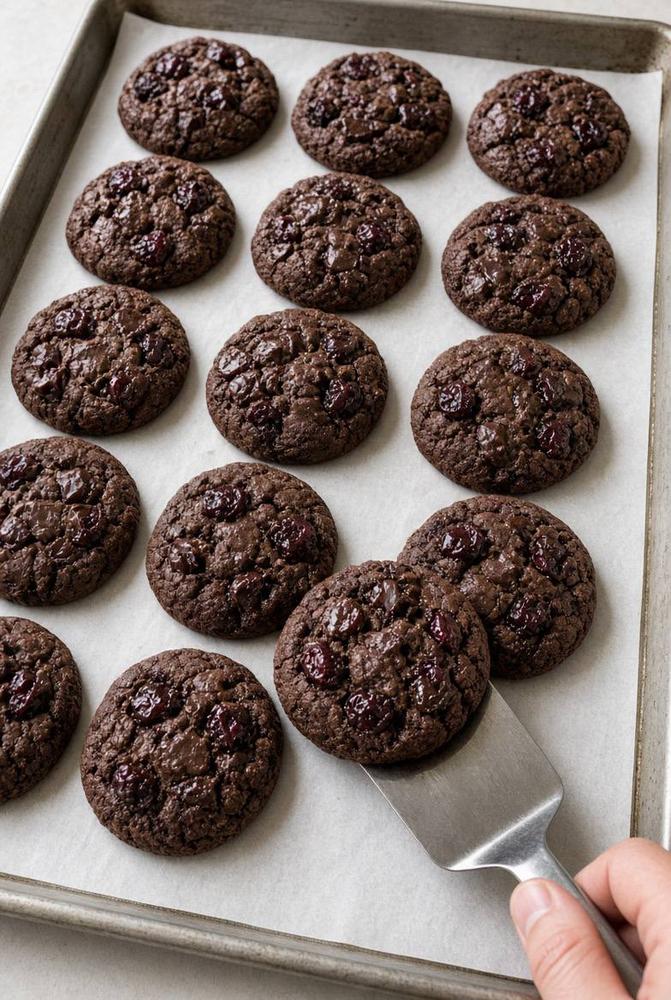
Get ready to fall in love with a cookie that’s more than just a sweet treat – it’s an experience. Our Chocolate Cherry Cookies are a symphony of flavors and textures, bringing together the intense richness of dark chocolate with the delightful tartness of plump, juicy cherries. Each bite delivers a perfect balance: a chewy, slightly fudgy interior with those coveted crispy edges, studded generously with melty chocolate chunks and vibrant, ruby-red cherries. These aren’t your average chocolate chip cookies; they’re a sophisticated upgrade, offering a depth of flavor that will have everyone reaching for just one more.
There’s something inherently irresistible about the chocolate and cherry pairing. It’s a classic combination that evokes images of decadent desserts and luxurious confections. In cookie form, this dynamic duo truly shines. The dark, almost brooding chocolate base provides the perfect canvas for the bright burst of the cherries, creating a harmonious contrast that dances on your palate. Visually, they are just as stunning – dark, inviting, and speckled with jewel-toned fruit, making them a beautiful addition to any dessert platter or a thoughtful homemade gift. They look homemade in the best possible way, with their slightly crinkled tops and generous distribution of mix-ins.
Whether you’re looking for the ultimate dessert to impress guests, a comforting afternoon snack with a cup of coffee, or a special homemade present for a loved one, these Chocolate Cherry Cookies fit the bill perfectly. They’re satisfyingly rich without being overly sweet, and their complex flavor profile makes them feel incredibly gourmet, yet they are surprisingly simple to bake. Prepare to be enchanted by their chewy texture, their deep chocolate notes, and the bright, fruity surprise in every single bite. This recipe is destined to become a new favorite in your baking repertoire.
Nutritional Information
Per serving (approximate values, based on 24 cookies per batch):
- Calories: 220
- Protein: 3g
- Carbohydrates: 30g
- Fat: 11g
- Fiber: 2g
- Sodium: 120mg
Ingredients
- 1 cup (2 sticks) unsalted butter, softened
- ¾ cup granulated sugar
- ¾ cup packed light brown sugar
- 2 large eggs, at room temperature
- 1 teaspoon vanilla extract
- 2 cups all-purpose flour
- ½ cup unsweetened cocoa powder (Dutch-processed recommended for darker color)
- 1 teaspoon baking soda
- ½ teaspoon salt
- 1 ½ cups dark chocolate chunks or chips (60-70% cacao recommended)
- 1 cup dried tart cherries, roughly chopped if very large
- Optional: Flaky sea salt for sprinkling
Instructions
- Preheat your oven to 375°F (190°C). Line two large baking sheets with parchment paper. This is crucial for preventing sticking and ensuring even baking and easy cleanup.
- In a large bowl, using an electric mixer, cream together the softened butter, granulated sugar, and brown sugar on medium speed until the mixture is light, fluffy, and pale in color, about 2-3 minutes. Scrape down the sides of the bowl as needed to ensure everything is well combined.
- Beat in the eggs one at a time, mixing well after each addition until fully incorporated. Then, stir in the vanilla extract. The mixture should be smooth and creamy.
- In a separate medium bowl, whisk together the all-purpose flour, cocoa powder, baking soda, and salt. Ensure there are no lumps of cocoa powder.
- Gradually add the dry ingredients to the wet ingredients, mixing on low speed until just combined. Be careful not to overmix the dough; overmixing can lead to tough cookies. Stop mixing as soon as no streaks of flour are visible.
- Gently fold in the dark chocolate chunks and dried cherries using a rubber spatula. Distribute them evenly throughout the dough. You want a good amount of both in every cookie.
- Drop rounded tablespoons of dough onto the prepared baking sheets, leaving about 2 inches between each cookie. A cookie scoop (about 1.5-2 tablespoons) works perfectly for uniform sizing. If desired, sprinkle a tiny pinch of flaky sea salt on top of each dough ball for an enhanced flavor contrast.
- Bake for 10-12 minutes, or until the edges are set and lightly golden, but the centers still look slightly soft and gooey. This is the secret to a chewy cookie. Do not overbake!
- Remove the baking sheets from the oven and let the cookies cool on the sheets for 5-7 minutes. This allows them to firm up slightly and prevents them from breaking when you transfer them.
- Carefully transfer the cooled cookies to a wire rack to cool completely. The cookies will continue to set as they cool.
- Once fully cooled, store them in an airtight container to maintain their freshness.
Cooking Tips and Variations
Achieving cookie perfection is all about the details, and these Chocolate Cherry Cookies are no exception. Here are some pro tips to ensure your batch is absolutely divine, along with exciting variations to keep things interesting.
Ingredient Quality Matters: For the best flavor, always opt for high-quality ingredients. Use good unsalted butter, a rich vanilla extract, and especially, a high-quality dark chocolate. Chocolate chunks or a chopped chocolate bar (around 60-70% cacao) will melt beautifully and create pockets of gooey deliciousness, far superior to standard chocolate chips that often contain stabilizers to prevent melting. Dutch-processed cocoa powder will give you a darker, richer chocolate flavor and a beautiful deep brown cookie.
Room Temperature Ingredients: Ensure your butter and eggs are at room temperature. This is crucial for proper emulsion and creaming. Room temperature butter creams more smoothly with sugar, creating tiny air pockets that contribute to a light and tender crumb. Cold eggs won’t incorporate as well, leading to a denser cookie.
Don’t Overmix: Once you add the dry ingredients to the wet, mix only until just combined. Overmixing develops the gluten in the flour, resulting in tough, cakey cookies rather than the desired chewy texture. As soon as you see no more streaks of flour, stop mixing.
Plump Your Cherries: If your dried cherries seem a bit dry or hard, you can rehydrate them slightly before adding them to the dough. Place them in a small bowl and cover with a splash of hot water, orange juice, or even a liqueur like Kirsch or Grand Marnier for about 10-15 minutes. Drain them thoroughly and pat them dry before adding them to the dough. This will make them even more succulent and flavorful.
Cookie Scoop for Uniformity: Using a cookie scoop (about 1.5 to 2 tablespoons in size) is highly recommended. It ensures that all your cookies are the same size, which means they will bake evenly. No more burnt edges on small cookies while larger ones are still raw in the middle.
The Importance of Parchment Paper: Always line your baking sheets with parchment paper. It prevents sticking, promotes even browning, and makes cleanup a breeze. Silicone baking mats also work wonderfully.
Don’t Overbake: This is perhaps the most critical tip for chewy cookies. Remove the cookies from the oven when the edges are set and lightly golden, but the centers still look a bit soft and slightly underbaked. They will continue to cook and set on the hot baking sheet. Overbaking is the quickest way to dry, crumbly cookies.
Cooling Process: Allow the cookies to cool on the baking sheet for at least 5-7 minutes before transferring them to a wire rack. They are delicate when hot and need this time to firm up. Moving them too soon can cause them to break apart.
Flavor Variations:
- Nutty Addition: Add ½ cup of chopped toasted pecans, walnuts, or almonds along with the chocolate and cherries for an extra layer of crunch and flavor.
- Different Chocolate: Experiment with different types of chocolate. Milk chocolate chunks will make for a sweeter cookie, while white chocolate chips could offer a lovely contrast. A mix of dark and milk chocolate is also delicious.
- Citrus Zest: A teaspoon of orange or lemon zest folded into the dough with the vanilla extract can brighten the flavor profile and complement the cherries beautifully.
- Spice It Up: A pinch of cinnamon or a tiny dash of almond extract (be careful, it’s strong!) can add an interesting depth to the chocolate and cherry flavors.
- Boozy Cherries: For an adult twist, soak your dried cherries in a tablespoon or two of Kirsch (cherry brandy), rum, or bourbon for at least 30 minutes before patting them dry and adding them to the dough.
- Double Chocolate Cherry: If you want an even more intense chocolate experience, you can increase the cocoa powder by another tablespoon and reduce the flour by the same amount.
- Salted Caramel Drizzle: Once cooled, drizzle the cookies with a homemade or store-bought salted caramel sauce for an extra touch of decadence.
By following these tips and feeling free to experiment with variations, you’ll consistently bake perfect, irresistible Chocolate Cherry Cookies that are tailored to your taste!
Storage and Reheating
Proper storage is key to keeping your Chocolate Cherry Cookies fresh, chewy, and delicious for as long as possible. Here’s how to store them and, if needed, how to refresh them.
Countertop Storage: Once your cookies have completely cooled to room temperature (this is important to prevent condensation), store them in an airtight container at room temperature. A cookie jar or a plastic storage container with a tight-fitting lid works perfectly. They will stay fresh and soft for up to 3-5 days. To maintain softness, you can place a half slice of bread or a small piece of apple in the container with the cookies; the moisture from the bread/apple will transfer to the cookies, keeping them from drying out. Just remember to replace the bread/apple every day or two.
Freezing Baked Cookies: Chocolate Cherry Cookies freeze exceptionally well, making them perfect for meal prep or for having a quick treat on hand. Once completely cooled, place the cookies in a single layer on a baking sheet and freeze for about an hour until solid. This prevents them from sticking together. Then, transfer the frozen cookies to a freezer-safe airtight container or a heavy-duty freezer bag. They can be stored in the freezer for up to 2-3 months. Label the container with the date so you know when they were frozen.
Freezing Cookie Dough: You can also freeze portions of the raw cookie dough. Scoop the dough into individual balls and place them on a parchment-lined baking sheet. Freeze until solid, then transfer the frozen dough balls to a freezer-safe bag or container. When you’re ready to bake, you can bake them directly from frozen; just add an extra 2-4 minutes to the baking time. This is fantastic for having fresh-baked cookies whenever a craving strikes!
Reheating/Refreshing Baked Cookies:
- Oven Method: To bring back that fresh-from-the-oven warmth and chewiness, place cooled or frozen cookies on a baking sheet. Heat in a preheated oven at 300°F (150°C) for about 5-7 minutes for cooled cookies, or 8-12 minutes for frozen cookies, until they are warmed through and slightly soft in the center. This method is best for multiple cookies.
- Microwave Method: For a quick single-cookie refresh, place one cookie on a microwave-safe plate. Microwave on high for 10-15 seconds. Be careful not to overheat, as this can make the cookie tough. This will soften the chocolate and make the cookie wonderfully gooey.
By following these storage and reheating guidelines, you can enjoy your delicious Chocolate Cherry Cookies at their best, whether it’s days or even weeks after they were baked.
Frequently Asked Questions
What kind of chocolate should I use for the best results?
For the absolute best Chocolate Cherry Cookies, we highly recommend using a good quality dark chocolate, specifically chocolate chunks or a chopped chocolate bar with 60-70% cacao content. These types of chocolate melt more smoothly and create luscious pockets of gooey chocolate throughout the cookie. Standard chocolate chips often contain stabilizers that prevent them from fully melting, resulting in a less desirable texture. Dutch-processed cocoa powder for the dough also contributes to a richer, darker chocolate flavor and color.
Can I use fresh cherries instead of dried?
While fresh cherries might sound appealing, they contain a lot of moisture which can significantly alter the texture of the cookie dough, potentially making it too wet and leading to a cakey or less stable cookie. For this recipe, dried tart cherries are highly recommended as they provide concentrated flavor without adding excess liquid. If you really want to incorporate fresh cherries, you would need to macerate them, drain them thoroughly, and potentially adjust the flour content, which can be tricky. Stick with dried for consistent results.
My cookies turned out too flat/too cakey. What went wrong?
Several factors can contribute to flat or cakey cookies. If your cookies are too flat, it might be due to butter that was too soft or even melted before creaming, or an incorrect ratio of leavening agents (baking soda). Ensure your butter is softened but still cool to the touch. Another common culprit is an oven that isn’t at the correct temperature (a cheap oven thermometer can help!). If your cookies are cakey, it’s often a sign of overmixing the dough, which develops the gluten too much. Also, using too much flour can lead to a cakey texture. Make sure to measure flour accurately, ideally by weight or by spooning it into a measuring cup and leveling it off.
How can I make these cookies even more special for a holiday or gift?
To elevate these cookies for a special occasion, consider a few extra touches. Before baking, sprinkle the tops of the dough balls with a bit of flaky sea salt; this enhances the chocolate flavor beautifully. After cooling, you could drizzle them with melted white chocolate for a striking visual contrast, or dip half the cookie in dark chocolate and then sprinkle with chopped pistachios or edible glitter. Packaging them in a decorative box or tin, perhaps tied with a festive ribbon, also makes them an incredibly thoughtful and impressive homemade gift.
Chocolate Cherry Cookies
Ingredients
Instructions
Preheat your oven to 375°F (190°C). Line two large baking sheets with parchment paper. This is crucial for preventing sticking and ensuring even baking and easy cleanup.
In a large bowl, using an electric mixer, cream together the softened butter, granulated sugar, and brown sugar on medium speed until the mixture is light, fluffy, and pale in color, about 2-3 minutes. Scrape down the sides of the bowl as needed to ensure everything is well combined.
Beat in the eggs one at a time, mixing well after each addition until fully incorporated. Then, stir in the vanilla extract. The mixture should be smooth and creamy.
In a separate medium bowl, whisk together the all-purpose flour, cocoa powder, baking soda, and salt. Ensure there are no lumps of cocoa powder.
Gradually add the dry ingredients to the wet ingredients, mixing on low speed until just combined. Be careful not to overmix the dough; overmixing can lead to tough cookies. Stop mixing as soon as no streaks of flour are visible.
Gently fold in the dark chocolate chunks and dried cherries using a rubber spatula. Distribute them evenly throughout the dough. You want a good amount of both in every cookie.
Drop rounded tablespoons of dough onto the prepared baking sheets, leaving about 2 inches between each cookie. A cookie scoop (about 1.5-2 tablespoons) works perfectly for uniform sizing. If desired, sprinkle a tiny pinch of flaky sea salt on top of each dough ball for an enhanced flavor contrast.
Bake for 10-12 minutes, or until the edges are set and lightly golden, but the centers still look slightly soft and gooey. This is the secret to a chewy cookie. Do not overbake!
Remove the baking sheets from the oven and let the cookies cool on the sheets for 5-7 minutes. This allows them to firm up slightly and prevents them from breaking when you transfer them.
Carefully transfer the cooled cookies to a wire rack to cool completely. The cookies will continue to set as they cool.
Once fully cooled, store them in an airtight container to maintain their freshness.