Introduction
Remember that classic brown bag lunch staple, the peanut butter and jelly sandwich? The one that instantly transported you back to childhood, sticky fingers and all? Well, get ready to have your nostalgic socks knocked off, because we’re transforming that beloved combo into something truly extraordinary: Peanut Butter & Jelly Fudge Bars! These aren’t just any old bars; they’re a sophisticated, layered dessert that takes all the comforting flavors you adore and elevates them into a show-stopping, no-bake masterpiece. Imagine the creamy, salty sweetness of peanut butter fudge, nestled on a delightful crumbly crust, all topped with a vibrant, fruity jelly swirl. It’s a grown-up twist on a childhood favorite that still delivers all the warm, fuzzy feelings.
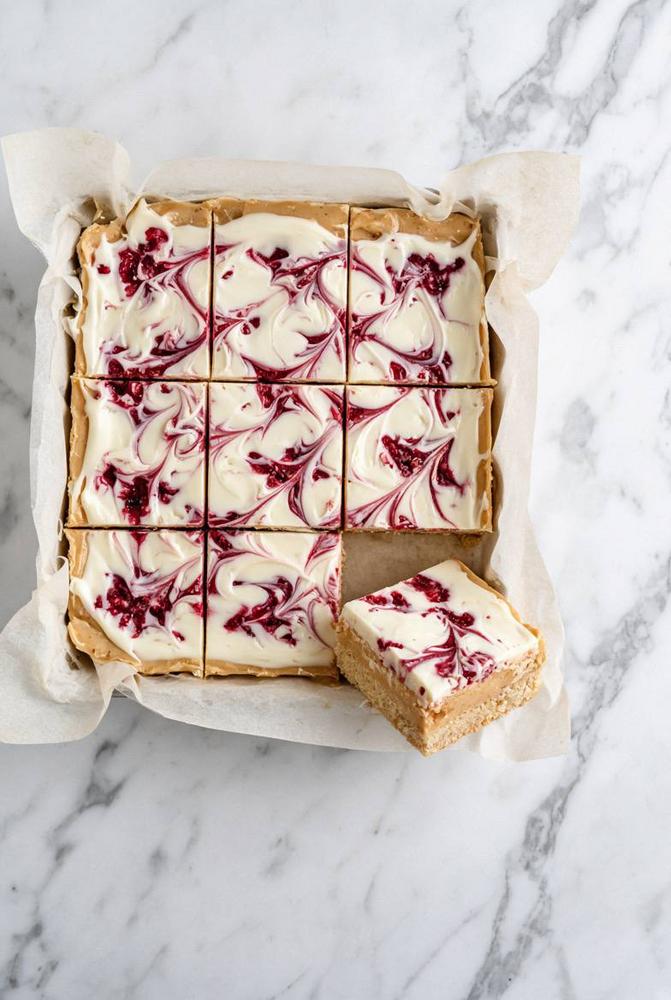
These fudge bars are more than just a dessert; they’re an experience. Each bite offers a symphony of textures and tastes, from the satisfying crunch of the base to the smooth, melt-in-your-mouth peanut butter fudge, perfectly complemented by the bright, tangy burst of raspberry jelly swirled through a luscious white chocolate topping. What makes them truly special, beyond their incredible flavor, is their impressive visual appeal. The striking red and white swirl on top looks like a work of art, making them perfect for potlucks, parties, or simply impressing your family with your culinary prowess. And the best part? They’re surprisingly easy to make, requiring no oven and minimal fuss, proving that you don’t need to spend hours in the kitchen to create something truly spectacular.
Get ready to ditch the bread and embrace this incredible no-bake treat. Whether you’re craving a taste of nostalgia, need an easy yet elegant dessert for a gathering, or simply want to indulge in something utterly delicious, these Peanut Butter & Jelly Fudge Bars are about to become your new go-to recipe. They’re sweet, salty, fruity, creamy, and guaranteed to bring a smile to everyone’s face. Let’s dive into creating these irresistible layers of pure joy!
Nutritional Information
Per serving (approximate values):
- Calories: 385
- Protein: 8g
- Carbohydrates: 42g
- Fat: 22g
- Fiber: 2g
- Sodium: 210mg
Ingredients
- 1 ½ cups (about 180g) crushed graham crackers, Nilla wafers, or shortbread cookies
- ½ cup (113g) unsalted butter, melted
- 1 cup (250g) creamy peanut butter (such as Jif or Skippy)
- ½ cup (113g) unsalted butter
- 3 cups (360g) powdered sugar, sifted
- 1 teaspoon vanilla extract
- 1 (14-ounce/397g) can sweetened condensed milk
- 12 ounces (340g) white chocolate chips or white candy melts
- 2 tablespoons vegetable oil or coconut oil (optional, for thinning white chocolate)
- ½ cup (120g) raspberry jam or jelly (or your preferred flavor like strawberry or grape)
Instructions
- Prepare the Pan: Line a 9×13 inch baking pan with parchment paper, leaving an overhang on the sides. This will make it easy to lift the bars out later. Lightly grease the parchment paper with cooking spray or butter.
- Make the Crumb Base: In a medium bowl, combine the crushed cookies/graham crackers with ½ cup melted butter. Mix until the crumbs are thoroughly moistened. Press this mixture evenly into the bottom of the prepared baking pan. Use the back of a spoon or your fingers to create a firm, compact layer. Place the pan in the refrigerator to chill while you prepare the peanut butter fudge.
- Prepare the Peanut Butter Fudge Layer: In a large microwave-safe bowl or a saucepan over medium-low heat, combine the 1 cup creamy peanut butter and ½ cup unsalted butter. Heat, stirring frequently, until both are melted and smooth. If using the microwave, heat in 30-second intervals, stirring after each, until melted.
- Once melted, remove from heat and stir in the sifted powdered sugar and vanilla extract until well combined and smooth.
- Next, pour in the entire can of sweetened condensed milk. Stir vigorously until the mixture is completely smooth, thick, and uniform. This is your peanut butter fudge.
- Assemble the Peanut Butter Fudge Layer: Retrieve the chilled pan with the crumb base from the refrigerator. Pour the peanut butter fudge mixture evenly over the crumb base. Use an offset spatula or the back of a spoon to spread it smoothly to the edges of the pan. Return the pan to the refrigerator and chill for at least 1-2 hours, or until the fudge layer is firm enough to support the topping.
- Prepare the Jelly Swirl Topping: While the fudge is chilling, prepare your topping. In a separate microwave-safe bowl, melt the white chocolate chips (or candy melts) in 30-second intervals, stirring after each, until smooth and fully melted. Be careful not to overheat, as white chocolate can seize. If the melted white chocolate is too thick, stir in 1-2 tablespoons of vegetable or coconut oil until it reaches a smooth, pourable consistency.
- In a small bowl, gently warm the raspberry jam/jelly in the microwave for 15-20 seconds until it’s slightly runny. Stir well.
- Create the Swirl Design: Once the peanut butter fudge layer is firm, remove the pan from the refrigerator. Pour the melted white chocolate evenly over the top of the peanut butter fudge layer, spreading it gently to cover the entire surface.
- Immediately, dollop small spoonfuls of the warmed raspberry jam randomly over the white chocolate layer.
- Using a skewer, toothpick, or the tip of a small knife, gently drag it through the jam and white chocolate to create beautiful swirls and patterns. Be careful not to dig too deep into the peanut butter fudge layer below.
- Chill and Cut: Return the pan to the refrigerator and chill for a minimum of 2-3 hours, or preferably overnight, until all layers are completely firm and set. This is crucial for clean cuts.
- Once thoroughly chilled, use the parchment paper overhang to lift the entire slab of fudge bars out of the pan and onto a cutting board.
- To cut clean bars, run a sharp knife under hot water, wipe it dry, and then make your cuts. Repeat this process for each cut. Cut into squares or rectangles of your desired size.
- Serve immediately or store for later enjoyment!
Cooking Tips and Variations
To achieve the most beautiful and distinct layers, ensure each layer is adequately chilled before adding the next. This prevents bleeding and helps maintain the structure of the bars. For the crumb base, pressing it down firmly is key to a stable foundation. You can use the bottom of a glass or a flat measuring cup to get a really compact layer. When making the peanut butter fudge, don’t overheat the mixture; just melt the butter and peanut butter until smooth, then stir in the remaining ingredients quickly. Overcooking can make the fudge grainy.
The perfect swirl for the topping is all about timing and technique. Make sure your white chocolate is melted and smooth but not too hot, and your jelly is slightly warmed and runny. Dollop the jelly strategically and then use a light hand with your skewer or knife. Don’t over-swirl, or the colors will muddy; fewer, deliberate passes create a more striking design. For cutting clean bars, the hot knife trick is a game-changer. Wipe the knife clean after each cut to prevent dragging crumbs or fudge onto the next piece. If your bars are too cold, they might crack when cut, so letting them sit at room temperature for 5-10 minutes before cutting can sometimes help, but ensure they are still very firm.
For variations, feel free to experiment with different types of jam or jelly. Strawberry, grape, or even apricot preserves would be delicious alternatives to raspberry, offering different flavor profiles. If you’re not a fan of white chocolate, you could try a milk or dark chocolate drizzle over the peanut butter fudge before adding the jelly swirls for a richer topping. For a different texture in the peanut butter fudge layer, you could use crunchy peanut butter, adding a subtle nutty bite. Consider adding a pinch of sea salt flakes to the top of the bars just after swirling for an extra pop of salty-sweet goodness. For those with nut allergies, almond butter or cashew butter can be substituted for peanut butter, though the flavor profile will change slightly. Just ensure the chosen nut butter has a similar consistency to creamy peanut butter. To make these gluten-free, simply use gluten-free graham crackers or cookies for the base layer.
Storage and Reheating
These Peanut Butter & Jelly Fudge Bars are best stored in an airtight container in the refrigerator. They will keep well for up to 5-7 days. Storing them in the fridge helps maintain their firm texture and prevents the layers from softening too much, especially the fudge and white chocolate topping. If you stack them, consider placing a piece of parchment paper between layers to prevent them from sticking together. While they are delightful straight from the fridge, some people prefer to let them sit at room temperature for about 10-15 minutes before serving to slightly soften the fudge and enhance the flavors and creaminess. Reheating is generally not recommended for these bars, as they are a no-bake, chilled dessert. They are meant to be enjoyed cold or at cool room temperature. Freezing is an option for longer storage; wrap individual bars tightly in plastic wrap, then place them in a freezer-safe bag or container for up to 1-2 months. Thaw them in the refrigerator overnight or at room temperature for an hour before serving.
Frequently Asked Questions
Can I use crunchy peanut butter instead of creamy?
Absolutely! While creamy peanut butter gives a smoother fudge, crunchy peanut butter will add a delightful texture and extra nutty bite to the peanut butter fudge layer. It’s a great variation if you enjoy a bit of crunch in your desserts.
My white chocolate seized when I melted it. What went wrong?
White chocolate is very delicate and can seize (become thick and clumpy) if it gets too hot, if even a tiny bit of water or steam gets into it, or if it’s stirred too vigorously during melting. To prevent this, melt it slowly in short bursts in the microwave, stirring gently after each, or use a double boiler over simmering (not boiling) water. If it does seize, sometimes stirring in a teaspoon or two of vegetable oil or melted shortening can help smooth it out, as recommended in the recipe.
How far in advance can I make these fudge bars?
These Peanut Butter & Jelly Fudge Bars are an excellent make-ahead dessert! You can prepare them up to 3-4 days in advance and store them in an airtight container in the refrigerator. In fact, they often taste even better the next day once the flavors have had more time to meld together. Just be sure to keep them well-chilled until serving.
Peanut Butter & Jelly Fudge Bars
Ingredients
Instructions
Prepare the Pan: Line a 9×13 inch baking pan with parchment paper, leaving an overhang on the sides. This will make it easy to lift the bars out later. Lightly grease the parchment paper with cooking spray or butter.
Make the Crumb Base: In a medium bowl, combine the crushed cookies/graham crackers with ½ cup melted butter. Mix until the crumbs are thoroughly moistened. Press this mixture evenly into the bottom of the prepared baking pan. Use the back of a spoon or your fingers to create a firm, compact layer. Place the pan in the refrigerator to chill while you prepare the peanut butter fudge.
Prepare the Peanut Butter Fudge Layer: In a large microwave-safe bowl or a saucepan over medium-low heat, combine the 1 cup creamy peanut butter and ½ cup unsalted butter. Heat, stirring frequently, until both are melted and smooth. If using the microwave, heat in 30-second intervals, stirring after each, until melted.
Once melted, remove from heat and stir in the sifted powdered sugar and vanilla extract until well combined and smooth.
Next, pour in the entire can of sweetened condensed milk. Stir vigorously until the mixture is completely smooth, thick, and uniform. This is your peanut butter fudge.
Assemble the Peanut Butter Fudge Layer: Retrieve the chilled pan with the crumb base from the refrigerator. Pour the peanut butter fudge mixture evenly over the crumb base. Use an offset spatula or the back of a spoon to spread it smoothly to the edges of the pan. Return the pan to the refrigerator and chill for at least 1-2 hours, or until the fudge layer is firm enough to support the topping.
Prepare the Jelly Swirl Topping: While the fudge is chilling, prepare your topping. In a separate microwave-safe bowl, melt the white chocolate chips (or candy melts) in 30-second intervals, stirring after each, until smooth and fully melted. Be careful not to overheat, as white chocolate can seize. If the melted white chocolate is too thick, stir in 1-2 tablespoons of vegetable or coconut oil until it reaches a smooth, pourable consistency.
In a small bowl, gently warm the raspberry jam/jelly in the microwave for 15-20 seconds until it’s slightly runny. Stir well.
Create the Swirl Design: Once the peanut butter fudge layer is firm, remove the pan from the refrigerator. Pour the melted white chocolate evenly over the top of the peanut butter fudge layer, spreading it gently to cover the entire surface.
Immediately, dollop small spoonfuls of the warmed raspberry jam randomly over the white chocolate layer.
Using a skewer, toothpick, or the tip of a small knife, gently drag it through the jam and white chocolate to create beautiful swirls and patterns. Be careful not to dig too deep into the peanut butter fudge layer below.
Chill and Cut: Return the pan to the refrigerator and chill for a minimum of 2-3 hours, or preferably overnight, until all layers are completely firm and set. This is crucial for clean cuts.
Once thoroughly chilled, use the parchment paper overhang to lift the entire slab of fudge bars out of the pan and onto a cutting board.
To cut clean bars, run a sharp knife under hot water, wipe it dry, and then make your cuts. Repeat this process for each cut. Cut into squares or rectangles of your desired size.
Serve immediately or store for later enjoyment!