Introduction
There’s an undeniable magic that comes with homemade treats, and marshmallows are no exception. Forget the bland, rubbery store-bought versions; sinking your teeth into a cloud of freshly made marshmallow is an experience entirely in itself. The moment you taste that soft, airy, melt-in-your-mouth sweetness, you’ll understand why making them from scratch is so incredibly rewarding. It’s a culinary adventure that transforms simple ingredients into something truly extraordinary, offering a texture and flavor profile that simply can’t be replicated by mass-produced alternatives.
As the holiday season approaches, or even when you’re just craving a unique and delightful confection, these Homemade Peppermint Marshmallows step into the spotlight. The vibrant, cool burst of peppermint is the perfect counterpoint to the marshmallow’s inherent sweetness, making them an ideal addition to a steaming mug of hot cocoa, a festive s’mores assembly, or simply enjoyed as a standalone treat. Their festive appearance, often adorned with a beautiful swirl of color and a sprinkle of crushed candy cane, makes them as much a feast for the eyes as they are for the palate. They instantly evoke feelings of warmth, celebration, and cozy winter evenings.
While the idea of making marshmallows from scratch might conjure images of complex candy-making techniques, rest assured, it’s far more achievable than you might think. With a trusty candy thermometer and a stand mixer to do the heavy lifting, you’ll be amazed at how easily you can create these fluffy, flavorful pillows of perfection. This recipe will guide you through each step, ensuring you achieve that signature bouncy texture, intense peppermint flavor, and beautiful, inviting appearance that will impress everyone who tries them. Get ready to embark on a sweet journey that will elevate your dessert game and fill your home with the delightful aroma of homemade goodness.
Nutritional Information
Per serving (approximate values, based on 36 servings):
- Calories: 75
- Protein: 1g
- Carbohydrates: 18g
- Fat: 0g
- Fiber: 0g
- Sodium: 2mg
Ingredients
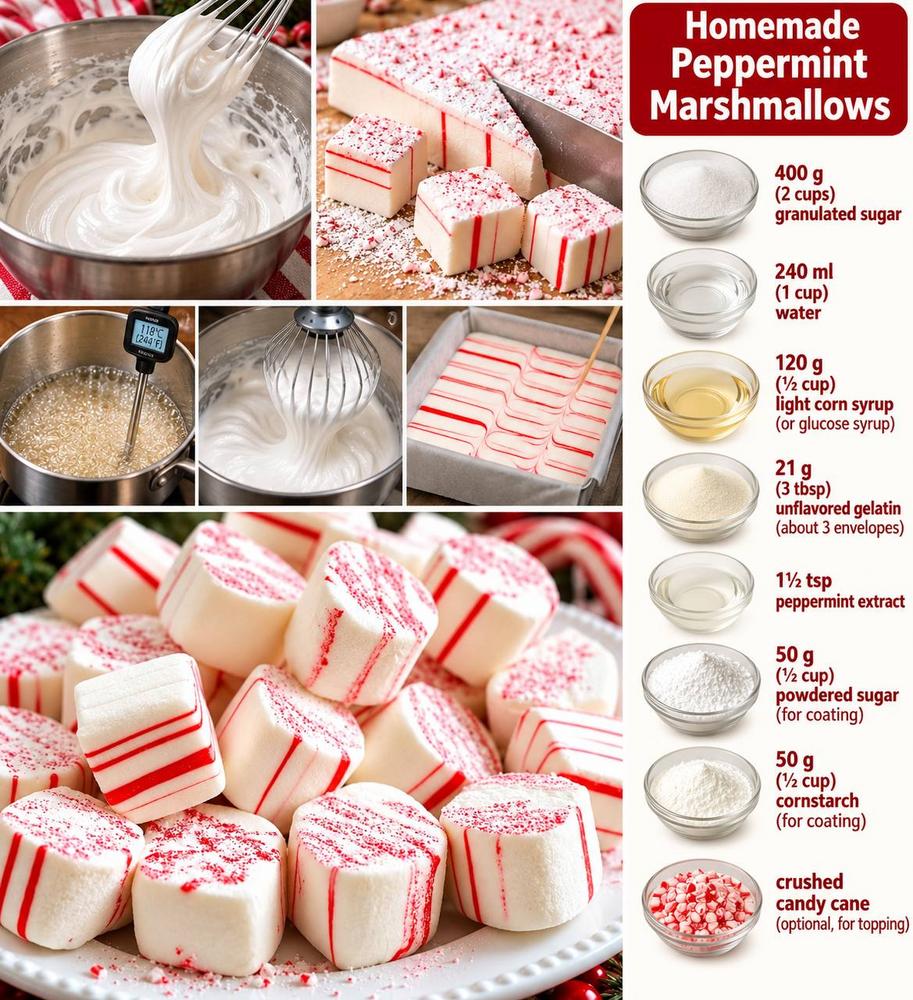
- 400 g (2 cups) granulated sugar
- 240 ml (1 cup) cold water, divided
- 120 g (½ cup) light corn syrup (or glucose syrup)
- 21 g (3 tbsp, about 3 envelopes) unflavored gelatin powder
- 1½ tsp peppermint extract
- 50 g (½ cup) powdered sugar (for coating)
- 50 g (½ cup) cornstarch (for coating)
- Optional: Red food coloring or melted red candy melts, for swirling
- Optional: Crushed candy cane, for topping
- A little neutral oil (like vegetable or canola), for greasing the pan
Instructions
- Prepare Your Pan: Lightly brush a 9×13 inch baking pan with a neutral oil, ensuring all sides and corners are coated. In a small bowl, whisk together the 50 g powdered sugar and 50 g cornstarch. Generously dust the oiled pan with about half of this mixture, tapping out any excess. Set aside. This coating is crucial to prevent sticking.
- Bloom the Gelatin: In the bowl of a stand mixer fitted with the whisk attachment, pour 120 ml (½ cup) of the cold water. Sprinkle the unflavored gelatin powder evenly over the water. Let it sit undisturbed for 5-10 minutes to “bloom” or hydrate. The gelatin will absorb the water and become thick and spongy.
- Cook the Sugar Syrup: While the gelatin blooms, combine the granulated sugar, the remaining 120 ml (½ cup) of cold water, and the light corn syrup in a medium-sized heavy-bottomed saucepan. Stir gently over medium heat until the sugar dissolves. Once dissolved, stop stirring. Insert a candy thermometer into the mixture, ensuring it doesn’t touch the bottom of the pan.
- Reach Hard Ball Stage: Bring the sugar syrup to a boil and continue cooking without stirring until the thermometer reads 118°C (244°F). This is the “hard ball” stage. Reaching this precise temperature is absolutely critical for the marshmallow’s final texture and stability. Be patient and watch the thermometer carefully.
- Combine and Whip: Once the sugar syrup reaches 118°C (244°F), immediately remove it from the heat. With the stand mixer on low speed, carefully and slowly pour the hot sugar syrup in a thin, steady stream down the side of the bowl into the bloomed gelatin mixture. Be extremely careful, as the syrup is very hot.
- Whip to Perfection: Once all the syrup has been added, increase the mixer speed to medium-high. Whip for 10-15 minutes, or until the mixture is very thick, fluffy, glossy, and has quadrupled in volume. It should be bright white and hold stiff peaks when the whisk is lifted. During the last minute of whipping, add the peppermint extract and continue to whip briefly to incorporate it fully.
- Pour into Pan & Swirl (Optional): Quickly scrape the marshmallow mixture into the prepared baking pan using an oiled spatula. Work quickly, as the marshmallow sets rapidly. If adding a swirl, drizzle a few lines of red food coloring or melted red candy melts over the top of the marshmallow mixture in the pan. Use a skewer or a thin knife to gently swirl the color into the marshmallow, creating a marbled effect. Be careful not to over-mix, or the color will fully incorporate.
- Set Completely: Leave the marshmallow to set uncovered at room temperature for at least 4-6 hours, or preferably overnight. Do not refrigerate, as this can make them weep and become sticky. The marshmallow should feel firm and only slightly tacky to the touch when fully set.
- Cut the Marshmallows: Once set, dust your clean work surface generously with the remaining powdered sugar and cornstarch mixture. Invert the marshmallow slab onto the dusted surface. Lightly dust the top of the marshmallow slab as well. Lightly oil a sharp knife or a pizza cutter, then dust it with the coating mixture. Cut the marshmallow into desired shapes, typically 1-inch to 1.5-inch squares. Re-oil and re-dust your knife as needed to prevent sticking.
- Coat and Decorate: As you cut each marshmallow piece, toss it gently in the remaining powdered sugar and cornstarch mixture to coat all sides, preventing sticking. For an extra festive touch, gently press the top of each coated marshmallow into crushed candy cane.
- Store: Place the finished marshmallows in an airtight container.
Cooking Tips and Variations
Achieving perfect homemade marshmallows hinges on a few crucial details. First and foremost, a reliable candy thermometer is your best friend. Do not attempt this recipe without one, as the sugar syrup must reach precisely 118°C (244°F) for the correct texture. Under-cooking will result in a runny, sticky mess, while over-cooking will yield a hard, brittle marshmallow. Test your thermometer in boiling water before you start; it should read 100°C (212°F). If it’s off by a degree or two, adjust your target temperature accordingly.
Whipping time is another critical factor. Don’t be tempted to stop early. The marshmallow mixture needs to be whipped vigorously for 10-15 minutes until it’s incredibly thick, fluffy, and glossy, holding stiff peaks. This process incorporates a vast amount of air, which is what gives marshmallows their signature light and airy texture. A stand mixer is highly recommended for this recipe, as a hand mixer may struggle with the volume and duration of whipping required.
To combat stickiness, be generous with your powdered sugar and cornstarch coating. This mixture not only prevents the marshmallows from sticking to each other but also makes them easier to handle and cut. When cutting, lightly oil your knife or pizza cutter and then dust it with the coating mixture. Repeat this process frequently to ensure clean cuts. If your knife becomes too sticky, simply wipe it clean and re-oil/re-dust.
Cleaning up after marshmallow making can be a sticky affair. For bowls and utensils, fill them with hot water immediately after use and let them soak. The hot water will dissolve the sugar, making cleanup much easier. For variations, consider swapping the peppermint extract for other flavorings like vanilla, almond, or even a citrus zest for a different twist. Food coloring can be added during the last minute of whipping for a solid color, or swirled in as described for a marbled effect. Experiment with different toppings too: toasted coconut, cocoa powder, finely chopped nuts, or sprinkles can all add unique textures and flavors.
Storage and Reheating
Homemade peppermint marshmallows are best stored in an airtight container at room temperature. It’s crucial not to refrigerate them, as the cold and moisture can cause them to become hard, sticky, and “weep” (release moisture). When stored properly, they will maintain their freshness and delightful texture for up to 1-2 weeks. You might find that after a few days, the exterior coating might absorb a little moisture, but they will still be perfectly delicious. If you notice them becoming a bit tacky, you can always give them another light dusting of the powdered sugar and cornstarch mixture.
These marshmallows are generally enjoyed at room temperature and do not require reheating. Their soft, fluffy texture is at its peak when they are allowed to be naturally warm. However, they are absolutely fantastic when used in applications where they will be gently warmed. For instance, dropping a few into a mug of hot cocoa will cause them to slowly melt into a creamy, peppermint-infused foam, creating an indulgent beverage experience. Similarly, using them for s’mores, where they are briefly toasted over a fire or under a broiler, will soften and caramelize their exterior, giving them a wonderfully gooey center. Just be mindful that direct, intense heat will melt them quickly, so keep an eye on them.
Frequently Asked Questions
What is the purpose of corn syrup in this recipe?
Light corn syrup (or glucose syrup) is a crucial ingredient in marshmallow making because it helps prevent sugar crystallization. Without it, the sugar in the syrup can recrystallize as it cools, resulting in a grainy, gritty marshmallow texture instead of the smooth, soft, and airy consistency you’re aiming for. It acts as an interfering agent, ensuring a perfectly smooth and stable marshmallow.
Can I make these marshmallows without a stand mixer?
While a stand mixer is highly recommended due to the long whipping time (10-15 minutes) and the thick consistency of the marshmallow mixture, it is possible to use a powerful hand mixer. However, be prepared for a strenuous arm workout, and ensure your hand mixer has enough power to handle the dense mixture without overheating. A stand mixer provides consistent, hands-free whipping, which is ideal for achieving the perfect volume and texture.
My marshmallows are too sticky to cut. What went wrong?
If your marshmallows are excessively sticky, it’s likely due to one of two reasons: either they didn’t set long enough, or the sugar syrup didn’t reach the correct temperature during cooking. Marshmallows need a full 4-6 hours, or preferably overnight, to set completely at room temperature. If the sugar syrup didn’t reach 118°C (244°F), it won’t be firm enough. Ensure you’re using a reliable candy thermometer and allowing ample setting time. Also, be generous with the powdered sugar and cornstarch coating when cutting.
How long do homemade marshmallows last?
When stored in an airtight container at room temperature, homemade peppermint marshmallows will stay fresh and delicious for 1 to 2 weeks. They do not require refrigeration and in fact, refrigeration can negatively impact their texture, making them hard and sticky. While they might lose a tiny bit of their initial fluffiness over time, their flavor will remain excellent for quite a while.
Homemade Peppermint Marshmallows
Ingredients
Instructions
Prepare Your Pan: Lightly brush a 9×13 inch baking pan with a neutral oil, ensuring all sides and corners are coated. In a small bowl, whisk together the 50 g powdered sugar and 50 g cornstarch. Generously dust the oiled pan with about half of this mixture, tapping out any excess. Set aside. This coating is crucial to prevent sticking.
Bloom the Gelatin: In the bowl of a stand mixer fitted with the whisk attachment, pour 120 ml (½ cup) of the cold water. Sprinkle the unflavored gelatin powder evenly over the water. Let it sit undisturbed for 5-10 minutes to “bloom” or hydrate. The gelatin will absorb the water and become thick and spongy.
Cook the Sugar Syrup: While the gelatin blooms, combine the granulated sugar, the remaining 120 ml (½ cup) of cold water, and the light corn syrup in a medium-sized heavy-bottomed saucepan. Stir gently over medium heat until the sugar dissolves. Once dissolved, stop stirring. Insert a candy thermometer into the mixture, ensuring it doesn’t touch the bottom of the pan.
Reach Hard Ball Stage: Bring the sugar syrup to a boil and continue cooking without stirring until the thermometer reads 118°C (244°F). This is the “hard ball” stage. Reaching this precise temperature is absolutely critical for the marshmallow’s final texture and stability. Be patient and watch the thermometer carefully.
Combine and Whip: Once the sugar syrup reaches 118°C (244°F), immediately remove it from the heat. With the stand mixer on low speed, carefully and slowly pour the hot sugar syrup in a thin, steady stream down the side of the bowl into the bloomed gelatin mixture. Be extremely careful, as the syrup is very hot.
Whip to Perfection: Once all the syrup has been added, increase the mixer speed to medium-high. Whip for 10-15 minutes, or until the mixture is very thick, fluffy, glossy, and has quadrupled in volume. It should be bright white and hold stiff peaks when the whisk is lifted. During the last minute of whipping, add the peppermint extract and continue to whip briefly to incorporate it fully.
Pour into Pan & Swirl (Optional): Quickly scrape the marshmallow mixture into the prepared baking pan using an oiled spatula. Work quickly, as the marshmallow sets rapidly. If adding a swirl, drizzle a few lines of red food coloring or melted red candy melts over the top of the marshmallow mixture in the pan. Use a skewer or a thin knife to gently swirl the color into the marshmallow, creating a marbled effect. Be careful not to over-mix, or the color will fully incorporate.
Set Completely: Leave the marshmallow to set uncovered at room temperature for at least 4-6 hours, or preferably overnight. Do not refrigerate, as this can make them weep and become sticky. The marshmallow should feel firm and only slightly tacky to the touch when fully set.
Cut the Marshmallows: Once set, dust your clean work surface generously with the remaining powdered sugar and cornstarch mixture. Invert the marshmallow slab onto the dusted surface. Lightly dust the top of the marshmallow slab as well. Lightly oil a sharp knife or a pizza cutter, then dust it with the coating mixture. Cut the marshmallow into desired shapes, typically 1-inch to 1.5-inch squares. Re-oil and re-dust your knife as needed to prevent sticking.
Coat and Decorate: As you cut each marshmallow piece, toss it gently in the remaining powdered sugar and cornstarch mixture to coat all sides, preventing sticking. For an extra festive touch, gently press the top of each coated marshmallow into crushed candy cane.
Store: Place the finished marshmallows in an airtight container.