Introduction
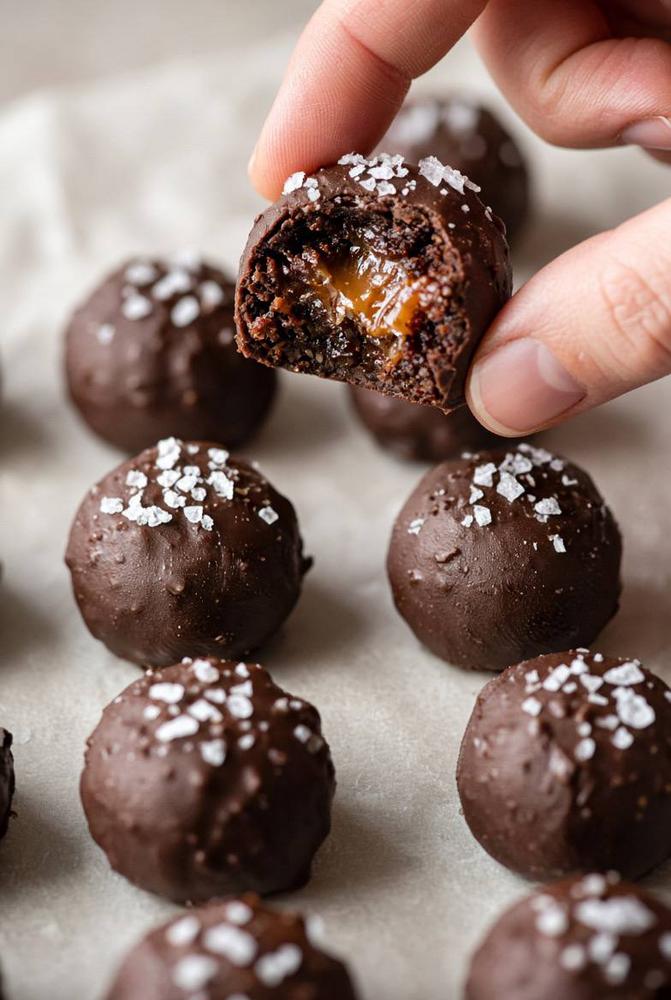
Prepare your taste buds for an unforgettable journey into the realm of pure indulgence: Salted Caramel Brownie Truffle Bites! Imagine a world where the fudgiest, most intensely chocolatey brownie you’ve ever tasted is transformed into a dense, decadent truffle. Now, envision that truffle encasing a molten core of luscious, golden salted caramel, all enrobed in a crisp, dark chocolate shell and finished with a delicate sprinkle of flaky sea salt. These aren’t just treats; they’re tiny explosions of flavor and texture, designed to captivate your senses with every single bite.
These Salted Caramel Brownie Truffle Bites are the quintessential showstopper, perfect for any occasion that calls for a touch of elegance and a whole lot of deliciousness. Whether you’re hosting a sophisticated dinner party, looking for the ultimate edible gift, or simply craving a moment of personal bliss, these truffles deliver. They offer the irresistible allure of rich chocolate, the gooey embrace of sweet and salty caramel, and a hint of crunch, all in one perfectly portioned bite. Best of all, they’re surprisingly approachable to make, transforming humble brownies into something truly extraordinary without requiring a culinary degree.
What makes these bites so special is their masterful balance of contrasting elements. The deep, bittersweet notes of chocolate from the brownie base and outer coating are perfectly complemented by the sweet, buttery richness of the caramel. The crucial addition of sea salt cuts through and enhances all these flavors, preventing them from being overly sweet and adding a sophisticated edge that elevates the entire experience. They’re fudgy, gooey, rich, and utterly irresistible – a true testament to the magic that happens when classic flavors are combined with a creative twist.
Nutritional Information
Per serving (approximate values):
- Calories: 280
- Protein: 3g
- Carbohydrates: 35g
- Fat: 15g
- Fiber: 2g
- Sodium: 120mg
Ingredients
- 1 (9×13-inch) pan fudgy brownies, baked and completely cooled (store-bought or homemade)
- 4 ounces cream cheese, softened
- 1/2 cup powdered sugar
- 1/2 teaspoon vanilla extract
- 1 cup prepared salted caramel sauce (store-bought or homemade), chilled until firm but still scoopable
- 16 ounces dark or semi-sweet chocolate, for melting
- 1 tablespoon coconut oil or shortening (optional, for smoother dipping)
- 2 teaspoons flaky sea salt, for garnish (such as Maldon)
Instructions
- Prepare the Brownie Base: Crumble the cooled brownies into a large mixing bowl. Ensure there are no large chunks remaining. You can use your hands, a fork, or a food processor for this step.
- Mix the Truffle Dough: Add the softened cream cheese, powdered sugar, and vanilla extract to the crumbled brownies. Using your hands, mix thoroughly until a cohesive, fudgy dough forms. It should be pliable and hold its shape when pressed together.
- Chill the Brownie Mixture: Cover the bowl with plastic wrap and refrigerate the brownie mixture for at least 30 minutes, or up to 1 hour. This makes it easier to handle and roll.
- Prepare the Caramel: While the brownie mixture is chilling, ensure your salted caramel sauce is chilled. It should be thick enough to scoop and hold its shape, but not rock hard. If it’s too runny, it will be difficult to encapsulate. If homemade, ensure it’s completely cooled.
- Form the Truffles: Take the chilled brownie mixture out of the refrigerator. Scoop out about 1 tablespoon of the brownie dough and flatten it into a disc in the palm of your hand. Place about 1/2 teaspoon of the chilled salted caramel in the center of the disc. Carefully fold the edges of the brownie dough around the caramel, sealing it completely. Roll the dough between your palms to form a smooth, round truffle. Repeat with the remaining brownie mixture and caramel.
- Second Chill: Arrange the formed truffles on a parchment-lined baking sheet. Place the baking sheet in the freezer for at least 20-30 minutes, or in the refrigerator for at least 1 hour. This firming step is crucial for easy dipping and to prevent the caramel from oozing.
- Melt the Chocolate Coating: While the truffles are chilling, prepare your chocolate coating. Chop the dark or semi-sweet chocolate into small, uniform pieces. Place about two-thirds of the chopped chocolate in a microwave-safe bowl. Microwave in 30-second intervals, stirring well after each, until mostly melted and smooth. Alternatively, use a double boiler: place chocolate in a heatproof bowl set over a saucepan of simmering water, stirring until melted. Remove from heat.
- Temper (Optional, for best results): If desired, add the remaining one-third of chopped chocolate to the melted chocolate and stir continuously until all the chocolate has melted and the mixture is smooth and glossy. This helps to temper the chocolate, resulting in a shinier, snappier coating that is less prone to blooming. If using coconut oil or shortening, stir it into the melted chocolate now until fully incorporated.
- Dip the Truffles: Remove the chilled truffles from the freezer/refrigerator. Working quickly, use a fork or a dipping tool to carefully lower one truffle into the melted chocolate, ensuring it is fully coated. Tap the fork gently against the side of the bowl to remove any excess chocolate.
- Garnish and Set: Immediately transfer the dipped truffle back to the parchment-lined baking sheet. While the chocolate is still wet, sprinkle generously with flaky sea salt. Repeat with the remaining truffles, melting more chocolate if necessary as you go.
- Final Chill and Serve: Once all truffles are dipped and garnished, return the baking sheet to the refrigerator for at least 30 minutes, or until the chocolate coating is completely set. Once set, they are ready to serve.
Cooking Tips and Variations
Achieving perfection with these Salted Caramel Brownie Truffle Bites is all about attention to detail and understanding a few key principles. First and foremost, the quality of your ingredients truly shines through. Use a high-quality fudgy brownie as your base; whether homemade or store-bought, ensure it’s dense and rich, not cakey. A cakey brownie will result in a drier, less cohesive truffle base that’s harder to work with. For the caramel, a good quality store-bought salted caramel sauce is perfectly fine, but if you’re feeling ambitious, a homemade version will take these truffles to an even higher level of deliciousness. When choosing your chocolate for the coating, opt for a good melting chocolate or a high-quality baking bar. The better the chocolate, the smoother and more luxurious your coating will be.
Temperature control is absolutely crucial throughout this recipe. The brownie mixture needs to be chilled sufficiently after mixing to make it firm enough to roll without sticking to your hands. Even more critical is chilling the caramel. If your caramel is too warm or too runny, it will ooze out when you try to form the truffles, creating a sticky mess. Chill it until it’s firm enough to scoop and hold its shape. Finally, the formed truffles must be thoroughly chilled or even frozen before dipping. This ensures they maintain their shape, and the cold truffle will help the chocolate coating set quickly and evenly, preventing the truffle from melting or softening during the dipping process.
When it comes to dipping, practice makes perfect. Work quickly, and if your chocolate starts to thicken, gently rewarm it. If you’re struggling with a smooth coating, adding a tiny bit of coconut oil or shortening to your melted chocolate can help thin it slightly and make dipping easier. Use a fork or a dedicated dipping tool, and tap off any excess chocolate before placing the truffle back on the parchment paper. Don’t forget to sprinkle the flaky sea salt immediately after dipping each truffle, while the chocolate is still wet, so it adheres properly. If you wait too long, the chocolate will set, and the salt won’t stick.
For variations, the possibilities are endless! You could experiment with different brownie flavors, such as espresso brownies for a coffee-chocolate twist, or even blonde brownies for a caramel-focused treat. The caramel itself can be enhanced; stir in a pinch of cinnamon, a tiny bit of cayenne pepper for a subtle kick, or even some finely chopped toasted nuts like pecans or walnuts for added texture. For the chocolate coating, feel free to use milk chocolate for a sweeter profile, or even white chocolate for a striking visual contrast, perhaps with a drizzle of dark chocolate on top. Other toppings could include a sprinkle of crushed pretzels for a salty-crunchy element, cocoa powder for a matte finish, or even a contrasting chocolate drizzle. These truffles are incredibly versatile, allowing you to customize them to your heart’s content and impress any palate.
Storage and Reheating
These Salted Caramel Brownie Truffle Bites are best stored in an airtight container in the refrigerator. Properly stored, they will remain fresh and delicious for up to 1 week. The cool temperature helps maintain the firm texture of the brownie base, the gooeyness of the caramel, and the crispness of the chocolate coating. If you prefer them slightly softer, you can take them out of the refrigerator about 15-20 minutes before serving, allowing them to come closer to room temperature. However, don’t leave them out for too long, especially in a warm environment, as the chocolate can melt and the caramel can become too runny.
For longer storage, these truffles freeze beautifully. Arrange them in a single layer on a parchment-lined baking sheet and freeze until solid, about 1-2 hours. Once frozen, transfer them to a freezer-safe airtight container or a heavy-duty freezer bag, separating layers with parchment paper to prevent sticking. They can be stored in the freezer for up to 3 months. When you’re ready to enjoy them, simply transfer them from the freezer to the refrigerator and let them thaw overnight, or let them sit at room temperature for about 30-60 minutes until they reach your desired consistency. Reheating is generally not recommended for these truffles, as it can cause the chocolate coating to melt and the caramel to ooze excessively, compromising their structure and delicate balance of textures. They are truly meant to be enjoyed chilled or at a cool room temperature.
Frequently Asked Questions
What kind of brownies should I use for the base?
For the best results, use fudgy brownies rather than cakey ones. Fudgy brownies provide a dense, moist, and rich base that holds together well when mixed with the cream cheese and rolled into truffles. If you use cakey brownies, your truffle mixture might be too dry and crumbly, making it difficult to form cohesive balls. You can use a homemade fudgy brownie recipe or a good quality store-bought one.
My caramel is too runny, what should I do?
If your salted caramel sauce is too runny, it will be very difficult to encapsulate within the brownie mixture and will likely ooze out. The best solution is to chill it thoroughly in the refrigerator until it is firm enough to scoop and hold its shape. If it’s still too thin after chilling, you might need to gently reduce it on the stovetop over low heat until it thickens, then chill it again. Alternatively, for a quick fix, you can mix a small amount of powdered sugar into the caramel to thicken it, though this may alter the flavor slightly.
Why is my chocolate coating not smooth and shiny?
Several factors can affect the smoothness and shine of your chocolate coating. Firstly, ensure your chocolate is chopped into small, even pieces to melt uniformly. Overheating chocolate can cause it to seize or become dull. Melting it gently in short intervals (microwave) or over a double boiler is key. Adding a tablespoon of coconut oil or shortening to your melted chocolate can also help create a smoother, more fluid coating that’s easier to dip and sets with a nice sheen. For a truly professional, shiny, and snappy finish, you can try tempering your chocolate, which involves heating and cooling it to specific temperatures to stabilize the cocoa butter crystals.
Can I make these ahead of time for a party?
Absolutely! These Salted Caramel Brownie Truffle Bites are an excellent make-ahead dessert. You can prepare them up to a week in advance and store them in an airtight container in the refrigerator. In fact, making them ahead often improves their flavor as the flavors meld together, and the chilling time ensures they are perfectly set and easy to serve. If you need to make them even further in advance, they can be frozen for up to 3 months, as detailed in the storage section.
Salted Caramel Brownie Truffle Bites
Ingredients
Instructions
Prepare the Brownie Base: Crumble the cooled brownies into a large mixing bowl. Ensure there are no large chunks remaining. You can use your hands, a fork, or a food processor for this step.
Mix the Truffle Dough: Add the softened cream cheese, powdered sugar, and vanilla extract to the crumbled brownies. Using your hands, mix thoroughly until a cohesive, fudgy dough forms. It should be pliable and hold its shape when pressed together.
Chill the Brownie Mixture: Cover the bowl with plastic wrap and refrigerate the brownie mixture for at least 30 minutes, or up to 1 hour. This makes it easier to handle and roll.
Prepare the Caramel: While the brownie mixture is chilling, ensure your salted caramel sauce is chilled. It should be thick enough to scoop and hold its shape, but not rock hard. If it’s too runny, it will be difficult to encapsulate. If homemade, ensure it’s completely cooled.
Form the Truffles: Take the chilled brownie mixture out of the refrigerator. Scoop out about 1 tablespoon of the brownie dough and flatten it into a disc in the palm of your hand. Place about 1/2 teaspoon of the chilled salted caramel in the center of the disc. Carefully fold the edges of the brownie dough around the caramel, sealing it completely. Roll the dough between your palms to form a smooth, round truffle. Repeat with the remaining brownie mixture and caramel.
Second Chill: Arrange the formed truffles on a parchment-lined baking sheet. Place the baking sheet in the freezer for at least 20-30 minutes, or in the refrigerator for at least 1 hour. This firming step is crucial for easy dipping and to prevent the caramel from oozing.
Melt the Chocolate Coating: While the truffles are chilling, prepare your chocolate coating. Chop the dark or semi-sweet chocolate into small, uniform pieces. Place about two-thirds of the chopped chocolate in a microwave-safe bowl. Microwave in 30-second intervals, stirring well after each, until mostly melted and smooth. Alternatively, use a double boiler: place chocolate in a heatproof bowl set over a saucepan of simmering water, stirring until melted. Remove from heat.
Temper (Optional, for best results): If desired, add the remaining one-third of chopped chocolate to the melted chocolate and stir continuously until all the chocolate has melted and the mixture is smooth and glossy. This helps to temper the chocolate, resulting in a shinier, snappier coating that is less prone to blooming. If using coconut oil or shortening, stir it into the melted chocolate now until fully incorporated.
Dip the Truffles: Remove the chilled truffles from the freezer/refrigerator. Working quickly, use a fork or a dipping tool to carefully lower one truffle into the melted chocolate, ensuring it is fully coated. Tap the fork gently against the side of the bowl to remove any excess chocolate.
Garnish and Set: Immediately transfer the dipped truffle back to the parchment-lined baking sheet. While the chocolate is still wet, sprinkle generously with flaky sea salt. Repeat with the remaining truffles, melting more chocolate if necessary as you go.
Final Chill and Serve: Once all truffles are dipped and garnished, return the baking sheet to the refrigerator for at least 30 minutes, or until the chocolate coating is completely set. Once set, they are ready to serve.