Introduction
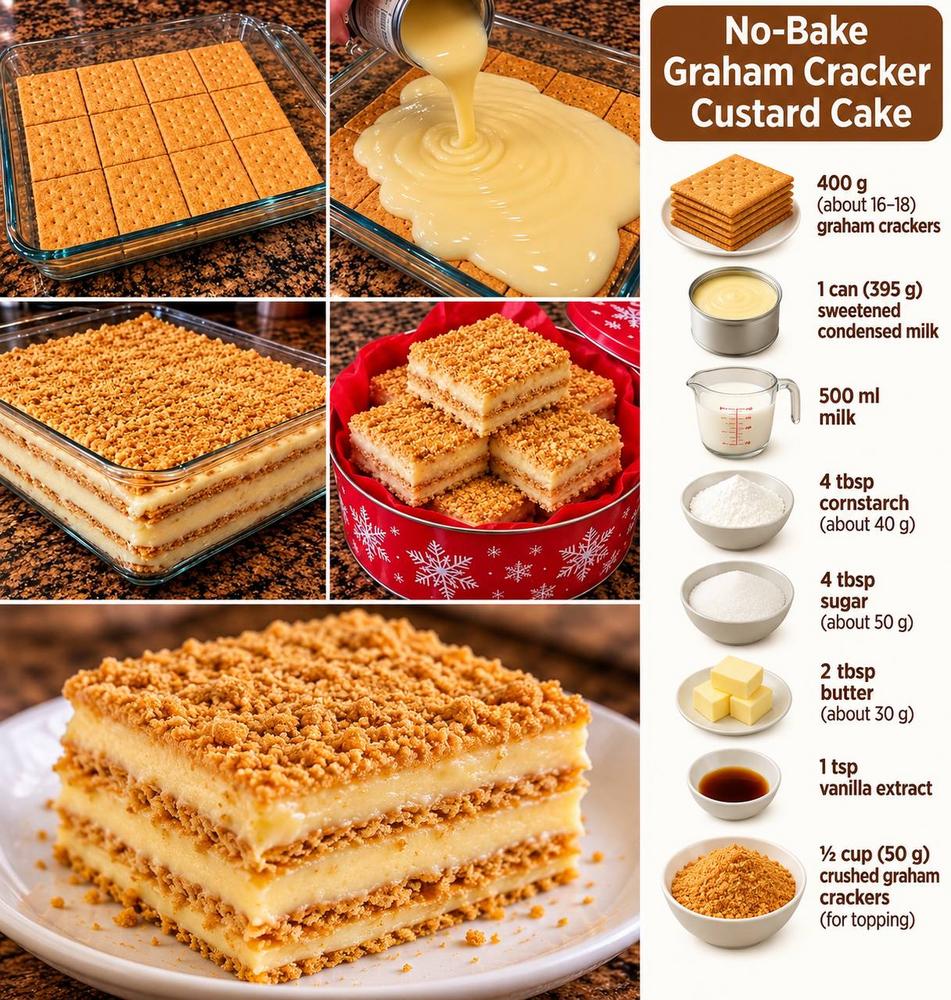
Craving a delightful dessert that requires absolutely no oven time? Look no further than this incredible No-Bake Graham Cracker Custard Cake! This deliciously simple treat is a true crowd-pleaser, perfect for potlucks, family gatherings, or just a sweet indulgence on a warm afternoon. It’s a testament to how humble ingredients can come together to create something truly magical and memorable.
What makes this dessert so special is its irresistible combination of textures and flavors. You start with crisp graham cracker layers that, over time, soften beautifully as they absorb the creamy, rich custard. The custard itself is a dream – smooth, sweet, and infused with comforting vanilla, creating a velvety contrast to the tender crackers. Topped with a sprinkle of crushed graham crackers for an added crunch and visual appeal, this cake is an impressive presentation without any of the fuss typically associated with baking. It’s a nostalgic taste that reminds many of childhood, yet sophisticated enough to grace any dessert table.
You’ll absolutely adore this No-Bake Graham Cracker Custard Cake for its sheer ease and impressive results. Not only does it free up your oven, making it ideal for warmer months or busy holidays, but its step-by-step assembly is incredibly straightforward, even for novice cooks. The beauty of a no-bake recipe means less stress and more time to enjoy the delightful process of creating something delicious. Plus, it’s a fantastic make-ahead dessert, allowing the flavors to meld and the layers to set perfectly overnight, ensuring a flawless slice every time. Get ready to impress everyone with this deceptively simple yet utterly delicious layered masterpiece!
Nutritional Information
Per serving (approximate values, based on 12 servings):
- Calories: 350-400 kcal
- Protein: 7-9g
- Carbohydrates: 50-55g
- Fat: 15-20g
- Fiber: 1-2g
- Sodium: 250-300mg
Ingredients
- Graham Crackers: 400 g (approximately 16-18 full sheets, plus ½ cup crushed for topping)
- Sweetened Condensed Milk: 1 can (395 g)
- Milk: 500 ml (whole milk recommended for creaminess)
- Cornstarch: 4 tablespoons (about 40 g)
- Granulated Sugar: 4 tablespoons (about 50 g)
- Unsalted Butter: 2 tablespoons (about 30 g)
- Vanilla Extract: 1 teaspoon
- Pinch of Salt: (optional, to balance sweetness)
Instructions
- Prepare Your Pan: Lightly grease a 9×13 inch (23×33 cm) baking dish or line it with parchment paper, leaving an overhang on the sides. This will make lifting and serving easier.
- Crush Graham Crackers for Topping: Take about ½ cup (50g) of graham crackers and crush them finely. You can do this by placing them in a Ziploc bag and crushing with a rolling pin, or pulsing them in a food processor. Set aside for later.
- Start the Custard Base: In a medium-sized saucepan, combine the cornstarch and granulated sugar. Whisk them together thoroughly to ensure there are no lumps. This dry mixture will help prevent lumps when the liquid is added.
- Add Liquids to Custard: Gradually whisk in the 500 ml of milk into the dry mixture, making sure to incorporate it smoothly. Then, add the entire can of sweetened condensed milk to the saucepan. Whisk everything together until well combined and smooth. If using, add a tiny pinch of salt at this stage to enhance the flavors.
- Cook the Custard: Place the saucepan over medium heat. Cook, stirring constantly with a whisk or a wooden spoon, making sure to scrape the bottom and sides of the pan. This constant stirring is crucial to prevent the custard from sticking, burning, or forming lumps.
- Thicken the Custard: Continue cooking and stirring for about 8-12 minutes, or until the mixture thickens significantly. It should reach a consistency similar to a thick pudding or gravy – it should coat the back of your spoon and hold its shape briefly when you lift the spoon. The custard will bubble gently as it thickens; ensure it comes to a gentle boil for at least a minute to activate the cornstarch fully.
- Finish the Custard: Once thickened, remove the saucepan from the heat. Immediately stir in the 2 tablespoons of unsalted butter and 1 teaspoon of vanilla extract. Stir vigorously until the butter is completely melted and incorporated, and the vanilla is evenly distributed. The butter adds a luxurious richness and gloss to the custard.
- Layer the First Graham Cracker Base: Arrange a single layer of whole graham crackers at the bottom of your prepared 9×13 inch dish. You may need to break some crackers to fit snugly and cover the entire bottom surface.
- Add the First Custard Layer: Pour approximately one-third to one-half of the hot custard evenly over the graham cracker layer. Use an offset spatula or the back of a spoon to gently spread the custard all the way to the edges.
- Repeat Layers: Place another layer of graham crackers over the custard. Then, pour another portion of the custard over these crackers and spread it evenly. Continue this layering process, typically ending with a final layer of custard on top. Most recipes will yield 3-4 layers of graham crackers and 3-4 layers of custard, depending on the thickness of your custard and how many crackers you use per layer.
- Add the Crumb Topping: While the final custard layer is still warm and soft, sprinkle the reserved crushed graham crackers evenly over the entire top surface of the cake. This adds a lovely texture and visual appeal.
- Chill to Set: Cover the dish loosely with plastic wrap, ensuring the plastic wrap doesn’t touch the custard directly if possible (you can use toothpicks to tent it). Refrigerate for at least 4 hours, but preferably overnight. Chilling is essential for the custard to set completely and for the graham crackers to soften, transforming into a tender, cake-like consistency.
- Cut and Serve: Once thoroughly chilled and set, remove the plastic wrap. Use a sharp knife (wiping it clean between cuts for neatness) to cut the cake into squares or bars. Serve chilled and enjoy!
Cooking Tips and Variations
Custard Consistency is Key: The most crucial step is cooking the custard to the right thickness. If it’s too thin, your cake won’t set properly, and the layers will be messy. If it’s too thick, it will be difficult to spread. Aim for a consistency that coats the back of a spoon and leaves a clear trail when you run your finger through it. Don’t be afraid to let it come to a gentle boil for a minute or two to ensure the cornstarch is fully activated.
Constant Stirring: Never stop stirring the custard while it’s on the heat. This prevents lumps and scorching on the bottom of the pan. A whisk is your best friend for a smooth custard.
Even Layers: For the best presentation and texture, try to make your graham cracker and custard layers as even as possible. Break graham crackers to fill in gaps. An offset spatula works wonders for spreading the custard smoothly.
Patience with Chilling: Do not rush the chilling process. A minimum of 4 hours is necessary, but overnight is truly ideal. This allows the custard to firm up completely and, more importantly, gives the graham crackers ample time to absorb moisture from the custard, transforming them from crisp to tender and cake-like.
Room Temperature Ingredients (for custard): While not strictly necessary for this recipe, using milk and condensed milk that are closer to room temperature can sometimes help the custard cook more evenly and prevent curdling, though with constant stirring, it’s usually not an issue.
Salt for Balance: A tiny pinch of salt (less than ¼ teaspoon) added to the custard mixture can really elevate the flavors, balancing the sweetness and making the vanilla taste more pronounced.
Flavor Variations:
- Citrus Zest: Add 1-2 teaspoons of lemon, orange, or lime zest to the custard along with the vanilla extract for a bright, refreshing twist.
- Coffee Kick: Dissolve 1-2 teaspoons of instant coffee or espresso powder in a tablespoon of hot milk before adding it to the custard mixture for a mocha-flavored dessert.
- Coconut Dream: Substitute half of the milk with full-fat coconut milk for a tropical flavor. You can also sprinkle toasted shredded coconut on top.
- Spiced Custard: Add ¼ teaspoon of ground cinnamon or nutmeg to the dry ingredients for a warm, comforting spice note.
- Chocolate Swirl: After pouring each custard layer, drizzle a bit of melted chocolate or chocolate syrup and swirl gently with a knife for a marbled effect.
- Nutty Topping: Instead of just crushed graham crackers, mix in some finely chopped toasted pecans, walnuts, or almonds for an added crunch and nutty flavor.
- Fruit Addition: Once the cake is set, you can top individual servings with fresh berries (strawberries, raspberries, blueberries) for a burst of freshness and color.
Presentation Ideas:
- For a cleaner cut, dip your knife in hot water and wipe it clean between each slice.
- Serve individual squares with a dollop of whipped cream or a sprig of mint for an elegant touch.
- If making for a party, consider making them in individual ramekins or small dessert cups for single servings.
Storage and Reheating
Storage: This No-Bake Graham Cracker Custard Cake is a fantastic make-ahead dessert. Once assembled and chilled, it should be stored in an airtight container in the refrigerator. If you don’t have an airtight container large enough, cover the original baking dish tightly with plastic wrap or aluminum foil. Stored properly, it will last for up to 3-4 days in the refrigerator. The graham crackers will continue to soften over time, making the texture even more cohesive and cake-like.
Reheating: As this is a no-bake, chilled dessert, it is not meant to be reheated. It is best served cold, straight from the refrigerator. Reheating would cause the custard to melt and lose its set consistency, and the graham crackers would become soggy and unpleasant. Enjoy it as a refreshing, cool treat!
Frequently Asked Questions
Can I use other types of crackers or cookies instead of graham crackers?
Yes, absolutely! While graham crackers are traditional and offer a classic flavor, you can certainly experiment with other options. Digestive biscuits work wonderfully and have a similar texture. Vanilla wafers, shortbread cookies, or even thin ginger snaps could also be used for different flavor profiles. Just ensure they are relatively thin and can soften nicely when absorbing the custard’s moisture. Adjust the quantity as needed to fit your dish.
My custard didn’t thicken. What went wrong?
There are a few common reasons why custard might not thicken. The most likely culprit is not cooking it long enough or not cooking it at a high enough temperature. Cornstarch needs to reach a certain temperature (just below boiling) and be cooked for at least a minute or two at that temperature to activate its thickening properties. Ensure you are stirring constantly and that the custard comes to a gentle boil, bubbling for a short period. Another reason could be inaccurate measurement of cornstarch; make sure you’re using level tablespoons. If your custard is still too thin after cooking, you can try mixing an additional tablespoon of cornstarch with a small amount of cold milk to form a slurry, then whisking it into the hot custard and cooking for a few more minutes until thickened.
How far in advance can I make this dessert?
This dessert is perfect for making ahead! In fact, it’s often better on the second day once the flavors have fully melded and the graham crackers have completely softened. You can comfortably assemble the entire cake 1-2 days in advance. Just ensure it’s tightly covered and stored in the refrigerator. Any longer than that, and the graham crackers might start to become too soft, though it will still be delicious.
Can I freeze this No-Bake Graham Cracker Custard Cake?
Freezing this dessert is generally not recommended. While the custard itself might hold up, the texture of the graham crackers can become unpleasantly soggy and crumbly once thawed, losing their tender, cake-like consistency. The dairy in the custard can also sometimes separate upon thawing, affecting the smooth texture. It’s best enjoyed fresh and chilled from the refrigerator within a few days of preparation.
Easy Layered Graham Cracker and Cream Cheese Dessert Bars
Ingredients
Instructions
Prepare Your Pan: Lightly grease a 9×13 inch (23×33 cm) baking dish or line it with parchment paper, leaving an overhang on the sides. This will make lifting and serving easier.
Crush Graham Crackers for Topping: Take about ½ cup (50g) of graham crackers and crush them finely. You can do this by placing them in a Ziploc bag and crushing with a rolling pin, or pulsing them in a food processor. Set aside for later.
Start the Custard Base: In a medium-sized saucepan, combine the cornstarch and granulated sugar. Whisk them together thoroughly to ensure there are no lumps. This dry mixture will help prevent lumps when the liquid is added.
Add Liquids to Custard: Gradually whisk in the 500 ml of milk into the dry mixture, making sure to incorporate it smoothly. Then, add the entire can of sweetened condensed milk to the saucepan. Whisk everything together until well combined and smooth. If using, add a tiny pinch of salt at this stage to enhance the flavors.
Cook the Custard: Place the saucepan over medium heat. Cook, stirring constantly with a whisk or a wooden spoon, making sure to scrape the bottom and sides of the pan. This constant stirring is crucial to prevent the custard from sticking, burning, or forming lumps.
Thicken the Custard: Continue cooking and stirring for about 8-12 minutes, or until the mixture thickens significantly. It should reach a consistency similar to a thick pudding or gravy – it should coat the back of your spoon and hold its shape briefly when you lift the spoon. The custard will bubble gently as it thickens; ensure it comes to a gentle boil for at least a minute to activate the cornstarch fully.
Finish the Custard: Once thickened, remove the saucepan from the heat. Immediately stir in the 2 tablespoons of unsalted butter and 1 teaspoon of vanilla extract. Stir vigorously until the butter is completely melted and incorporated, and the vanilla is evenly distributed. The butter adds a luxurious richness and gloss to the custard.
Layer the First Graham Cracker Base: Arrange a single layer of whole graham crackers at the bottom of your prepared 9×13 inch dish. You may need to break some crackers to fit snugly and cover the entire bottom surface.
Add the First Custard Layer: Pour approximately one-third to one-half of the hot custard evenly over the graham cracker layer. Use an offset spatula or the back of a spoon to gently spread the custard all the way to the edges.
Repeat Layers: Place another layer of graham crackers over the custard. Then, pour another portion of the custard over these crackers and spread it evenly. Continue this layering process, typically ending with a final layer of custard on top. Most recipes will yield 3-4 layers of graham crackers and 3-4 layers of custard, depending on the thickness of your custard and how many crackers you use per layer.
Add the Crumb Topping: While the final custard layer is still warm and soft, sprinkle the reserved crushed graham crackers evenly over the entire top surface of the cake. This adds a lovely texture and visual appeal.
Chill to Set: Cover the dish loosely with plastic wrap, ensuring the plastic wrap doesn’t touch the custard directly if possible (you can use toothpicks to tent it). Refrigerate for at least 4 hours, but preferably overnight. Chilling is essential for the custard to set completely and for the graham crackers to soften, transforming into a tender, cake-like consistency.
Cut and Serve: Once thoroughly chilled and set, remove the plastic wrap. Use a sharp knife (wiping it clean between cuts for neatness) to cut the cake into squares or bars. Serve chilled and enjoy!