Introduction
There’s an undeniable, almost primal joy in sneaking a spoonful of raw cookie dough straight from the bowl. It’s a nostalgic indulgence, a taste of childhood rebellion, but one that always comes with that tiny whisper of caution. What if we told you that you could capture that pure, unadulterated bliss in a perfectly safe, decadently delicious, and utterly irresistible bite-sized treat? Enter our Chocolate Chip Cookie Dough Truffles! These aren’t just any no-bake dessert; they are spherical nuggets of pure happiness, crafted to deliver all the sweet, comforting flavors of classic chocolate chip cookie dough, without any of the worry.
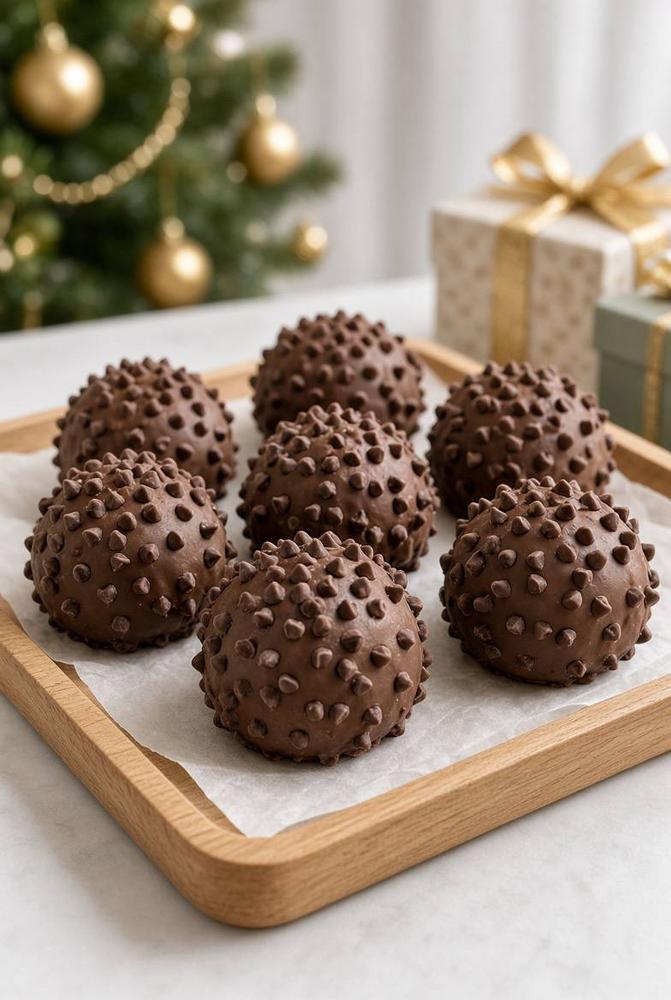
These edible cookie dough bites are the ultimate indulgence, transforming a beloved secret pleasure into an elegant, shareable confection. Each truffle features a rich, buttery, brown sugar-infused chocolate chip cookie dough center, made perfectly safe to eat raw. This delectable core is then enrobed in a smooth, luxurious layer of melted chocolate, providing a satisfying snap with every bite. To elevate them even further, the entire outer surface is generously studded with an abundance of mini chocolate chips, adding a delightful texture and an extra burst of chocolatey goodness. They are the perfect blend of creamy, chewy, and crunchy, making them an instant crowd-pleaser for any occasion.
What makes these Chocolate Chip Cookie Dough Truffles truly special is their versatility and ease. They are a no-bake wonder, meaning no oven time is required, making them ideal for hot days or when you just need a quick dessert fix. Their bite-sized nature makes them perfect for holiday dessert platters, party favors, homemade gifts (especially with that festive background!), or simply a delightful treat to keep on hand for when a craving strikes. They are customizable, easy to make, and guaranteed to disappear fast, leaving everyone asking for the recipe. Get ready to ditch the baking sheets and embrace the pure joy of safe, edible cookie dough!
Nutritional Information
Per serving (approximate values, based on 24 truffles):
- Calories: 180-220
- Protein: 2-3g
- Carbohydrates: 20-25g
- Fat: 10-15g
- Fiber: 1-2g
- Sodium: 50-70mg
Ingredients
- 1 cup (2 sticks) unsalted butter, softened
- 3/4 cup granulated sugar
- 1 cup packed light brown sugar
- 2 teaspoons vanilla extract
- 1/4 teaspoon salt
- 2 cups all-purpose flour, heat-treated (see instructions below)
- 1/4 cup milk (any kind works: whole, 2%, almond, oat)
- 1 cup mini chocolate chips, plus extra for coating
- 16-18 ounces (approximately 2.5-3 cups) melting chocolate (milk, semi-sweet, or dark chocolate chips/wafers)
- 1/2 teaspoon coconut oil or vegetable shortening (optional, for smoother chocolate coating)
Instructions
- Heat-Treat the Flour: This crucial step ensures the flour is safe to consume raw. Spread the 2 cups of all-purpose flour evenly on a baking sheet. Bake at 300°F (150°C) for 5-7 minutes, or until the internal temperature reaches 160°F (71°C). Alternatively, microwave the flour in a microwave-safe bowl for 1-2 minutes, stirring every 30 seconds, until it reaches the same temperature. Let the flour cool completely before proceeding.
- Cream Butter and Sugars: In a large mixing bowl, using an electric mixer (handheld or stand mixer), cream together the softened unsalted butter, granulated sugar, and packed light brown sugar until light and fluffy, about 2-3 minutes.
- Add Wet Ingredients: Beat in the vanilla extract and salt until well combined.
- Combine Dry and Wet: Gradually add the cooled, heat-treated flour to the butter mixture, mixing on low speed until just combined. The dough will be crumbly at first.
- Add Milk: Pour in the milk, one tablespoon at a time, mixing until the dough comes together and is moist and pliable but not sticky. You might not need all the milk, or you might need a tiny bit more, depending on your flour and humidity. The goal is a firm, scoopable dough.
- Fold in Chocolate Chips: Gently fold in the 1 cup of mini chocolate chips until evenly distributed throughout the dough.
- Chill the Dough: Cover the bowl with plastic wrap and refrigerate the cookie dough for at least 30 minutes to 1 hour. This will make it easier to roll.
- Form the Truffles: Line a baking sheet with parchment paper. Using a small cookie scoop (about 1 tablespoon) or your hands, roll the chilled cookie dough into uniform spherical balls, approximately 1-inch in diameter. Place them on the prepared baking sheet.
- Freeze the Truffles: Once all truffles are formed, place the baking sheet in the freezer for at least 15-20 minutes. This helps them firm up and prevents them from falling apart when dipped in warm chocolate.
- Melt the Chocolate Coating: While the truffles are freezing, prepare your chocolate coating. In a microwave-safe bowl, melt the melting chocolate (chocolate chips or wafers) in 30-second intervals, stirring well after each, until smooth and fully melted. If using, stir in the coconut oil or vegetable shortening for a smoother, more fluid consistency.
- Dip the Truffles: Remove the frozen cookie dough balls from the freezer. Using a fork or a dipping tool, carefully dip each cookie dough ball into the melted chocolate, ensuring it’s fully coated. Lift the truffle out, gently tap the fork against the side of the bowl to remove excess chocolate, and slide it back onto the parchment-lined baking sheet.
- Add Mini Chocolate Chips: Immediately after dipping each truffle (while the chocolate is still wet), sprinkle or gently press additional mini chocolate chips onto the entire surface. This creates that beautiful, textured outer layer.
- Chill to Set: Once all truffles are dipped and coated with mini chocolate chips, return the baking sheet to the refrigerator for at least 30-60 minutes, or until the chocolate coating is completely set and firm.
- Serve and Enjoy: Once set, your Chocolate Chip Cookie Dough Truffles are ready to be served!
Cooking Tips and Variations
Achieving Perfect Edible Dough: The key to great edible cookie dough is the right consistency. If your dough feels too crumbly after adding the flour, add milk sparingly, one teaspoon at a time, until it comes together. If it feels too sticky, you can try adding a tablespoon or two more of heat-treated flour, or simply chill it longer. Chilling is your friend – it makes the dough much easier to roll into perfect spheres.
The Art of Chocolate Dipping: For a smooth, even chocolate coating, make sure your melted chocolate isn’t too hot, as this can melt the cookie dough centers. A temperature between 90-95°F (32-35°C) is ideal. If your chocolate starts to thicken as you dip, gently reheat it for a few seconds in the microwave. Using a deep, narrow bowl for melting chocolate can make dipping easier, ensuring the truffle is fully submerged with less waste. For extra shine and snap, you can temper your chocolate, but simply melting and chilling works perfectly fine for these treats.
Mini Chips are Mighty: While regular chocolate chips are great inside the dough, mini chocolate chips are essential for the outer coating. Their smaller size allows them to adhere better to the wet chocolate and creates a more even, appealing texture all around the truffle. Don’t skimp on this step – it really makes the truffles pop!
Flavor Fun:
- Peanut Butter Dream: Add 1/4 cup of creamy peanut butter to the butter and sugar mixture for a delightful peanut butter cookie dough base.
- Birthday Cake Bliss: Fold in 1/4 cup of colorful sprinkles (nonpareils work best) into the dough and add some to the outer coating for a festive look.
- Spice It Up: A pinch of cinnamon or nutmeg in the dough can add a warm, comforting note, especially perfect for fall or winter holidays.
- Extract Adventures: Swap out some of the vanilla extract for almond extract, peppermint extract (for a holiday twist!), or even a touch of coffee extract for a mocha flavor.
- Nutty Crunch: Finely chop some toasted pecans or walnuts and fold them into the cookie dough for an added layer of texture and flavor.
Presentation Perfection: These truffles make fantastic gifts! Arrange them in mini cupcake liners inside a decorative box, or layer them in cellophane bags tied with festive ribbons. For serving, arrange them on a pretty platter, perhaps nestled among some holiday greenery or other small treats. They look absolutely stunning on a dessert table.
Storage and Reheating
Storage: Chocolate Chip Cookie Dough Truffles should always be stored in an airtight container in the refrigerator. This keeps the cookie dough fresh and firm and prevents the chocolate coating from melting or becoming sticky. They will stay fresh and delicious for up to 1-2 weeks when stored properly.
Freezing (for longer storage): These truffles freeze beautifully! Once the chocolate coating is completely set, place the truffles in a single layer on a parchment-lined baking sheet and freeze for about 1-2 hours, or until solid. Then, transfer the frozen truffles to a freezer-safe airtight container or freezer bag. They can be stored in the freezer for up to 2-3 months. When you’re ready to enjoy them, simply take them out of the freezer and let them thaw in the refrigerator for a few hours, or at room temperature for about 15-30 minutes, before serving. There is no need for reheating.
Frequently Asked Questions
Why do I need to heat-treat the flour?
Raw flour can sometimes contain harmful bacteria, such as E. coli. Heat-treating the flour, either by baking it in the oven or microwaving it, kills any potential bacteria, making it safe to consume raw in edible cookie dough recipes. It’s a quick and essential step for food safety.
Can I use regular chocolate chips for the coating instead of melting chocolate or wafers?
While you can melt regular chocolate chips, they often contain stabilizers that make them less fluid and sometimes harder to get a smooth, even coating. Melting wafers or chocolate specifically designed for melting (like tempering chocolate or chocolate candy melts) will give you a much smoother, glossier finish and a better “snap” when the chocolate sets. If using regular chips, adding a teaspoon of coconut oil or vegetable shortening can help thin them out for easier dipping.
My cookie dough is too sticky to roll. What should I do?
If your cookie dough is too sticky, it likely needs more chilling time. Cover the bowl and refrigerate it for at least an hour, or even longer. A colder dough is much easier to handle and roll into firm balls. If it’s still too sticky after chilling, you can try adding a tablespoon or two more of heat-treated flour, mixing it in until the desired consistency is reached.
How can I make these dairy-free or vegan?
To make these truffles dairy-free or vegan, you can easily substitute the dairy ingredients. Use a high-quality vegan butter substitute (sticks work best), plant-based milk (almond, oat, or soy milk), and ensure your chocolate chips and melting chocolate are dairy-free or vegan-certified. The rest of the recipe steps remain the same, ensuring a delicious dairy-free treat!
Chocolate Chip Cookie Dough
Ingredients
Instructions
Heat-Treat the Flour: This crucial step ensures the flour is safe to consume raw. Spread the 2 cups of all-purpose flour evenly on a baking sheet. Bake at 300°F (150°C) for 5-7 minutes, or until the internal temperature reaches 160°F (71°C). Alternatively, microwave the flour in a microwave-safe bowl for 1-2 minutes, stirring every 30 seconds, until it reaches the same temperature. Let the flour cool completely before proceeding.
Cream Butter and Sugars: In a large mixing bowl, using an electric mixer (handheld or stand mixer), cream together the softened unsalted butter, granulated sugar, and packed light brown sugar until light and fluffy, about 2-3 minutes.
Add Wet Ingredients: Beat in the vanilla extract and salt until well combined.
Combine Dry and Wet: Gradually add the cooled, heat-treated flour to the butter mixture, mixing on low speed until just combined. The dough will be crumbly at first.
Add Milk: Pour in the milk, one tablespoon at a time, mixing until the dough comes together and is moist and pliable but not sticky. You might not need all the milk, or you might need a tiny bit more, depending on your flour and humidity. The goal is a firm, scoopable dough.
Fold in Chocolate Chips: Gently fold in the 1 cup of mini chocolate chips until evenly distributed throughout the dough.
Chill the Dough: Cover the bowl with plastic wrap and refrigerate the cookie dough for at least 30 minutes to 1 hour. This will make it easier to roll.
Form the Truffles: Line a baking sheet with parchment paper. Using a small cookie scoop (about 1 tablespoon) or your hands, roll the chilled cookie dough into uniform spherical balls, approximately 1-inch in diameter. Place them on the prepared baking sheet.
Freeze the Truffles: Once all truffles are formed, place the baking sheet in the freezer for at least 15-20 minutes. This helps them firm up and prevents them from falling apart when dipped in warm chocolate.
Melt the Chocolate Coating: While the truffles are freezing, prepare your chocolate coating. In a microwave-safe bowl, melt the melting chocolate (chocolate chips or wafers) in 30-second intervals, stirring well after each, until smooth and fully melted. If using, stir in the coconut oil or vegetable shortening for a smoother, more fluid consistency.
Dip the Truffles: Remove the frozen cookie dough balls from the freezer. Using a fork or a dipping tool, carefully dip each cookie dough ball into the melted chocolate, ensuring it’s fully coated. Lift the truffle out, gently tap the fork against the side of the bowl to remove excess chocolate, and slide it back onto the parchment-lined baking sheet.
Add Mini Chocolate Chips: Immediately after dipping each truffle (while the chocolate is still wet), sprinkle or gently press additional mini chocolate chips onto the entire surface. This creates that beautiful, textured outer layer.
Chill to Set: Once all truffles are dipped and coated with mini chocolate chips, return the baking sheet to the refrigerator for at least 30-60 minutes, or until the chocolate coating is completely set and firm.
Serve and Enjoy: Once set, your Chocolate Chip Cookie Dough Truffles are ready to be served!